Case Settings
General Settings
The “General Settings” page allows you to tune some settings like enable deduplication, enable NLP library, OCR, etc. It has four sections, General Settings, OCR Settings, Inventory Listings and OAuth Settings. The sections and their settings are explained below.
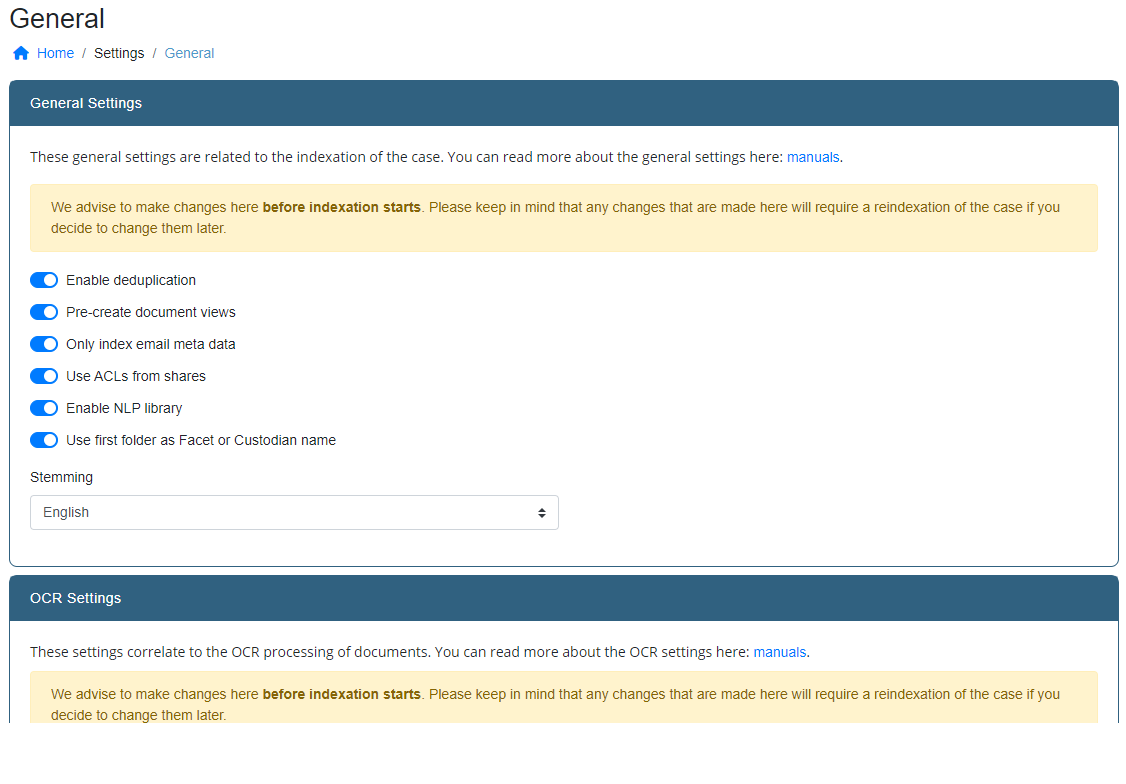
General Settings
General settings allow you to switch some features on or off. It also allows you to set some parameters that will influence indexer behaviour in order to get the best possible results. It is advised to make sure these settings are configured correctly before starting the indexation of data.
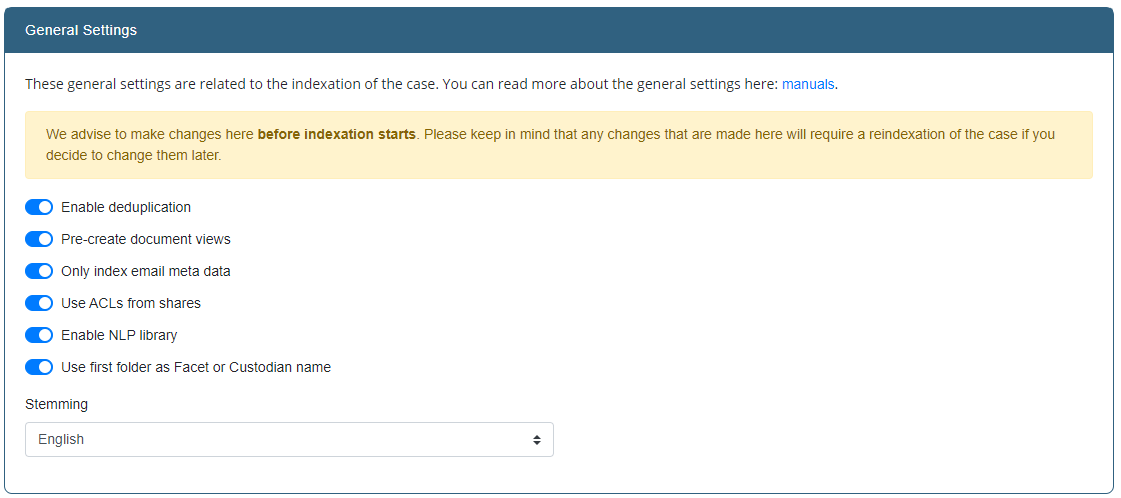
- Enable deduplication
- Enables de-duplication of documents based on their content.
The case needs to be re-indexed when this setting is changed.
- Pre-create document views
This option allows you to pre-create document views. This will result in nicer document previews and faster loading times. More disk space will be used.
- Only index email meta data
When this option is enabled, only the metadata of emails is processed. The email content will not be included in the index.
- Use ACLs from shares
When this option is disabled, the Access Control Lists of shares will not be taken into account when indexing. This means that all INDICA users can see all indexed documents, regardless of whether or not they can see the documents on the source.
- Enable NLP library
When this option is enabled, INDICA will use it’s NLP algorithm to extract NLP keywords from documents.
- Use first folder as Facet or Custodian name
This feature is especially useful for eDiscovery investigations. Enabling this option allows you to place data items that belong to a custodian in a separate folder. INDICA will recognise this folder as a custodian and adds filtering capabilities on custodian in the facet bar. The filter options will be displayed in the categry “Custodian”. Please do make sure that the category Custodian is visible in the Facet Settings.
- Stemming
When Stemming is enabled, the indexer will trim down verbs to their stem for indexing.
OCR Settings
These settings allows you to tweak the OCR processing of the indexer. If needed, OCR can be completely disabled as well. Tweaking parameters like the OCR settings will greatly benefit the accuracy of the OCR processing.
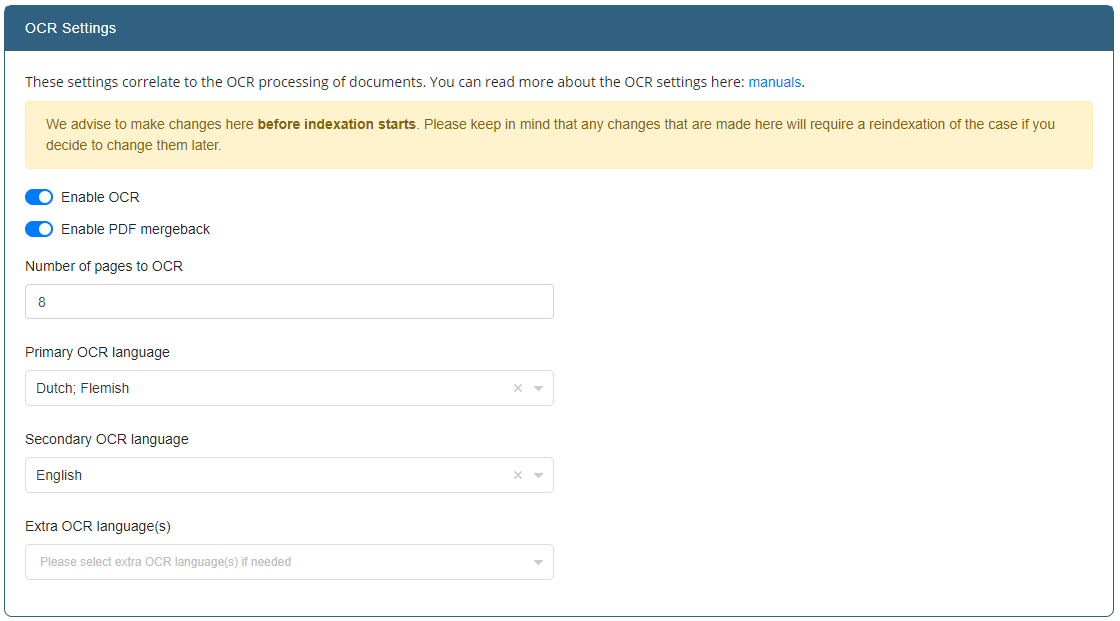
The following settings can be changed:
- Enable OCR
- This option specifies whether OCR should be enabled for this case or not.If disabled, the indexer will keep track of files that need OCR processing in case OCR will be done at a later stage.
- Enable PDF mergeback
- Not all PDF’s contain a text layer. INDICA is able to OCR these documents and save the OCR’ed text in the index so the user can search for this.PDF mergeback offers the option to generate the PDF files in the INDICA archive.The original document will be untouched, but the new document will have an OCR’ed text layer merged back into the document.After this merge back, the user is able to search within the document and find the content within the document much faster.
- Number of pages to OCR
- This setting changes the number of pages that will be processed by the OCR engine.Lowering this number makes indexing faster, but may decrease indexing accuracy for OCR documents.This has nothing to do with the OCR quality, but rather the amount of data that is processed.
- Primary OCR language
- This should be the language that occurs the most times in the data set.
- Secondary OCR language
- This should be the language that occurs the most times after the primary language in the data set.
- Extra OCR language(s) (Only visible when Primary and Secondary languages are set)
- Extra OCR languages can be entered here.
OCR depends on language packages for it’s OCR engine. INDICA comes with a few languages pre-installed. If you select a language that is not installed, a message will be displayed:

If the machine has an internet connection, the language package will be downloaded automatically.
Tip
It is advised to select (at least) the primary language. The secondary and extra languages are optional. If no languages are selected, the OCR engine will fall back to the default language; English.
Warning
The more languages are enabled, the slower OCR will become because it will try all selected languages on the encountered document. This can drastically slow down the OCR performance.
Inventory Listings
These settings allow to configure settings for creating inventory exports. You can read more about inventory exports here: Case Manager Inventory Exports.
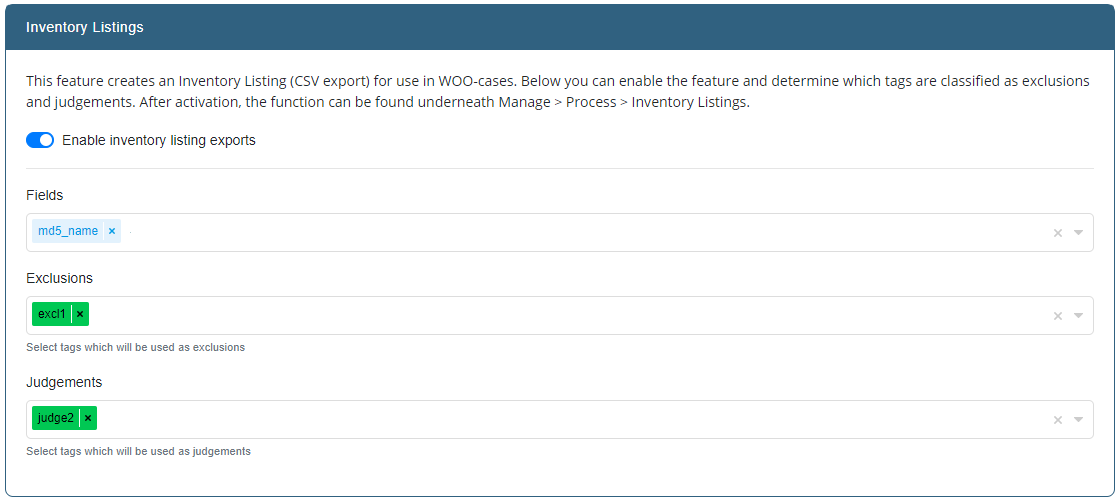
Here you can choose which tags are used as exclusions and which as judgements. These tags will be the ones that are available to choose from when creating inventory exports.
Display Settings
Facet Settings
Facet Settings allows you to manage and create filtering capabilities in the INDICA front-end.
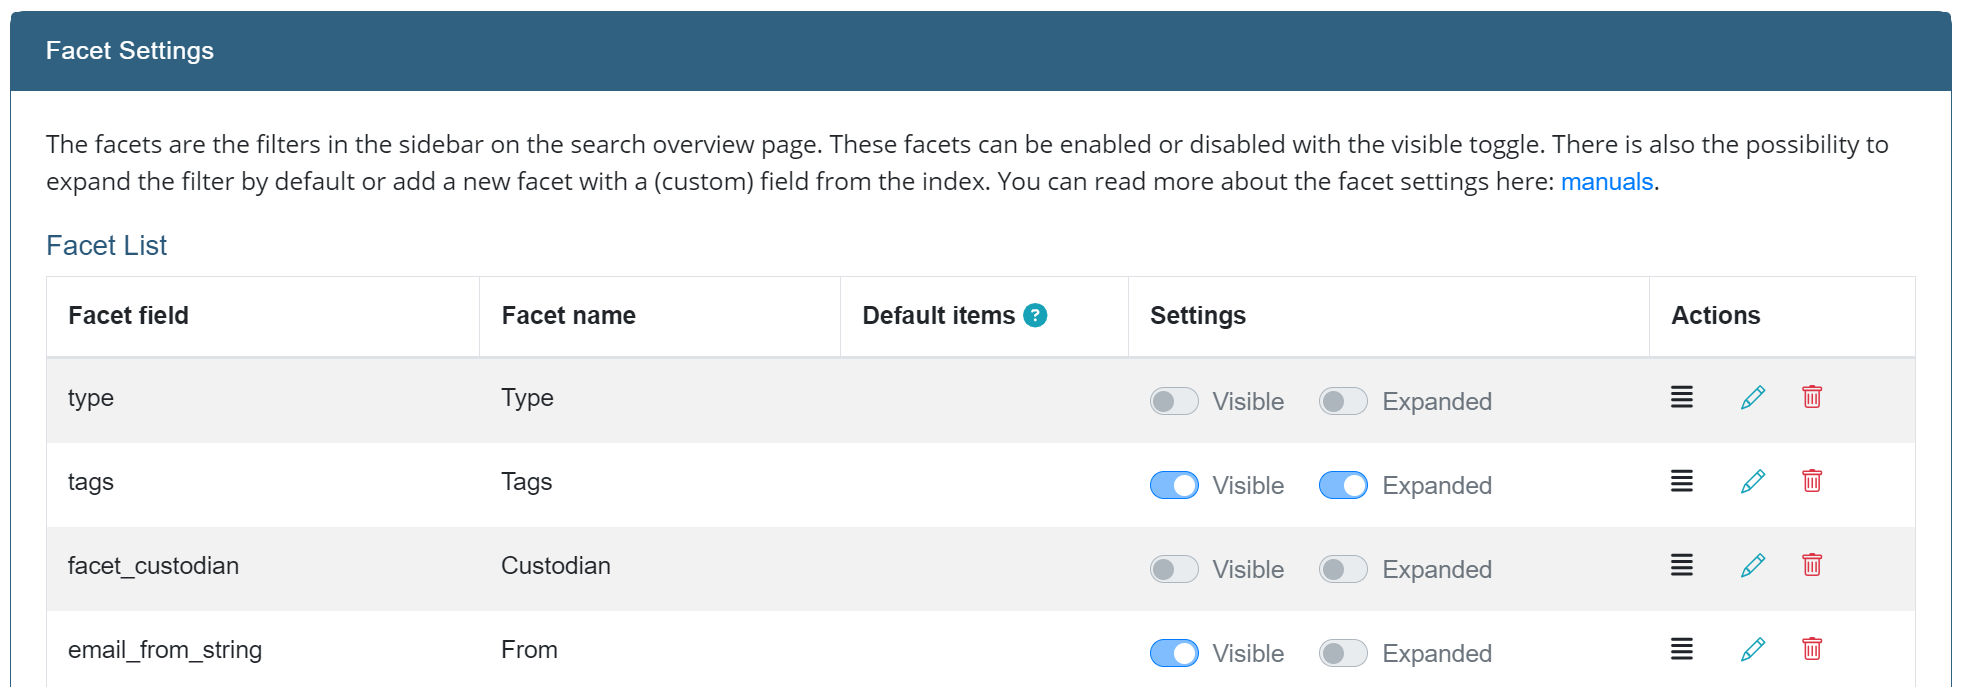
The setting shows the list of currently active filters (facets) in the front-end. Don’t see the facet list in your front-end? Click on the “Reset to default” button to seed the current facets. From the overview, it’s possible to:
- Re-order facets
Rearranging facets is possible by dragging the icon with the four horizontal lines in the action column. Changes are saved automatically. Changing the order of the facets will be reflected on the front-end.
- Delete facets
Click on the trash icon in the action column to remove a facet. It can always be re-added if needed.
- Edit facets
It is possible to change some characteristics of a facet by clicking on the pen icon in the action column. You can change the following properties:
- Facet name
- The name of the facet - what it will be called in the facets list on the Search page.
- Default items
- These filter options will always be displayed, even when there are no documents associated with them.
- Settings
- “Visible” either hides or displays this facet. Useful when the facet should be hidden.“Expanded” defines whether the facet category should be collapsed or expanded on the Search page.
Save changes by clicking the green check mark.
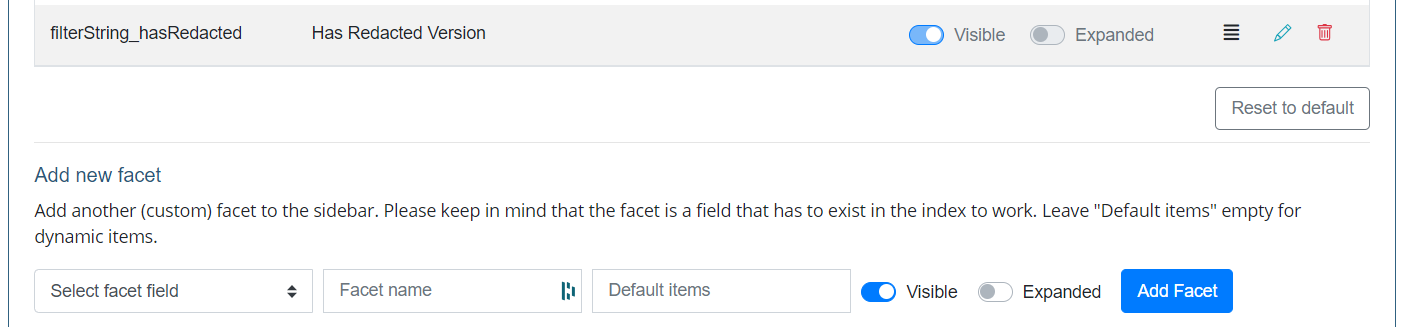
- Reset facets to default
When needed, the facets can be reset to the default setup by clicking the “Reset to default” button. This will discard all changes made to the facets and restores the default set of facets. Use only when you want to go back to the default facets.
- Add new facet
Select a new facet to add apart from the default ones from the dropdown, fill in the appropriate fields and click “Add Facet”. Please keep in mind that the facet is a field that has to exist in the index to work.
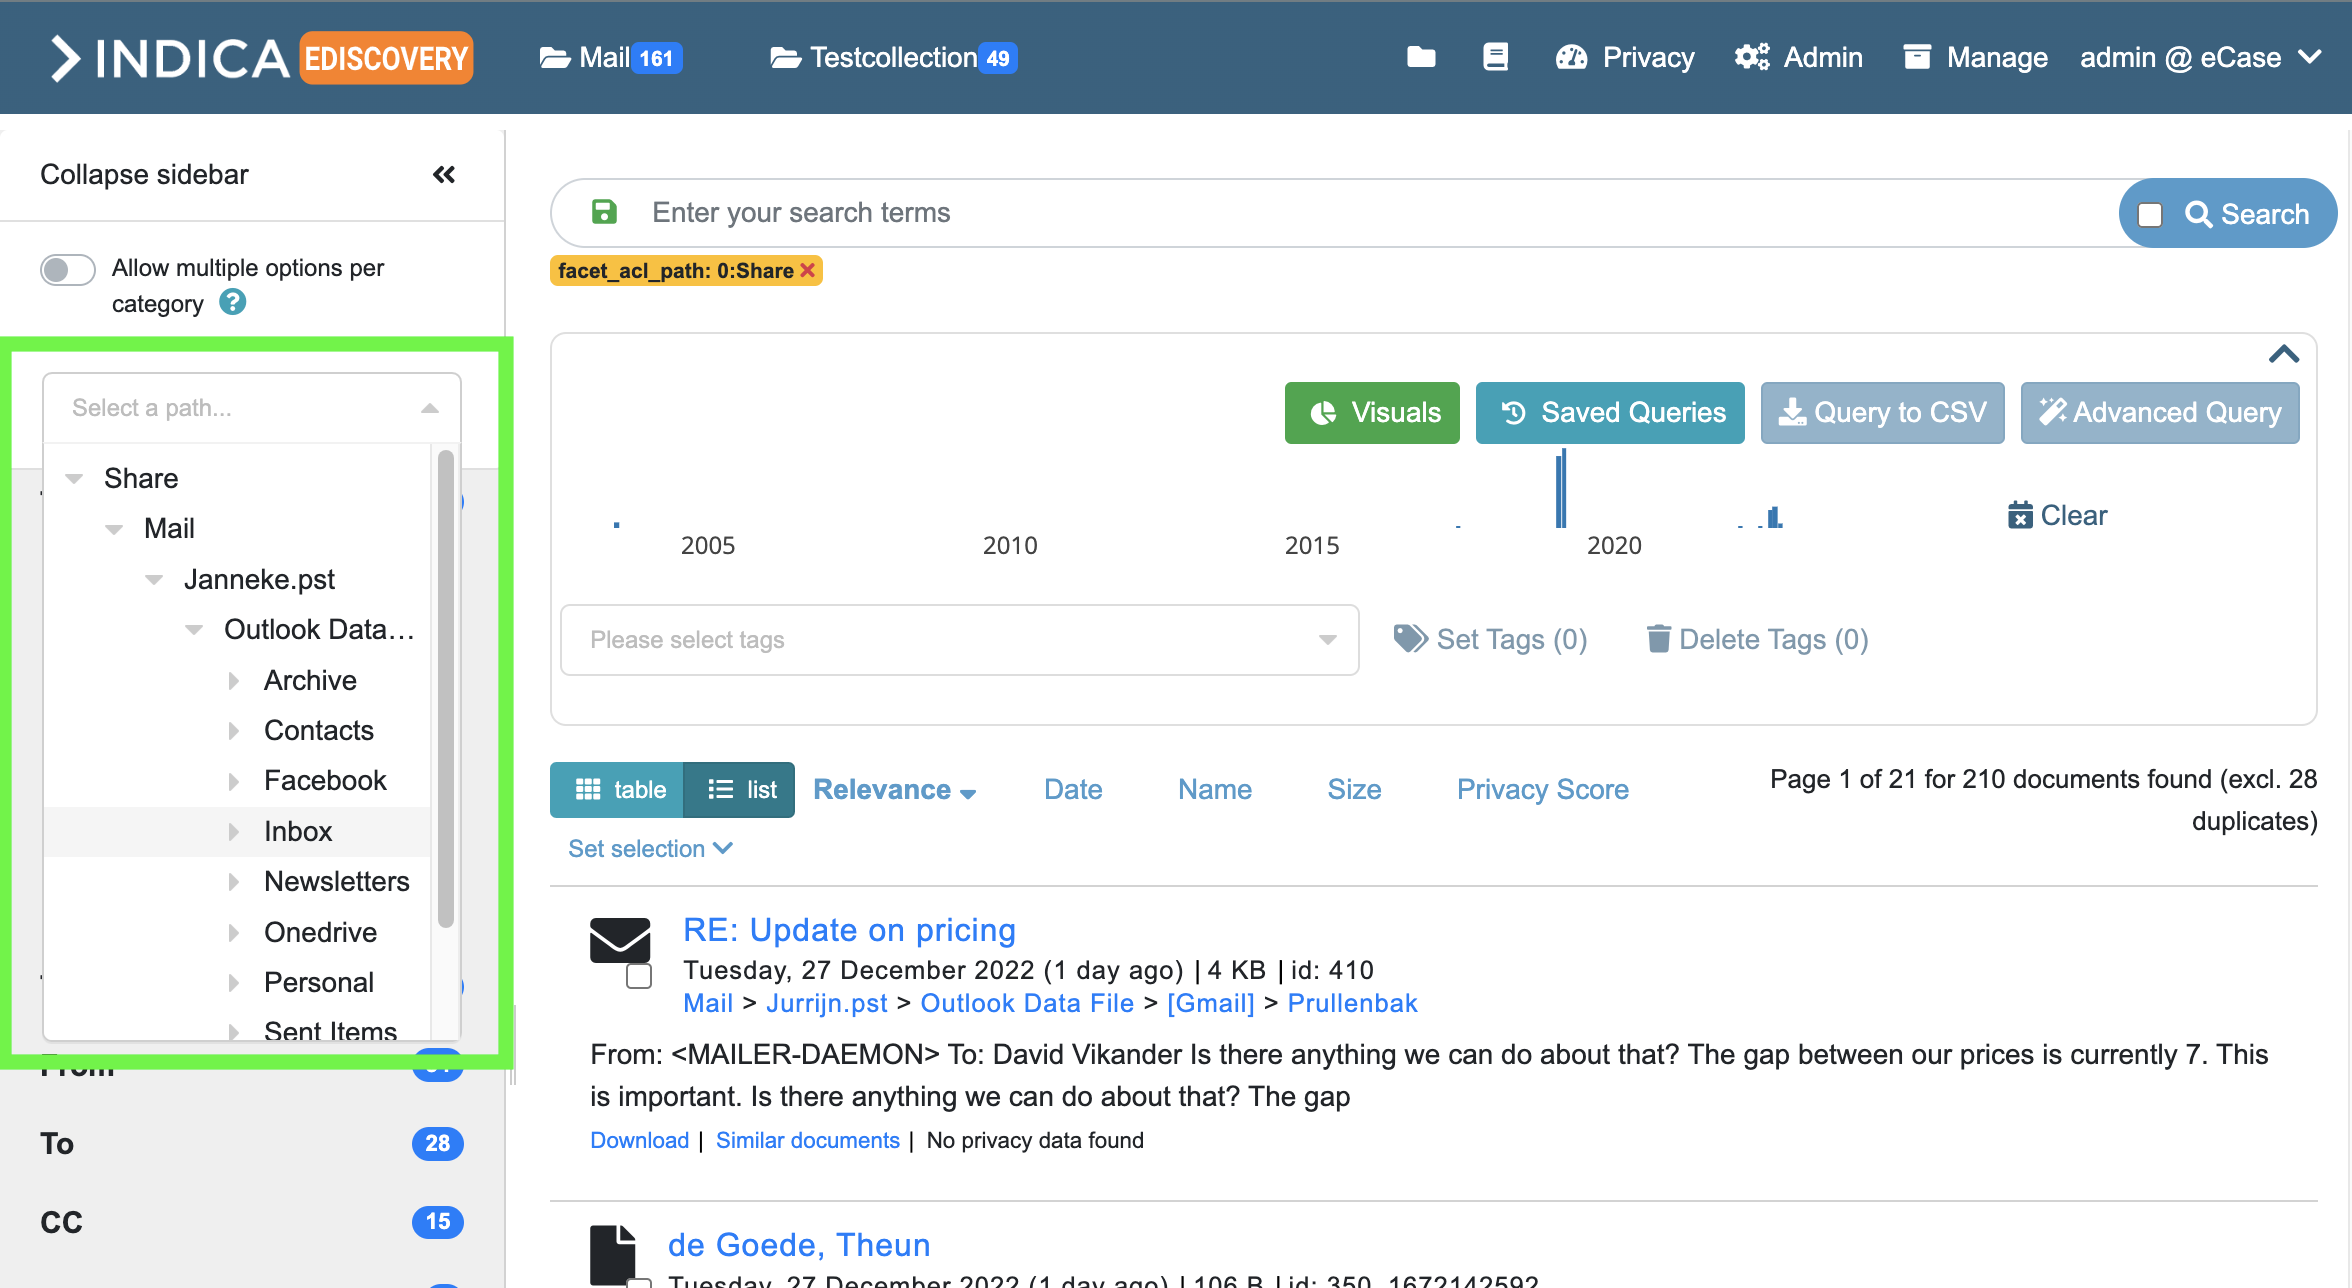
Path Select Settings
Path selection is the top facet on the search page. The path select is available to the user in two ways: as a dropdown or as a modal. If the modal is selected, the facet is called “Folders”. Otherwise a dropdown will be shown.
Result list Settings
The following option can be changed on this page:
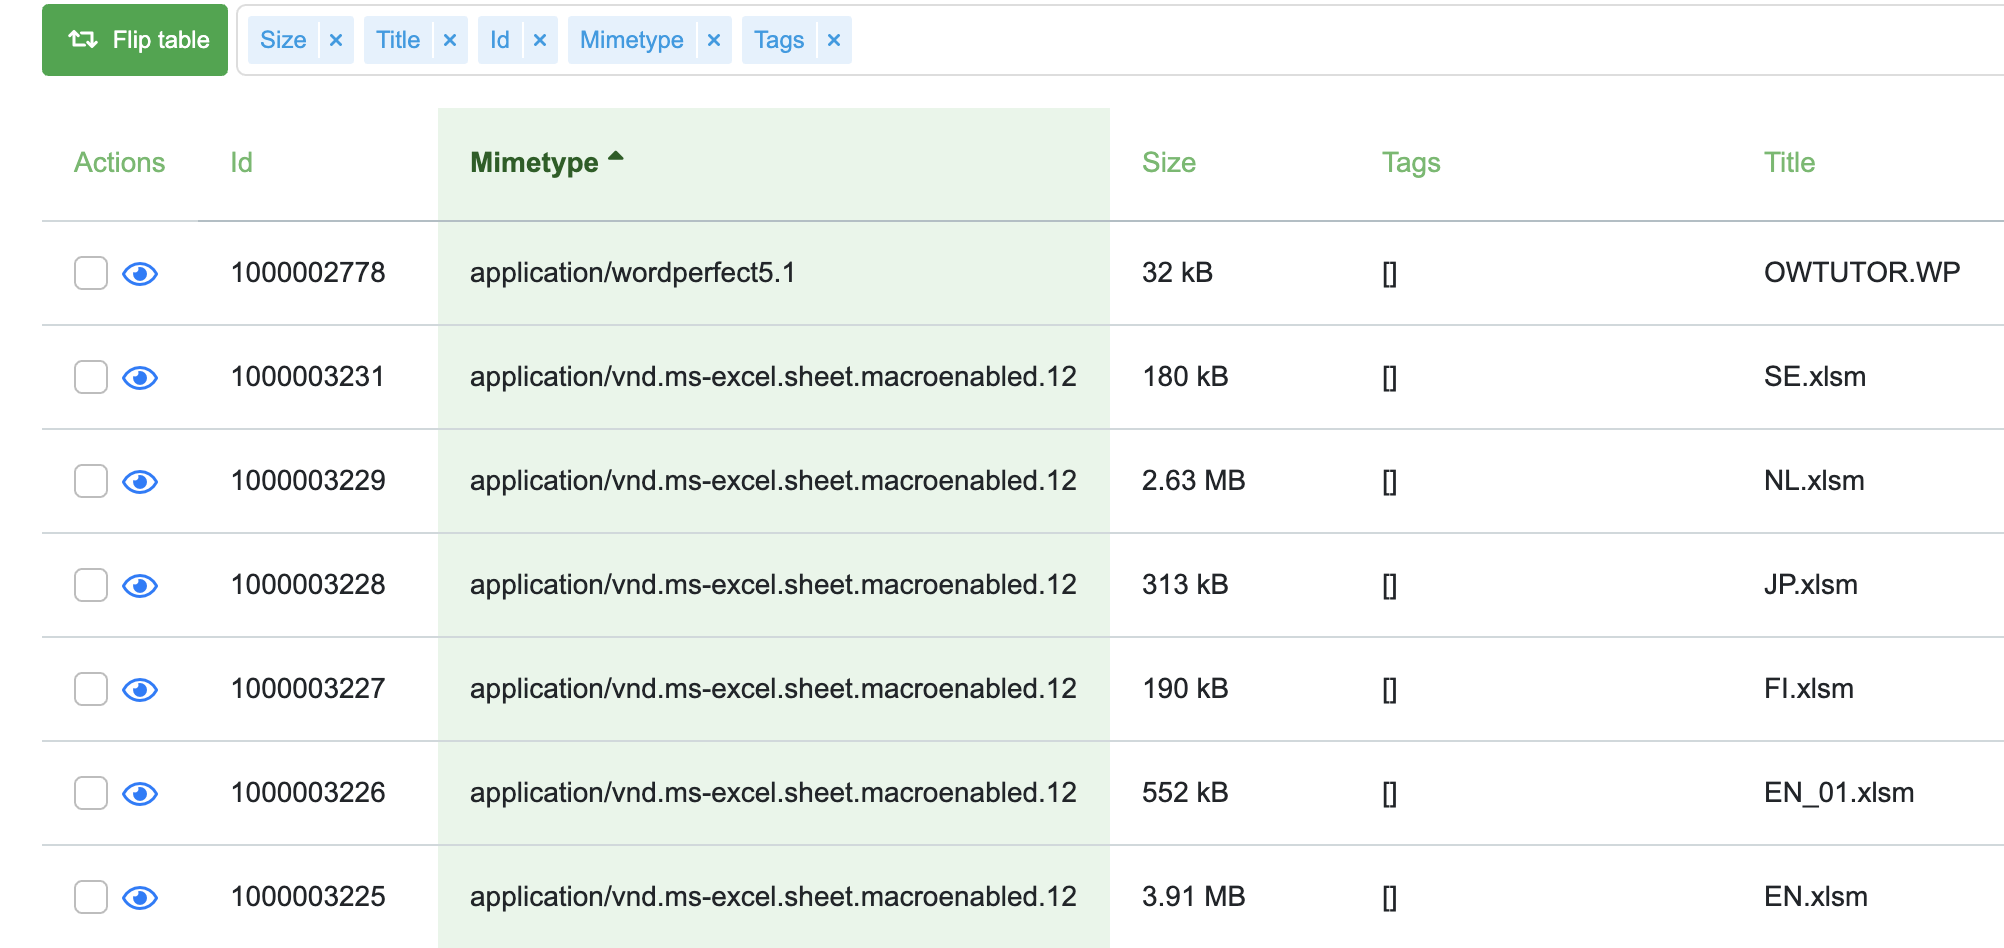
- Allow user to toggle between list and table style.
When enabled, a button will appear on the search page that allows the user to switch between list-style results and table-style results. The table-style results can be used for a custom overview of query results, as the displayed information can be chosen by the user. This feature is very powerful, but less easy to use.
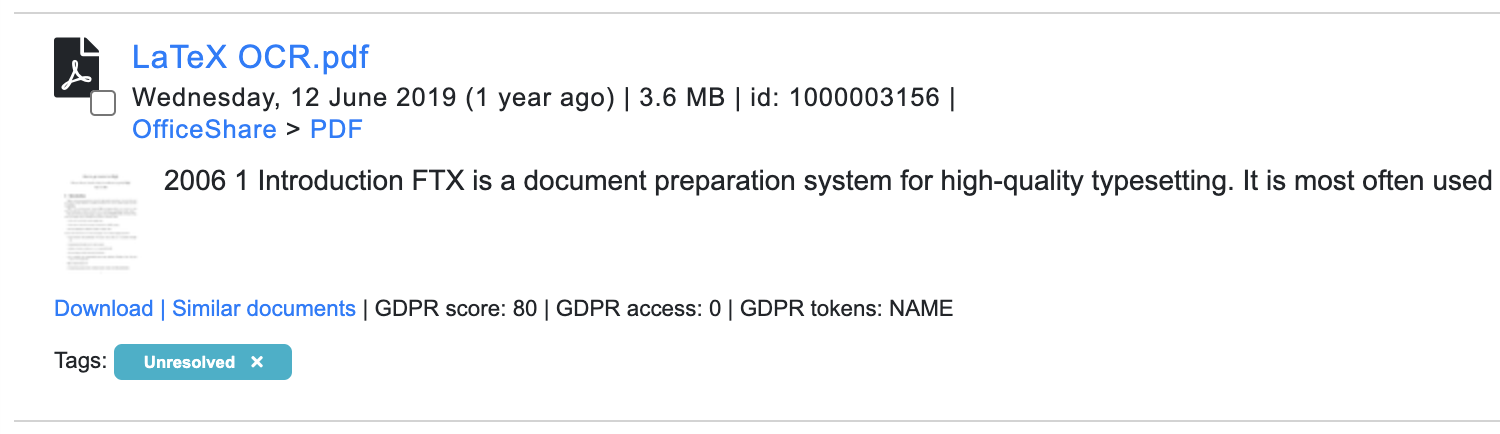
Example of list-style preview:
Example of table-style preview:
List Style Settings
These options allow for customizing the information in the list-style results.
The following options can be changed:
- Show date
Enable or disable the displaying of the date from result item.
- Show file size
Enable or disable the displaying of the file size from result item.
- Show ID
Enable or disable the displaying of the document ID from result item.
- Show path
Enable or disable the displaying of the file path from result item.
- Show summary
Enable or disable the displaying of the document summary from result item.
- Show similar
Enable or disable the displaying of the “Similar Documents” button from result item.
- Show duplicates
Enable or disable the displaying of the “Duplicates” button from result item.
- show Privacy
Enable or disable the displaying of Privacy tokens from result item.
Index Progress Notification Settings
When the indexer is active, a message will be displayed stating the progress and a warning to the users. This setting allows to change the type of indexer progress notification. The user can choose to not display the message, have it be smaller or keep it in its normal format.
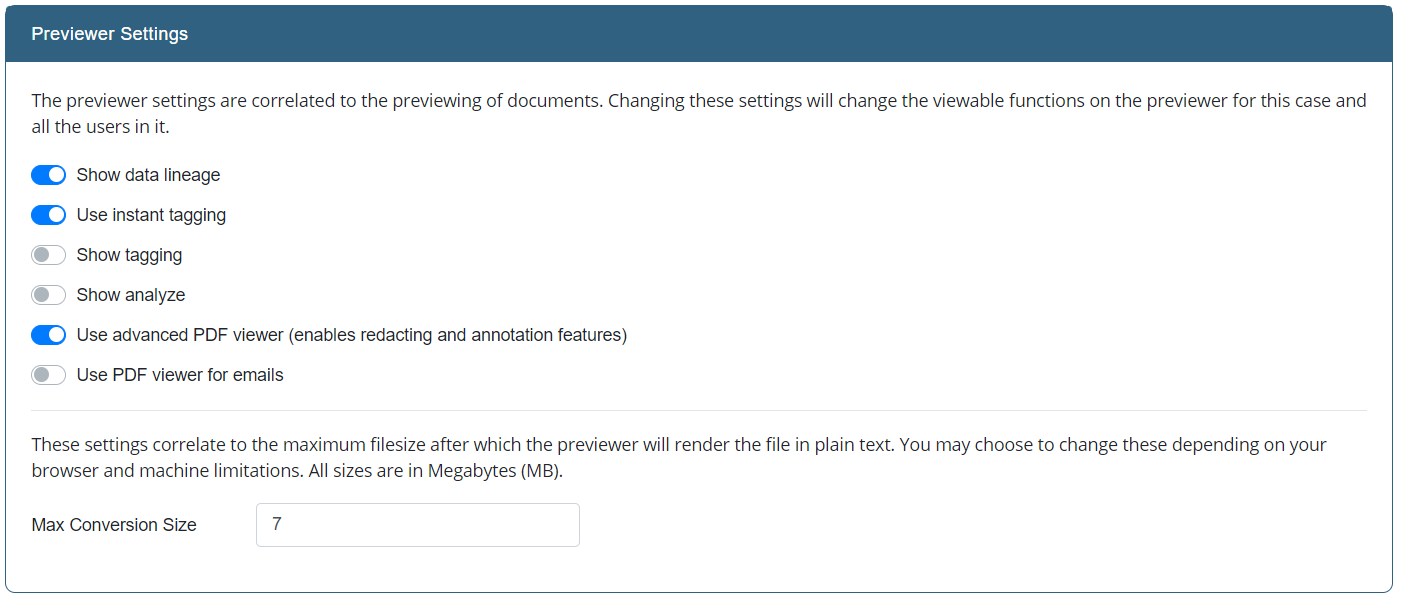
Previewer Settings
The previewer settings are correlated to the previewing of documents. Changing these settings will change the viewable functions on the previewer for this case and all the users in it. This panel allows you to change the following options:
- Show data lineage
This option enables and disables the options to show data lineage button in the front-end. The data lineage feature gives the user the possibility to select text and click on the lineage button. This will fire off a query with the selected text and the results will open automatically in the new “Data Lineage” tab. This feature makes it easier to find the ‘single source of truth’ when dealing with duplicate inform
- Use instant tagging
When this option is enabled, when selecting a tag in the previewer it is immediately applied to the document, without having to take the extra step to “save” the applied tags.
- Show tagging
This option enables and disables the options to tag documents in the front-end. It is not possible to alter tags when this option is disabled.
- Show analyze
This option enables and disabled the option to analyze a document in the front-end. It is not possible to alter tags when this option is disabled.
- Use advanced PDF viewer (enabled redacting and annotation features)
This setting requires PSPDFKit to be configured on your INDICA system. This setting enables the advanced PDF viewer for documents.
- Use PDF viewer for emails
This setting enabls the advanced PDF viewer for viewing e-ma
- Maximum Conversion Size configuration
This setting sets the maximum spreadsheet size (in MB) that will be rendered in the front-end. Anything above this number will be rendered as plain text.
Search Settings
The search settings allow you to manipulate the search results. This can be done by defining synonyms, stopwords, and editing the boosting settings.
Stopword List
During indexing, it is possible to exclude a list of stopwords from the index. Those words are generally words without informational value, like “a”, “and”, “this”, “the”, etc.
Words can be added by typing them in the text field and then pressing the “Add” button.
INDICA comes with a default lists of stopwords, which can be changed here as well.
Synonym List
It is also possible to define synonyms. This allows you to automatically broaden search results that contain words. Synonyms can be added in the text field and then clicking the “Add” button.
Synonyms need to be added as a comma-separated list, for example: “hello,hi,hey”.
Boosting
Boosting can be done by adding a boost query, or by adding a boost function.
Boost Query
The Boost Query specifies an additional query clause that will be added to the user’s main query to influence the score.
INDICA provides the relevance level of matching documents based on the results found. To boost a query, use the caret, “^”, symbol with a boost factor (a number) at the end of the query you are searching. The higher the boost factor, the more relevant the query will be. Boosting allows you to control the relevance of a document by boosting its query. For example, if you are searching for
jakarta apache
And you want the term “jakarta” to be more relevant, boost it using the ^ symbol along with the boost factor next to the query. You would type:
jakarta^4 apache
This will make documents with the term jakarta appear more relevant. You can also boost Phrase Terms as in the example:
“jakarta apache”^4 “Indica search”
By default, the boost factor for each term or phrase is 1. Although the boost factor must be positive, it can be less than 1 (e.g. 0.2).
Boost Function
A Boost Function can also be added here. This feature is for advanced users. Please refer to the official documentation for help.
API Settings
INDICA supports two types of API’s. The polling API and the high level API.
Polling API
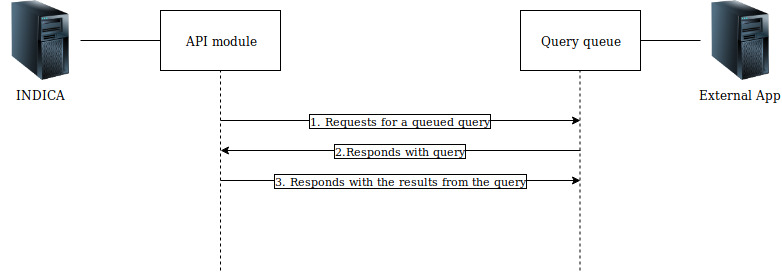
The INDICA Polling API service for external systems is a secure API that enables external systems to query the INDICA index in a limited way. It is designed for asynchronous communication initiated by the INDICA appliance (polling for instructions). The API is only able to transfer meta information, no actual content of document object can ever be transmitted to the external system asking for information.
The external system creates a queue of queries according to its needs in its own external API end point (the command set) to be run against the INDICA index. The INDICA pull API then returns the results back to the external systems designated API endpoint. Query results can return metadata from the index with addition to Privacy issues and for authorized users links to preview in the INDICA system itself.
This API is designed for on-premise INDICA systems and Internet-facing applications.
Setting up your Application
For the API to work, your application requires a very basic job system. A single Basic Auth or preferably OAuth protected endpoint(GET) that returns a query of commands/queries for INDICA to process. And a single protected endpoint(POST) which receives the results from INDICA.
Endpoint paths are configurable and you can create it according to your system limits/needs, but it should reside on two of the endpoints (not more) and explicitly POST endpoint has to match the specified pattern.
Type |
Path |
Ext. App. JSON structure |
Description |
|---|---|---|---|
GET |
/api/indica/jobs |
Response body has to match one of the job type structures |
|
POST |
/api/indica/jobs/{job_id} |
These will be result that you will receive from INDICA once specific job type is done. |
INDICA also accepts more job types than the ones shown in the examples above. API endpoints stay the same on your system, but required request end response JSON structures change based on every type.
Type |
Job Queue JSON |
Response JSON |
Description |
|---|---|---|---|
document_query |
Document query returns hit counts and meta fields you requested |
||
subject_details |
Returns the same values as Document Query. The only difference is that the query is generated by INDICA |
||
document_export |
Tag export prepares a package on specified tags and uploads it to a specified vendor with specified security measures |
||
privacy_query |
Returns Privacy issues on all or specific assets. |
Batched result responses
All responses can be batched if the job request includes “batch” : 1 and batch_size fields in the JSON. batch_size has to be an integer of what is the maximum character count in the resulting JSON will be. Batched results have one extra JSON key (“batch_id”) and an extra status - “inprogress”. In which “batch_id” represents the order in a batch and status tells if the batch is still “inprogress” or is “processed”.
Setting up a polling job on the INDICA appliance
For job polling system to work correctly it is required to follow strict guidelines.
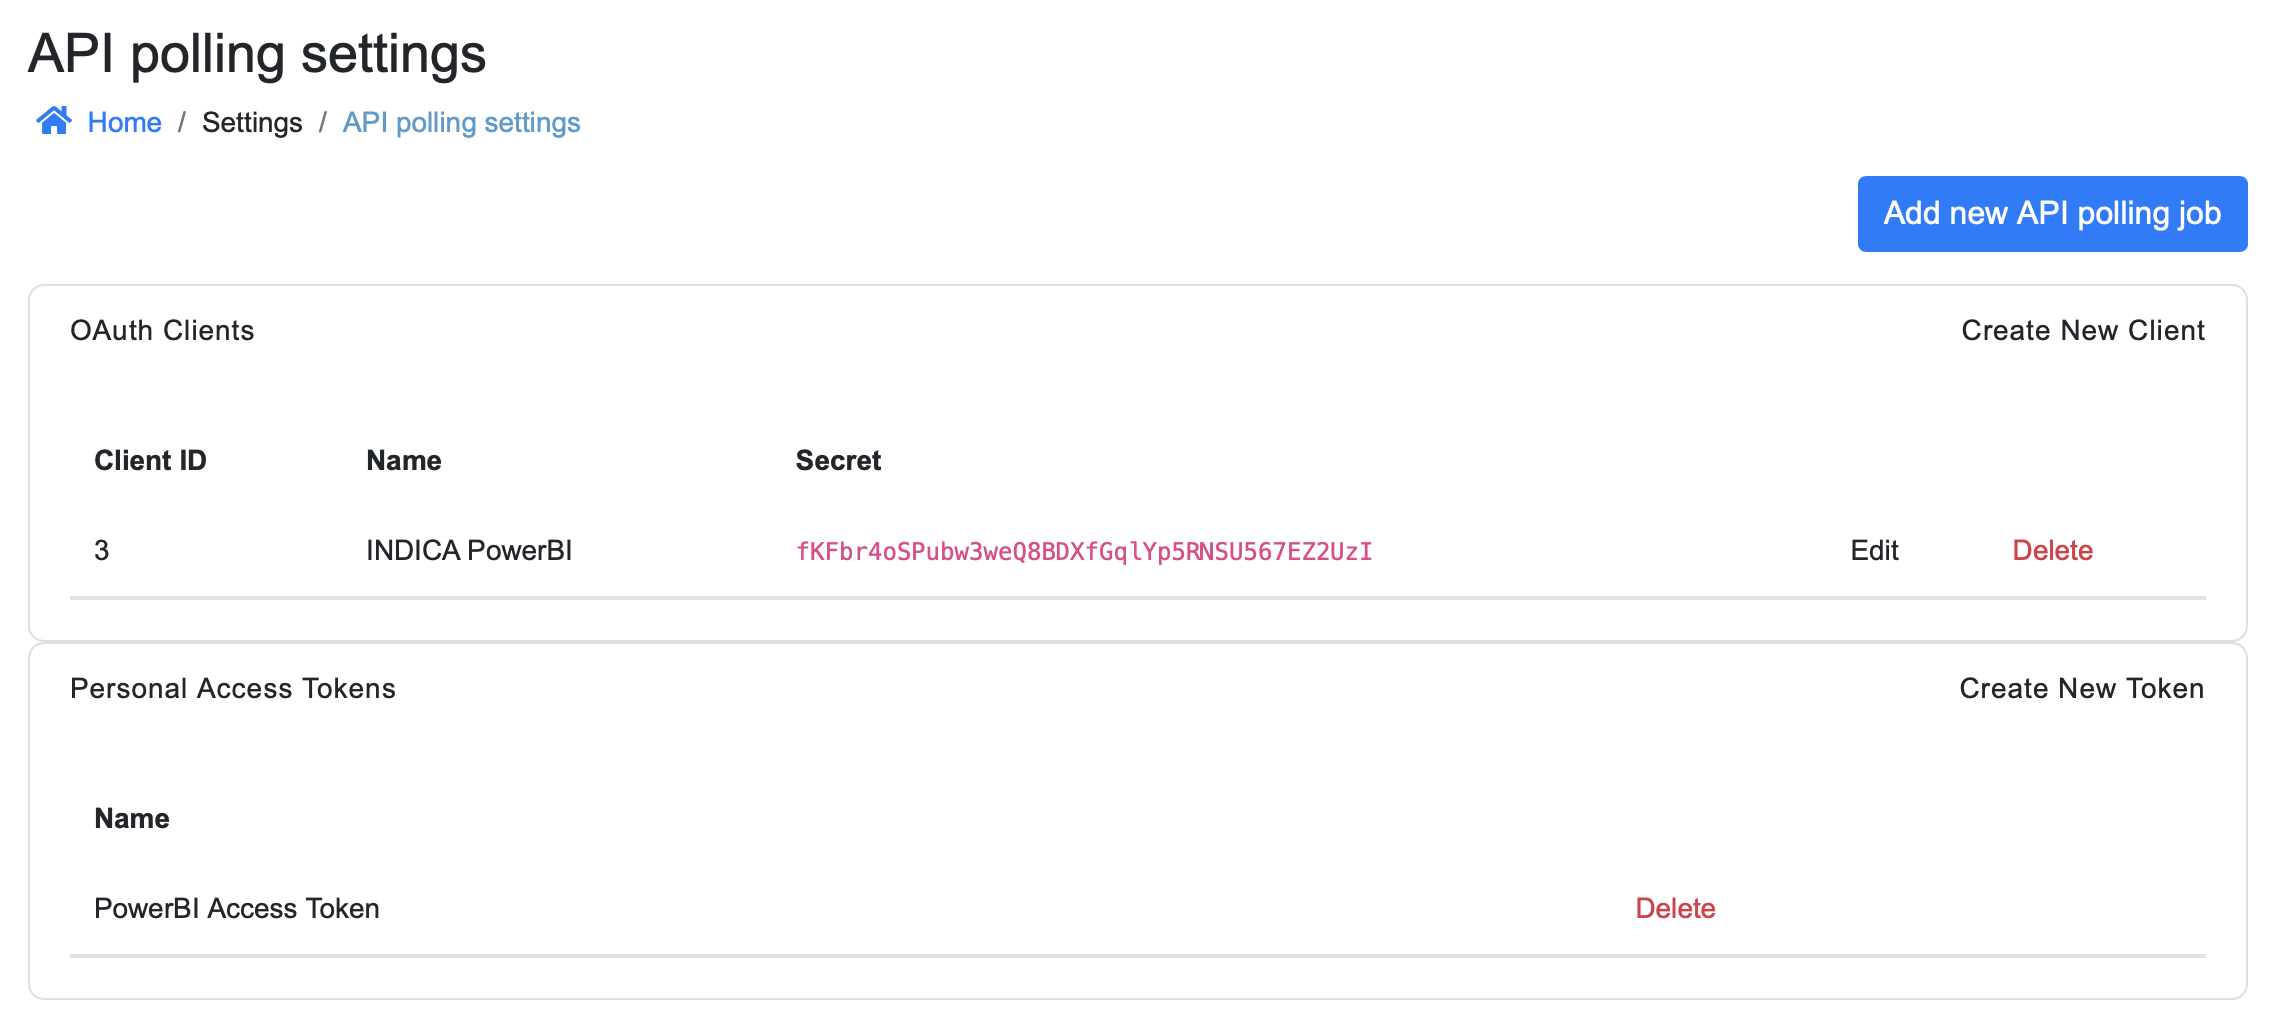
Settings configuration currently resides in Settings > API Settings inside the case management.
To create a new polling job, press the “Add new API polling job” button.
Polling jobs will run according to your settings:
- Result data type
Can be changed based on what data you want to be returned to the external source. Currently, there is “Document query” - which returns document fields that you select further down in “Return fields”, and there is also a choice to return “Privacy issues”. Structure of returned data is described below;
- Run query in user scope
Option specifies if the query should include only the data which adheres to a specific user’s rights (could be API user with your setup in your AD);
- User
Setting of a user who’s scope will be used;
- Time between polling
Is used to specify how often the system will check if there are new jobs in the GET endpoint, and run them. Running jobs too often might degrade the performance of your system;
- Endpoint Authentication type
Specifies what type of authentication external endpoints use;
- Job Queue GET endpoint
Specifies endpoint from which jobs list in a JSON format will be retrieved;
- Result POST endpoint
Specifies endpoint to which the queried Document field(s) or Privacy issues will be sent;
- Require acknowledge
Specifies if acknowledgment of received jobs should be given. It is strongly recommended to use acknowledgment since it negates duplicate jobs when polling time is shorter, or queries are more difficult. It guarantees that the same job doesn’t get picked up twice or more;
- Job acknowledgment endpoint
Specifies an endpoint to which acknowledgment will be done.
PowerBI Connection
With INDICA, it is possible to connect PowerBI and use the modeling capabilities of PowerBI to create your own dashboarding.
Setting up an API connection between INDICA and PowerBI requires some setup. The steps needed to take are:
Creating an OAuth client
Creating a personal access token
Connecting PowerBI to INDICA
Creating request URLs
In the following sections, the above steps will be described in detail.
Creating an OAuth client
First, navigate to the API Settings page under ‘Manage’ > ‘Settings’ > ‘API Settings’. You will be presented with the following page:
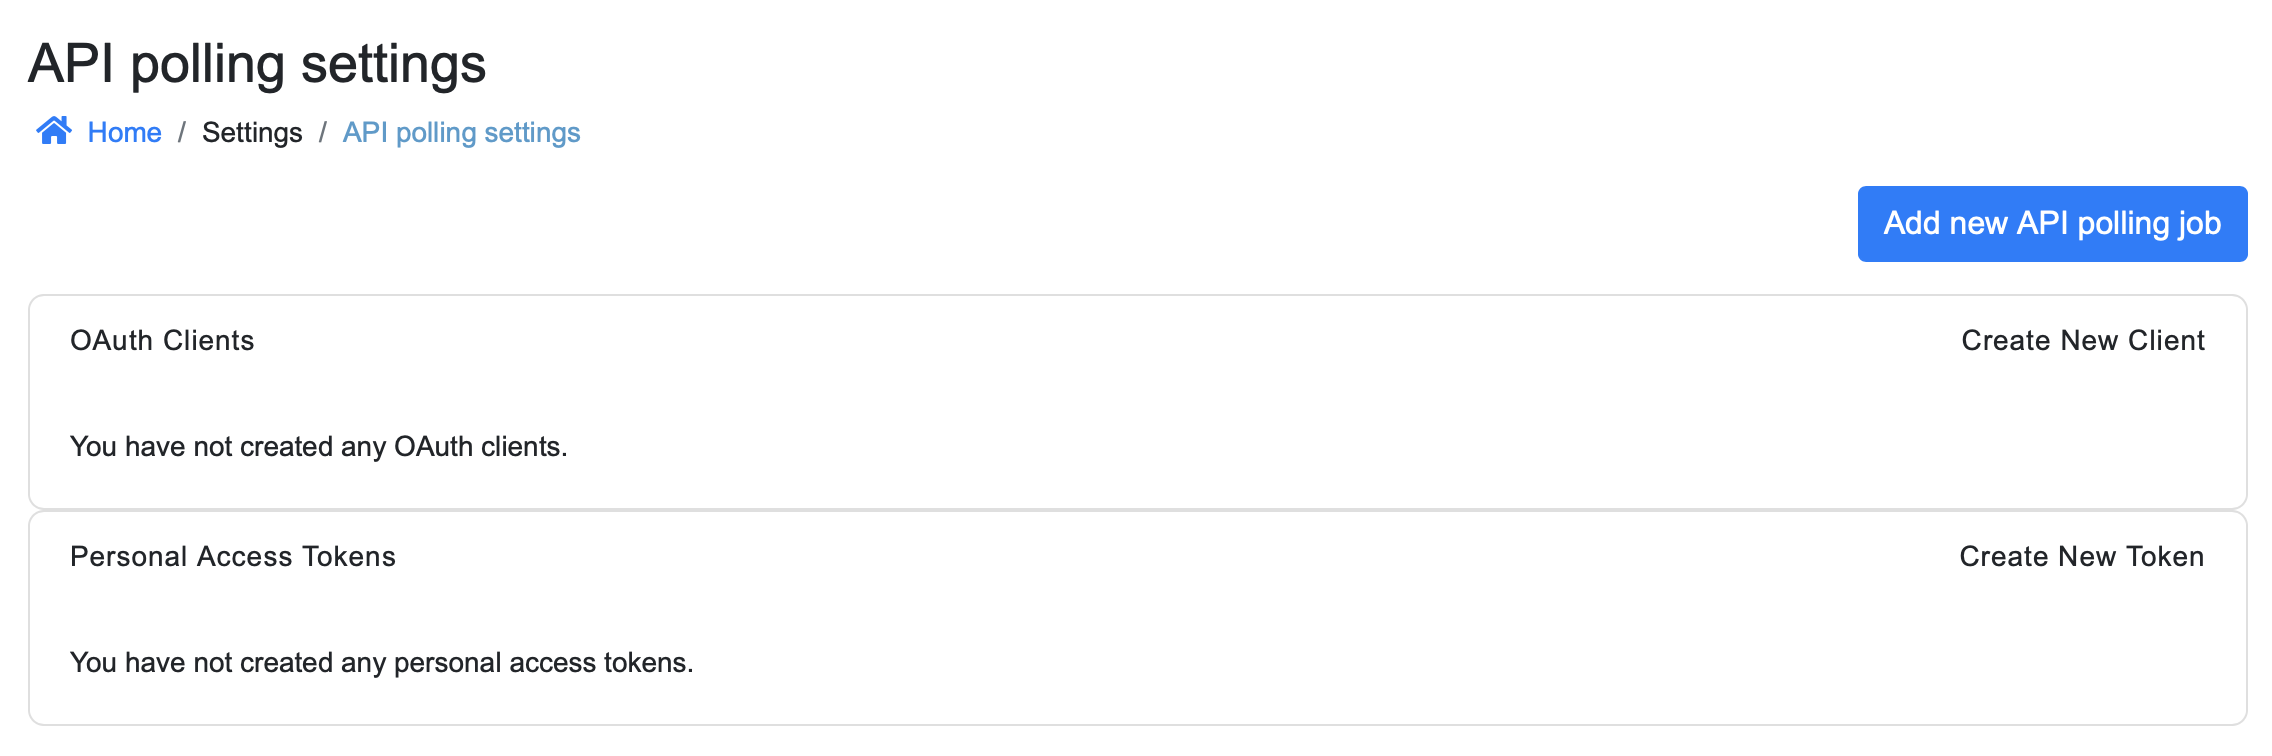
Here, we can create a new OAuth client by clicking the “Create New Client” button. A popup will open:

The following information is required:
- Name
Choose a descriptive name so you will recognise it later on.
- Redirect URL
If you don’t know what to fill in as redirect URL, you can use https://127.0.0.1, this will be a placeholder.
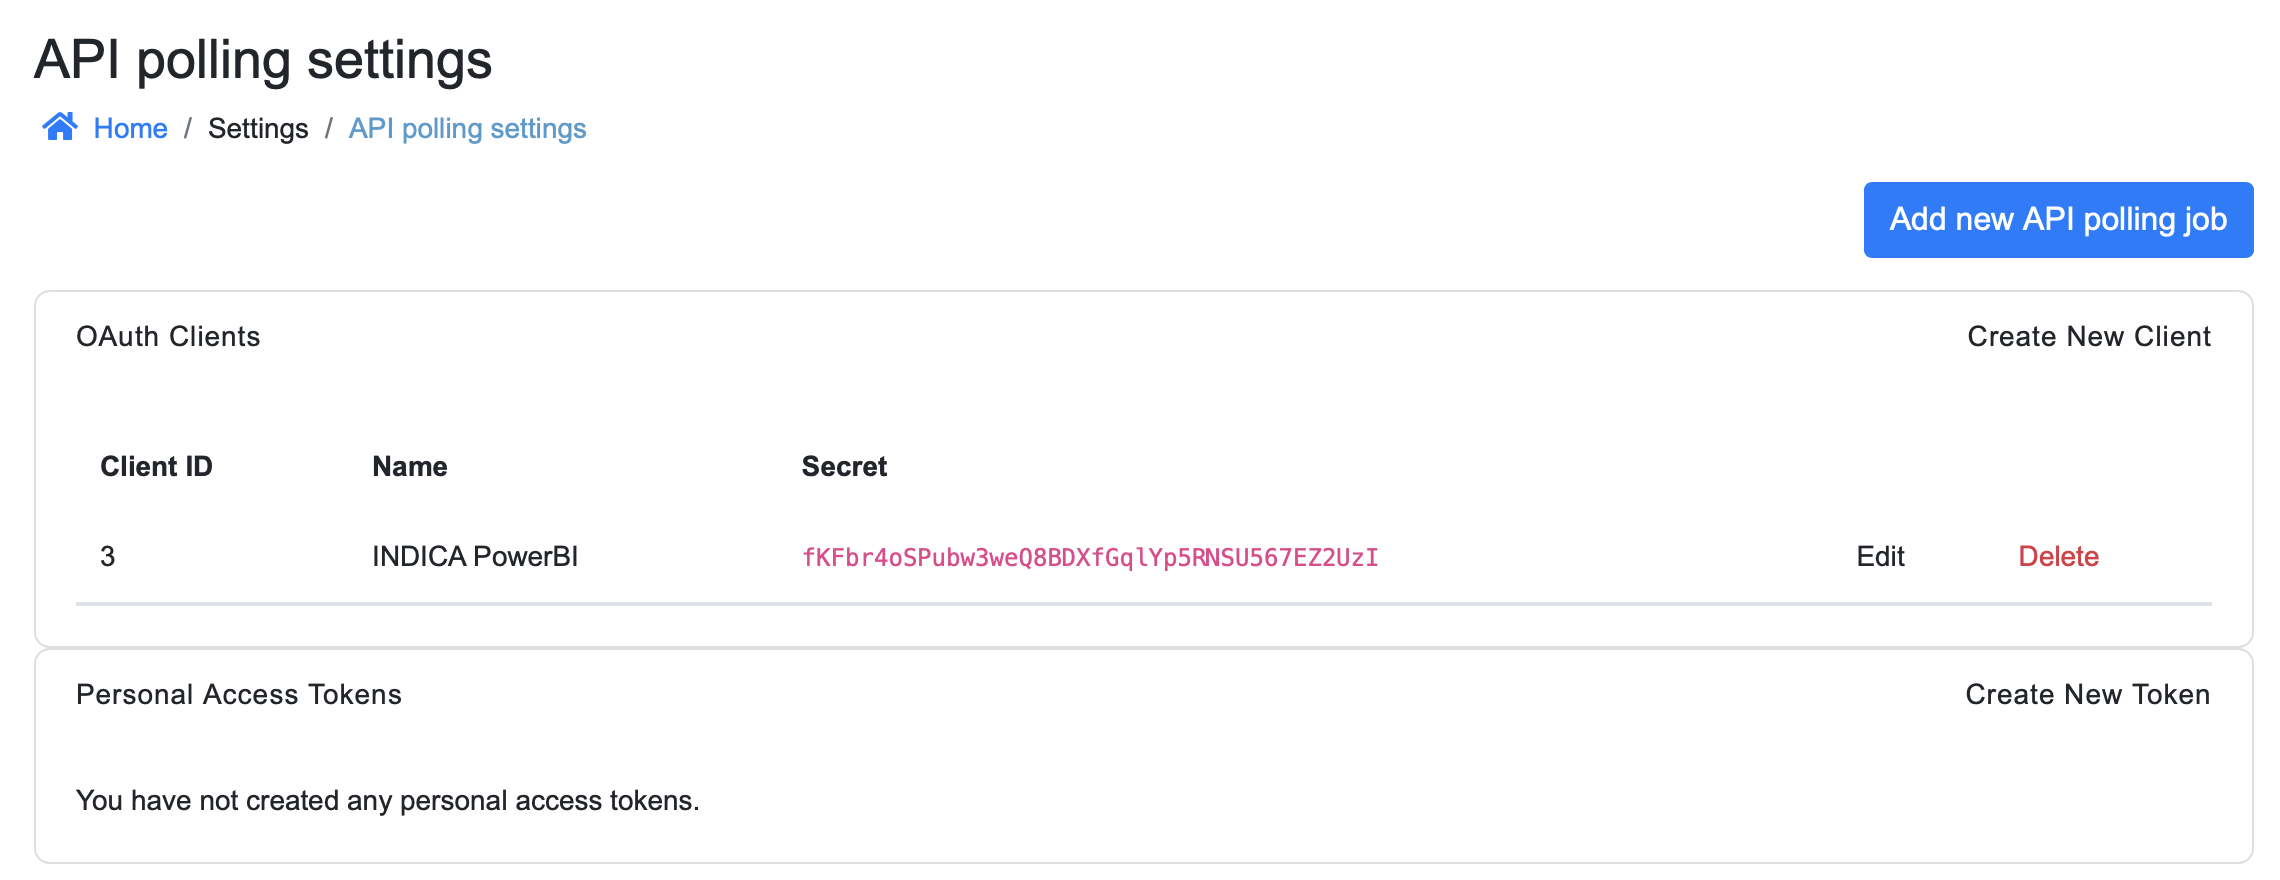
After filling in all fields, click “Create” to create the OAuth client.
The settings page should look like this:
Creating a Personal Access Token
The next step is creating a Personal Access Token. This token will be used by PowerBI to let INDICA know that it has access to the data. The access token will give unlimited access to the data within INDICA; be careful with it. Do not share it with untrusted parties.
A new token can be created by clicking the “Create New Token” button. A popup will open:
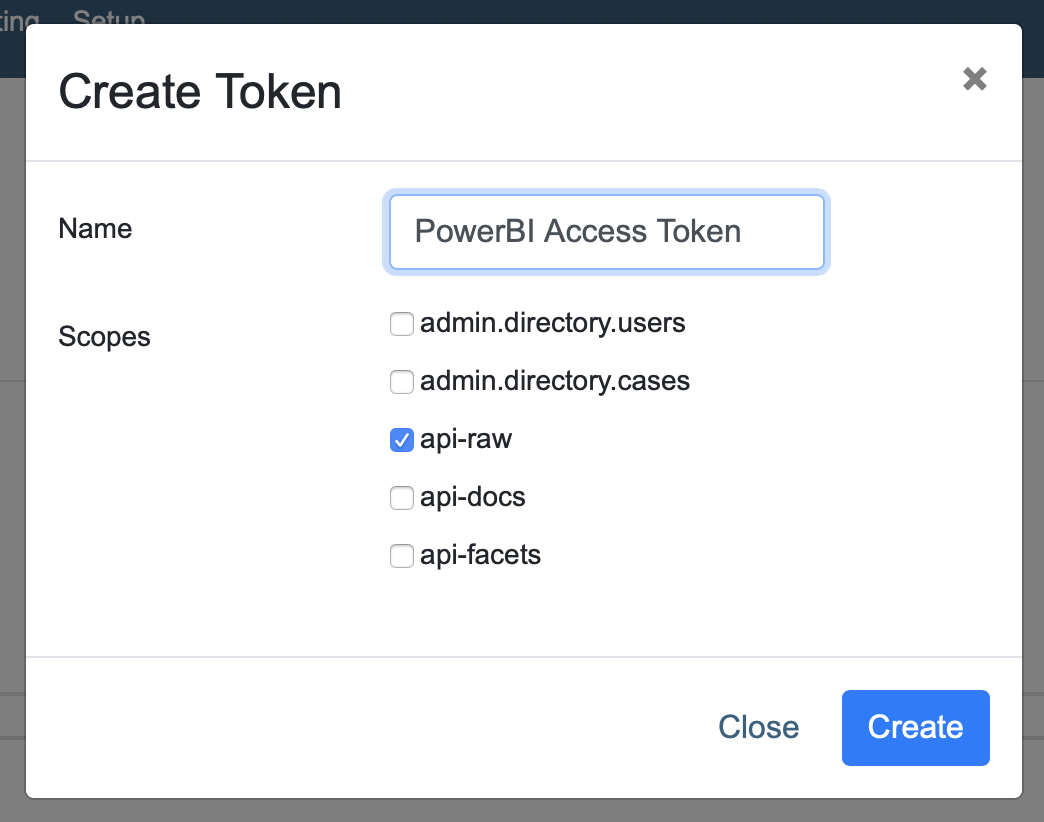
The following information is required:
- Name
Choose a descriptive name so you will recognise it later on.
- Scopes
Scopes define the kind of information is retrievable by the API connection.
The following 5 scopes are available to the user:
- admin.directory.users
This scope gives the user the ability to: Read and modify users.
- admin.directory.cases
This scope gives the user the ability to: Read and modify cases.
- api-raw
This is the most powerful scope, this scope allows the user to send an receive raw SOLR data.
- api-docs
This scope gives the user access to the documents in the index.
- api-facets
This scope gives the user access to the facets.
For the PowerBI connection, we will be using the scope “api-raw”.
After checking the box for api-raw click “Create” to generate your Personal Access Token.
You will now be presented with your personal access token. Make sure to save this token somewhere safe. It will be needed later on.
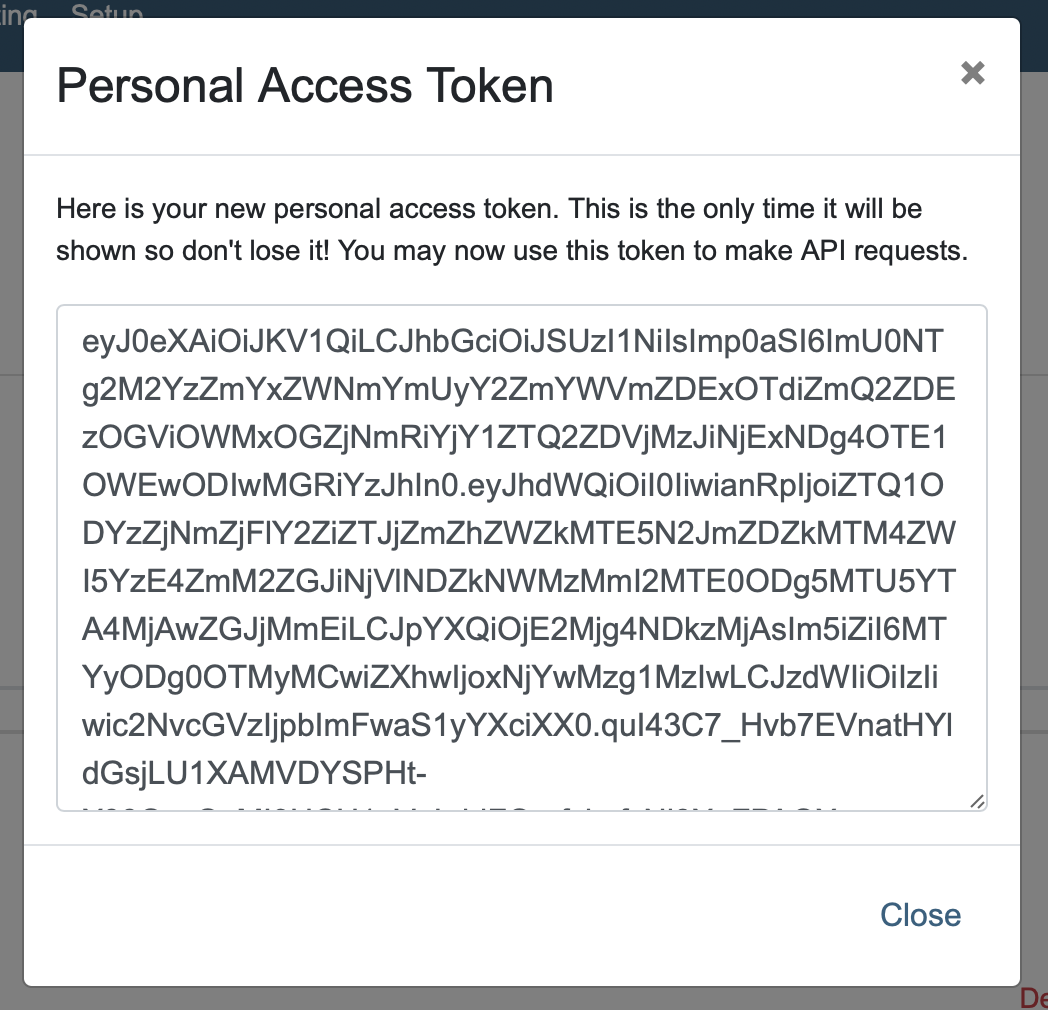
Warning
This is the only time you will be presented with this token. When the popup is closed, there is no way to retrieve it. Make sure to store this somewhere safe.
When done, click the “Close” button to close the popup.
The settings page should look like this:
Connecting PowerBI to INDICA
When above steps are completed, the connection between INDICA and PowerBI can be made. Open PowerBI and click the button “Transform data”.

When clicked, the Power Query Editor will open.
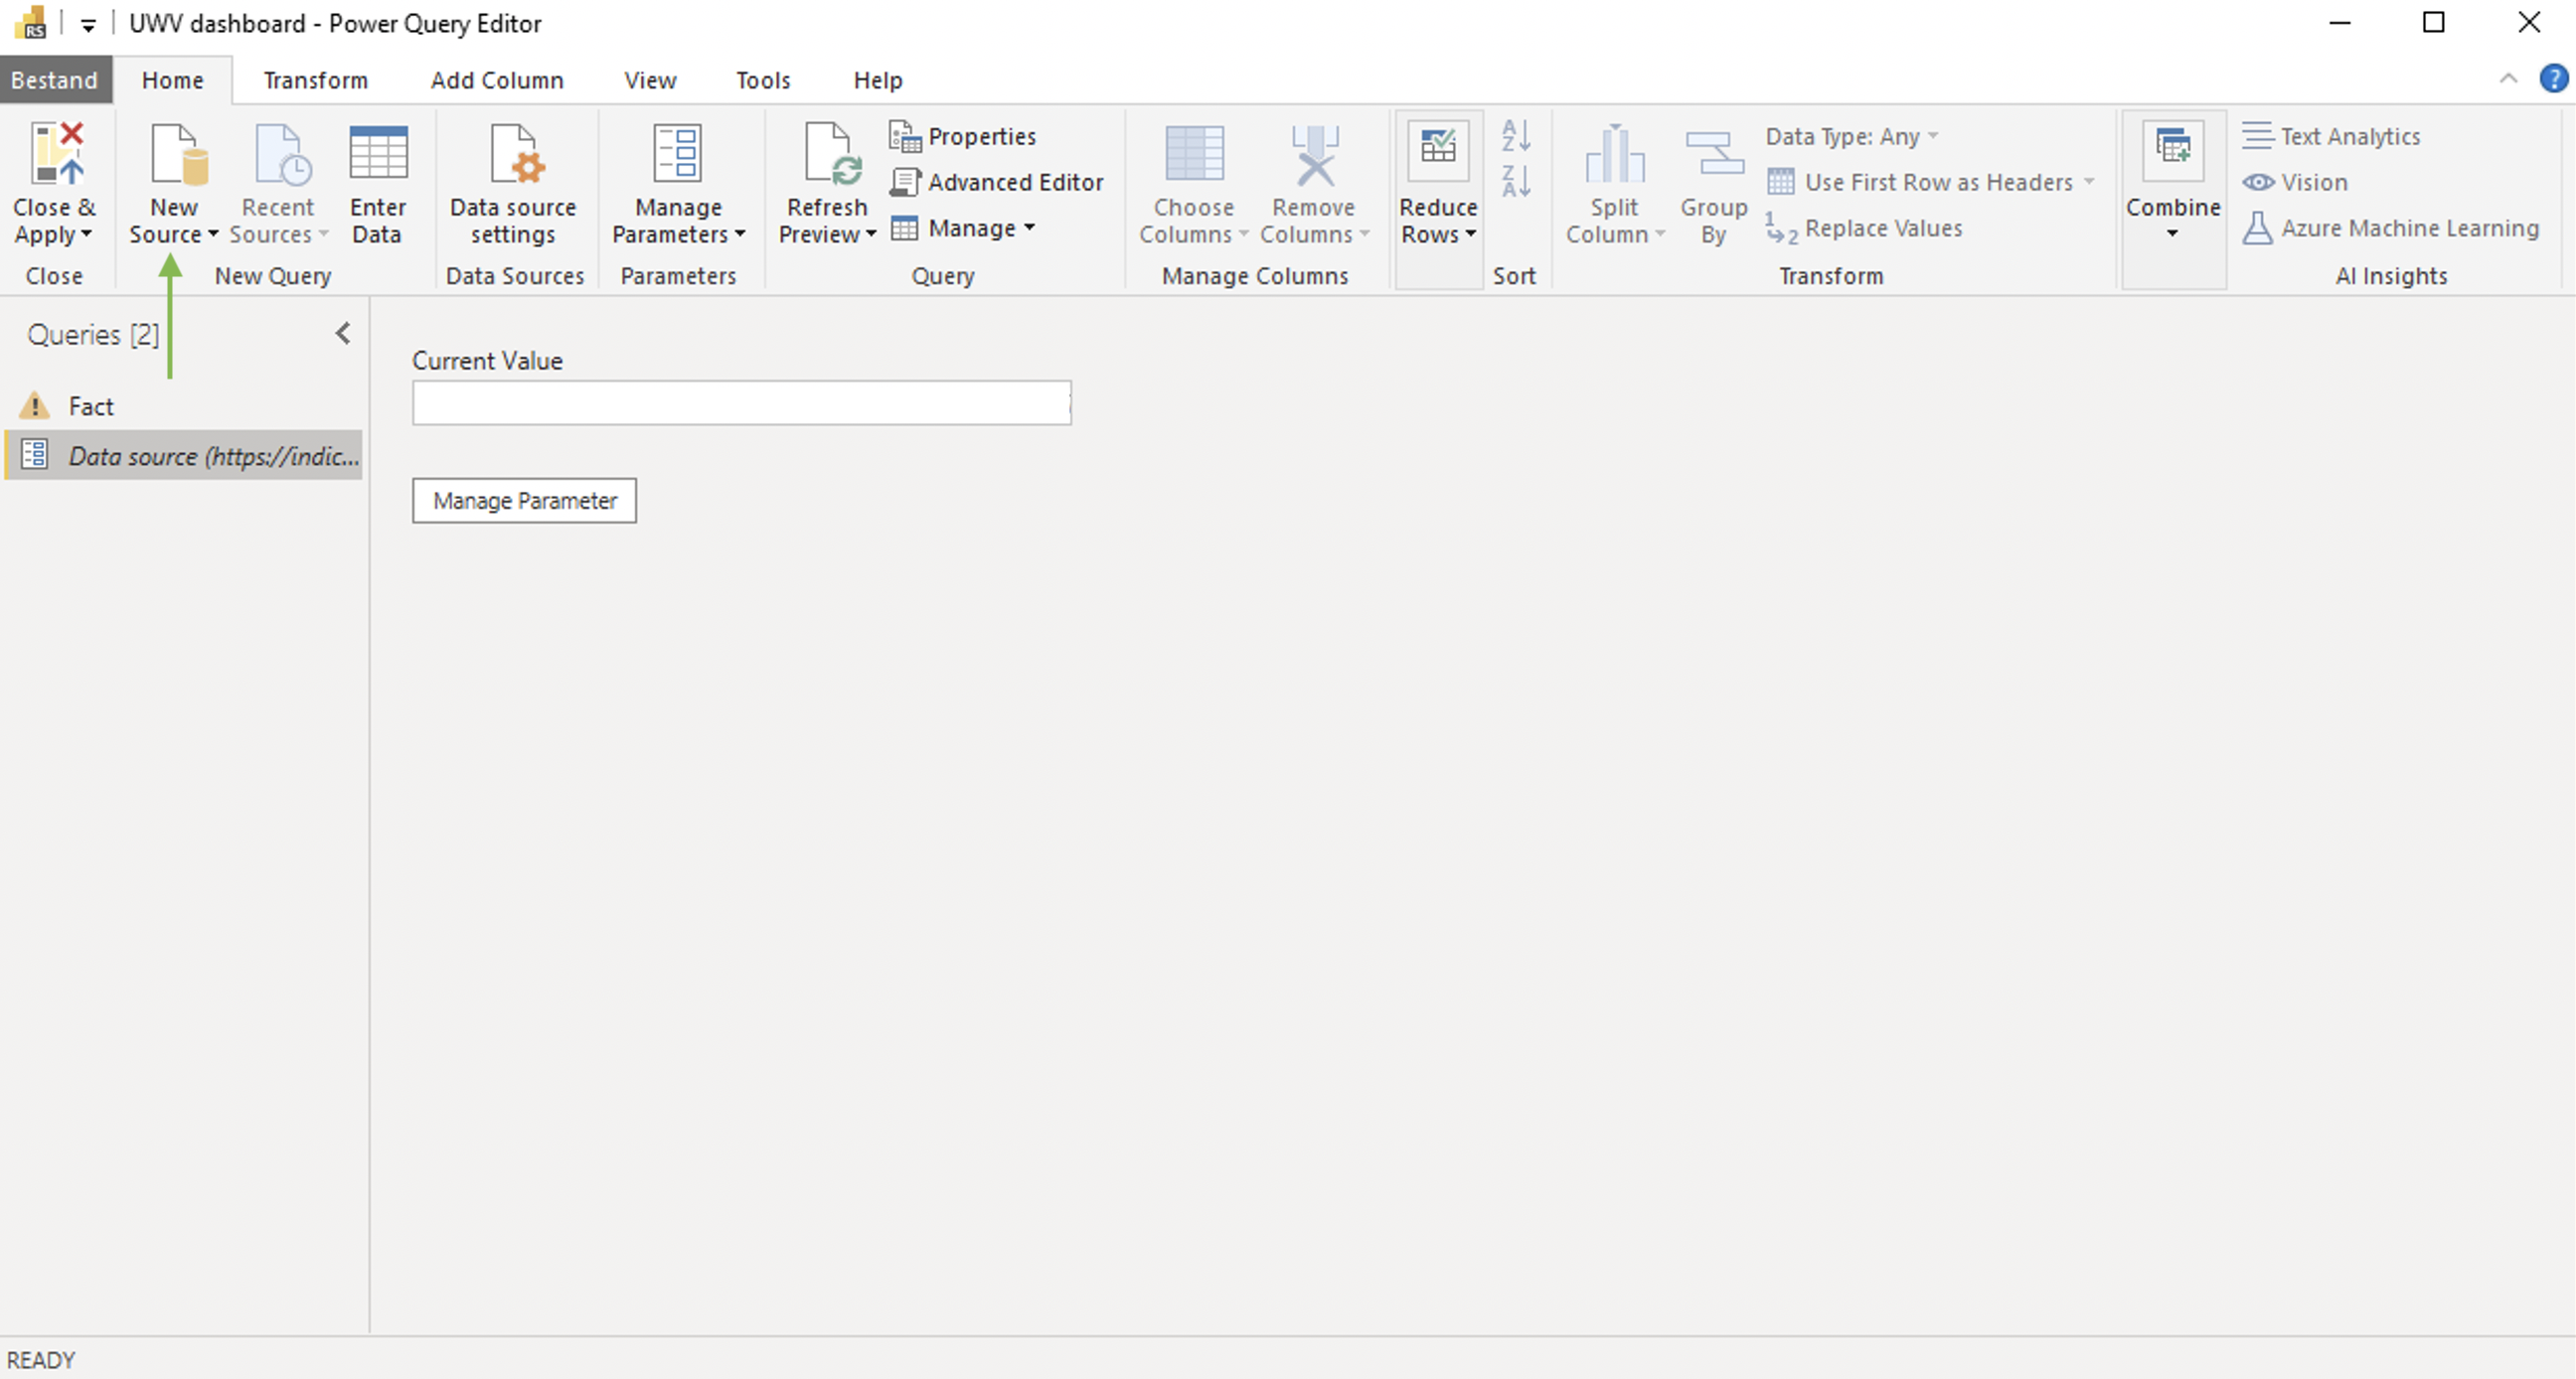
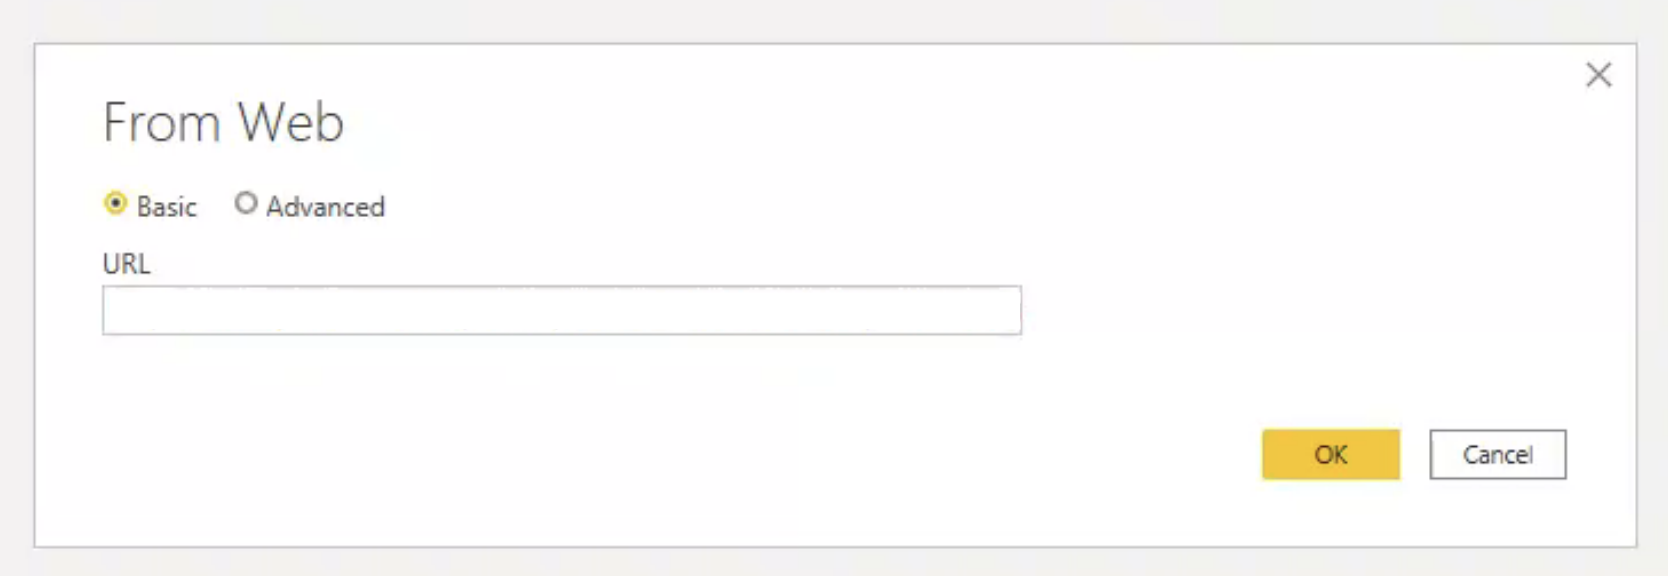
Click “New Source” in the menubar on the top (marked by the green arrow). Choose “Web” from the list of available options. A popup will open:
In this popup, choose the “Advanced” option. The popup will now look like this:
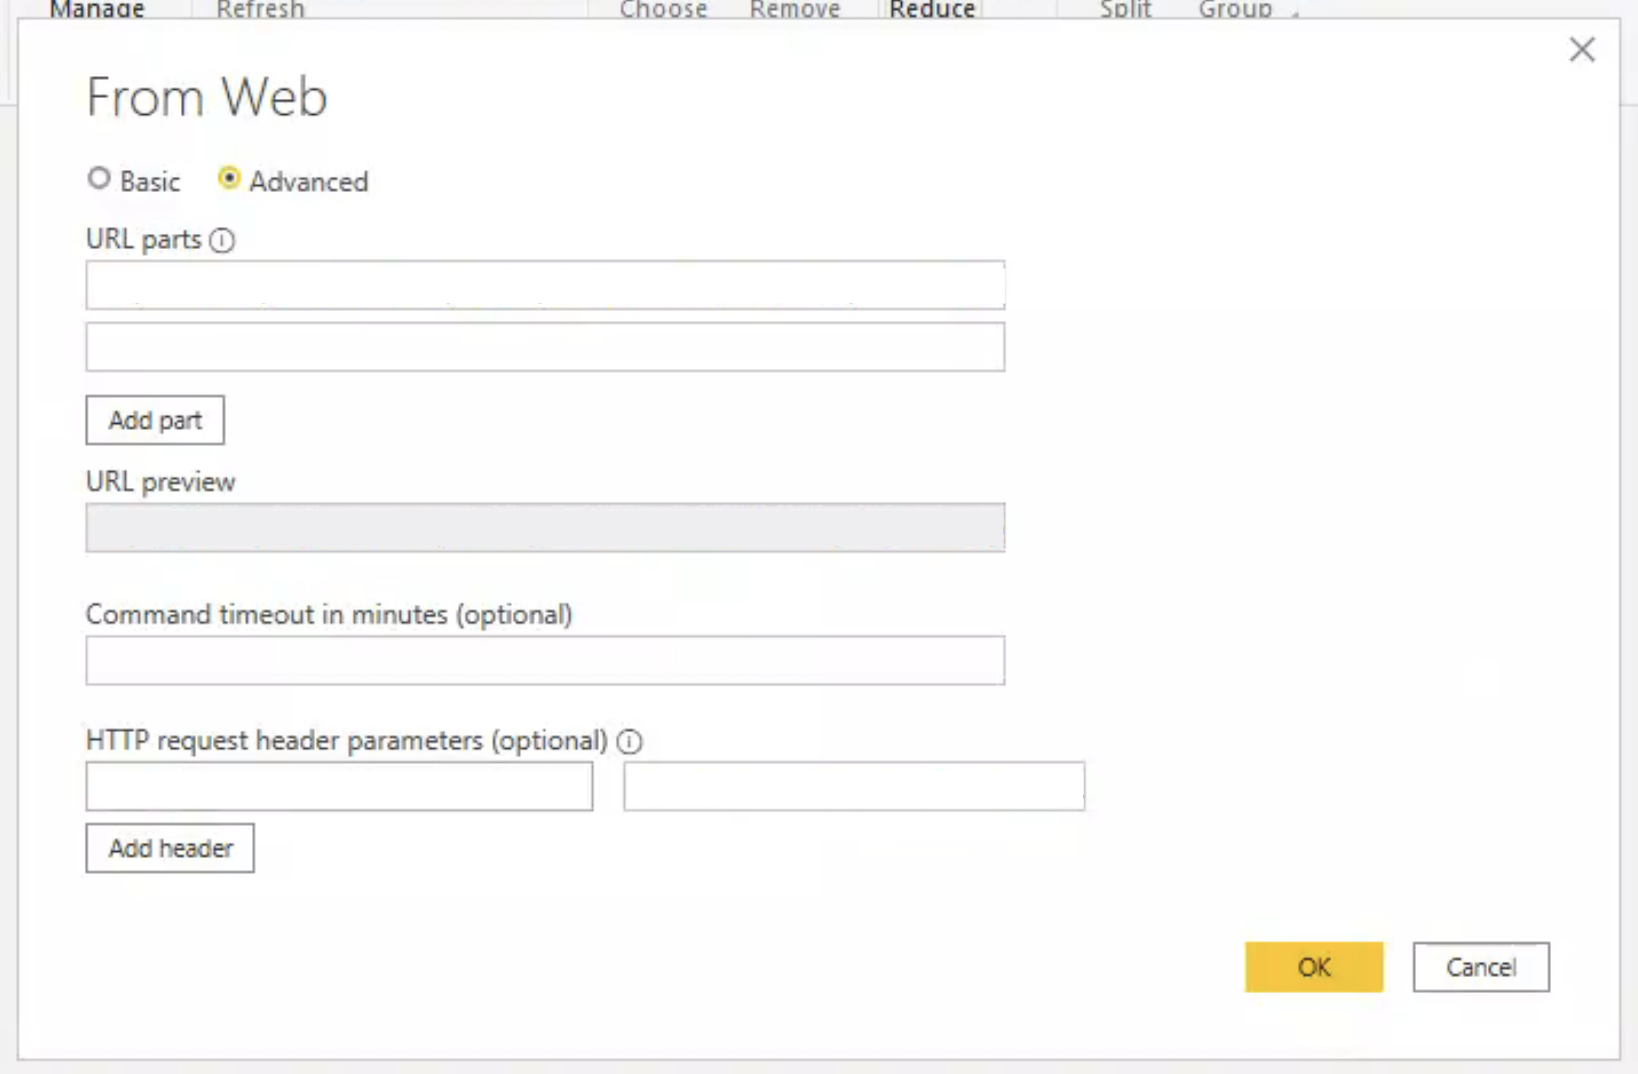
The following fields are required:
URL parts
HTTP request header parameter
Adding the access token to the request
INDICA will not return any data when the access token is not set correctly.
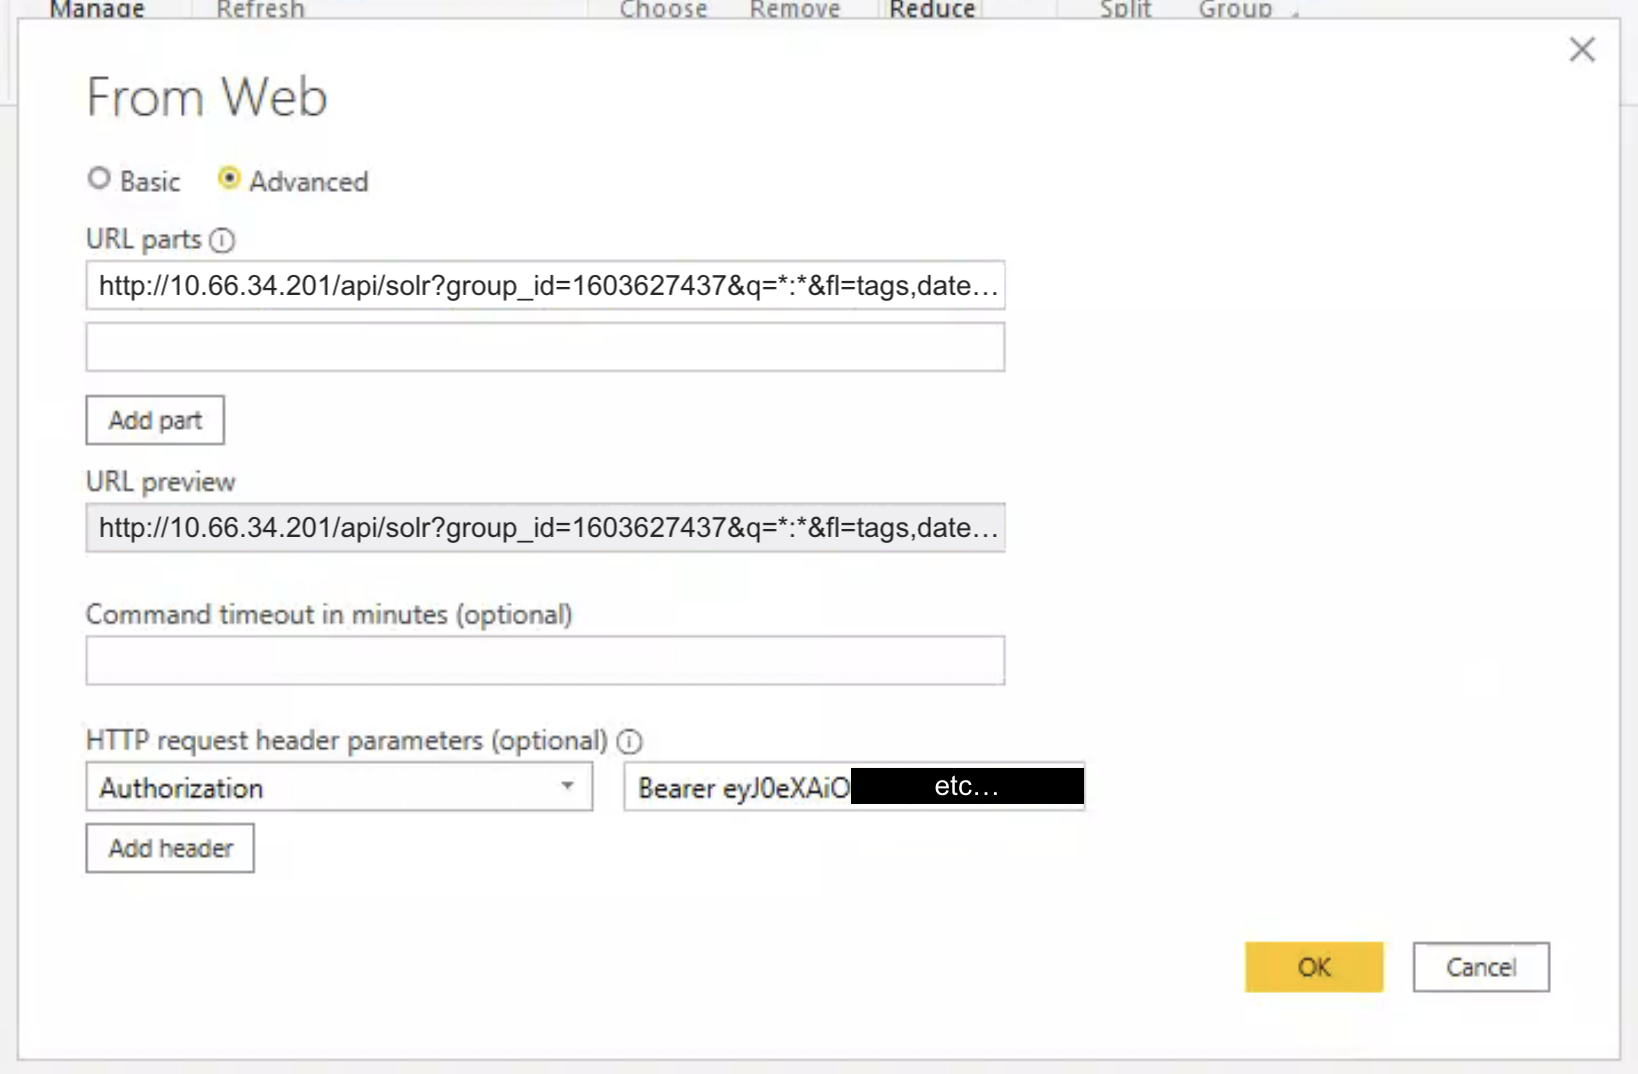
To configure PowerBI to include the access token, type the word Authorization in the field on the left under “HTTP request header parameters”.
Then, in the field on the right, type in the word Bearer followed by a space, and then the complete Personal Access Token.
The popup should now look like this:
When everything is filled in, click “OK”.
If a question pops up asking “Select which level to apply these settings to”, pick the option that ends with /api/solr.
Then, click “Connect”. Your connection with PowerBI should now be made.
In some occasions, PowerBI will return an error stating that it is unable to connect:

This happens because INDICA will return data in CSV format, while PowerBI expects JSON. Click “Edit” when the above error is displayed.
Then the following popup will open:
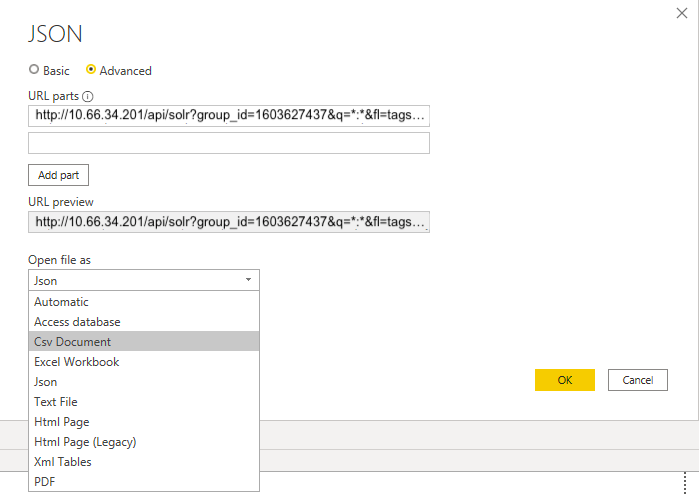
Under “Open file as”, select the option for “Csv Document”. PowerBI will now recognise the output that INDICA generates. Finally, click “OK” to confirm. You should now be presented with a preview of the selected data.
The INDICA and PowerBI connection is now ready for use.
Creating request URLs
The URL can be created by combining serveral parameters:
The URL or IP of the INDICA appliance (called
URLin the example);The ID of the case on the INDICA appliance (called
GROUP_IDin the example);The query you want to use (called
QUERYin the example);A list of the fields to retrieve (called
FIELD_LISTin the example);The number of rows that will be retrieved (called
NUM_ROWSin the example).
Above parameters may be placed in the following format:
http(s)://URL/api/solr?group_id=GROUP_ID&q=QUERY&fl=FIELD_LIST&wt=csv&rows=NUM_ROWS
Note that depending on the appliance, either http or https needs to be used.
A working example of this would be:
http://10.66.34.201/api/solr?group_id=1603627437&q=*:*&fl=tags,date,type&wt=csv&rows=100000
Note
For no query, use *:* as query
When the URL has been prepared, you can copy and paste it in the “URL parts” field in PowerBI.
Polling API Examples
Job GET Endpoint JSON
 1[
 2    {
 3      "job_id": "47ec1fe7db822300e5c4e1bb4b961972",
 4      "job_type": "document_query",
 5      "q": "\"David Vikander \"~0",
 6      "fq": "",
 7      "return_fields": [
 8        "file_name",
 9        "mime_type",
10        "size"
11      ],
12      "status": "processed"
13    },
14    {
15      "job_id": "47ec1fe7db822300e5c4e1bb4b961972",
16      "job_type": "document_query",
17      "q": "\"Dead Kennedys\"~0 OR \"test\"~0",
18      "fq": "",
19      "return_fields": [
20        "file_name",
21        "mime_type"
22      ],
23      "status": "processed"
24    }
25]
Job Result JSON
 1{
 2    "job_id": "47ec1fe7db822300e5c4e1bb4b961972",
 3    "job_type": "document_query",
 4    "result_url": "http://192.168.2.128/search?q=%22David%20Vikander%22~0&page=1&fq={%22privacy_Combined%22:[%22NAME%22]}&sort=score%20desc&mlt=0",
 5    "result_collection": {
 6      "count": 2,
 7      "entries": [
 8        {
 9          "file_name": "John_Doe.doc",
10          "mime_type": "doc"
11        },
12        {
13          "file_name": "John Doe.pst",
14          "mime_type": "pst"
15        }
16      ]
17    },
18    "status": "processed",
19    "error_message": "error"
20}
Document Query JSON
 1[
 2    {
 3      "job_id": "47ec1fe7db822300e5c4e1bb4b961972",
 4      "job_type": "document_query",
 5      "q": "\"David Vikander \"~0",
 6      "fq": [
 7        {
 8          "tags": [
 9            "2_todelete"
10          ]
11        }
12      ],
13      "return_fields": [
14        "file_name",
15        "mime_type",
16        "size"
17      ],
18      "exporting": true,
19      "status": "processed"
20    },
21    {
22      "job_id": "47ec1fe7db822300e5c4e1bb4b961972",
23      "job_type": "document_query",
24      "q": "\"Dead Kennedys\"~0 OR \"test\"~0",
25      "fq": "",
26      "return_fields": [
27        "file_name",
28        "mime_type"
29      ],
30      "exporting": true,
31      "status": "pending"
32    }
33]
Document Query Response JSON
 1{
 2    "job_id": "47ec1fe7db822300e5c4e1bb4b961972",
 3    "job_type": "document_query",
 4    "result_url": "http://192.168.2.128/search/SCA0001052?q=a",
 5    "result_collection_urls": [
 6      {
 7        "name": "TestCollections",
 8        "url": "http://192.168.2.128/search/SCA0001052?module=TestCollections&q=a"
 9      },
10      {
11        "name": "Sites",
12        "url": "http://192.168.2.128/search/SCA0001052?module=Sites&q=a"
13      }
14    ],
15    "result_collection": {
16      "count": 2,
17      "entries": [
18        {
19          "file_name": "John_Doe.doc",
20          "mime_type": "doc"
21        },
22        {
23          "file_name": "John Doe.pst",
24          "mime_type": "pst"
25        }
26      ]
27    },
28    "tags": [
29      {
30        "title": "To Delete",
31        "value": "2_todelete"
32      },
33      {
34        "title": "Unresolved",
35        "value": "1_unresolved"
36      }
37    ],
38    "status": "processed",
39    "error_message": "error"
40}
Subject Details Request JSON
 1{
 2    "job_id": "SCA0001017",
 3    "job_type": "subject_details",
 4    "subject_details": {
 5      "name": "John Doe",
 6      "tel": "88123456789",
 7      "email": "jonh@example.com",
 8      "address": "Elm Street 13"
 9    },
10    "status": "pending"
11}
Export Documents JSON
 1[
 2    {
 3      "job_id": "47ec1fe7db822300e5c4e1bb4b961972",
 4      "job_type": "document_export",
 5      "packaging": 1,
 6      "export_vendor": "box",
 7      "query_job_id": "56rsbs0e5css51972",
 8      "protection": "pass",
 9      "subject_email": "test@example.com",
10      "status": "processed"
11    },
12    {
13      "job_id": "8e6d5fe7db822300e5c4e1bb4b961947",
14      "job_type": "document_export",
15      "packaging": 1,
16      "export_vendor": "box",
17      "query_job_id": "56rsbs0e5css51972",
18      "protection": "pass",
19      "subject_email": "test@example.com",
20      "status": "processed"
21    }
22]
Document Export Response JSON
1{
2    "job_id": "47ec1fe7db822300e5c4e1bb4b961972",
3    "job_type": "document_export",
4    "package_url": "https://example.com",
5    "status": "processed",
6    "error_message": "error"
7}
Privacy Query JSON
1[
2    {
3      "job_id": "e6e31e4ddb032300e5c4e1bb4b9619fa",
4      "job_type": "privacy_query",
5      "q": "",
6      "fq": "",
7      "status": "processed"
8    }
9]
Privacy Query Response JSON
 1{
 2    "job_id": 64,
 3    "job_type": "privacy_query",
 4    "result_collection": {
 5      "count": 1,
 6      "entries": [
 7        {
 8          "asset": {
 9            "type": "collection",
10            "identifiers": {
11              "name": "Unstructured Data",
12              "ip": "198.168.1.0",
13              "path": "/dropbox/JohnDoe/things"
14            }
15          },
16          "issues": [
17            {
18              "type": "NAME",
19              "count": 227
20            },
21            {
22              "type": "EMAIL",
23              "count": 53
24            },
25            {
26              "type": "TEL",
27              "count": 11
28            },
29            {
30              "type": "CC",
31              "count": 4
32            }
33          ]
34        }
35      ]
36    },
37    "status": "processed",
38    "error_message": "error"
39}
Batch Response JSON
Response 1
 1[
 2    {
 3      "job_id": "47ec1fe7db822300e5c4e1bb4b961972",
 4      "job_type": "document_query",
 5      "batch_id": 0,
 6      "result_url": "indica.lan/query=JonhDoe",
 7      "result_collection": {
 8        "count": 2,
 9        "entries": [
10          {
11            "file_name": "John_Doe.doc",
12            "mime_type": "doc"
13          },
14          {
15            "file_name": "John Doe.pst",
16            "mime_type": "pst"
17          }
18        ]
19      },
20      "status": "inprogress"
21    }
22]
Response 2
 1[
 2    {
 3      "job_id": "47ec1fe7db822300e5c4e1bb4b961972",
 4      "job_type": "document_query",
 5      "batch_id": 1,
 6      "result_url": "indica.lan/query=JonhDoe",
 7      "result_collection": {
 8        "count": 2,
 9        "entries": [
10          {
11            "file_name": "test.pst",
12            "mime_type": "email"
13          },
14          {
15            "file_name": "test.txt",
16            "mime_type": "text"
17          }
18        ]
19      },
20      "status": "processed"
21    }
22]