System Settings
Users
Overview of the User administration page. Here it’s possible to create, edit, and delete users. You can also reset their password from this page.
Note
When Active Directory integration is enabled, the users and managers are administrated through the Active Directory.
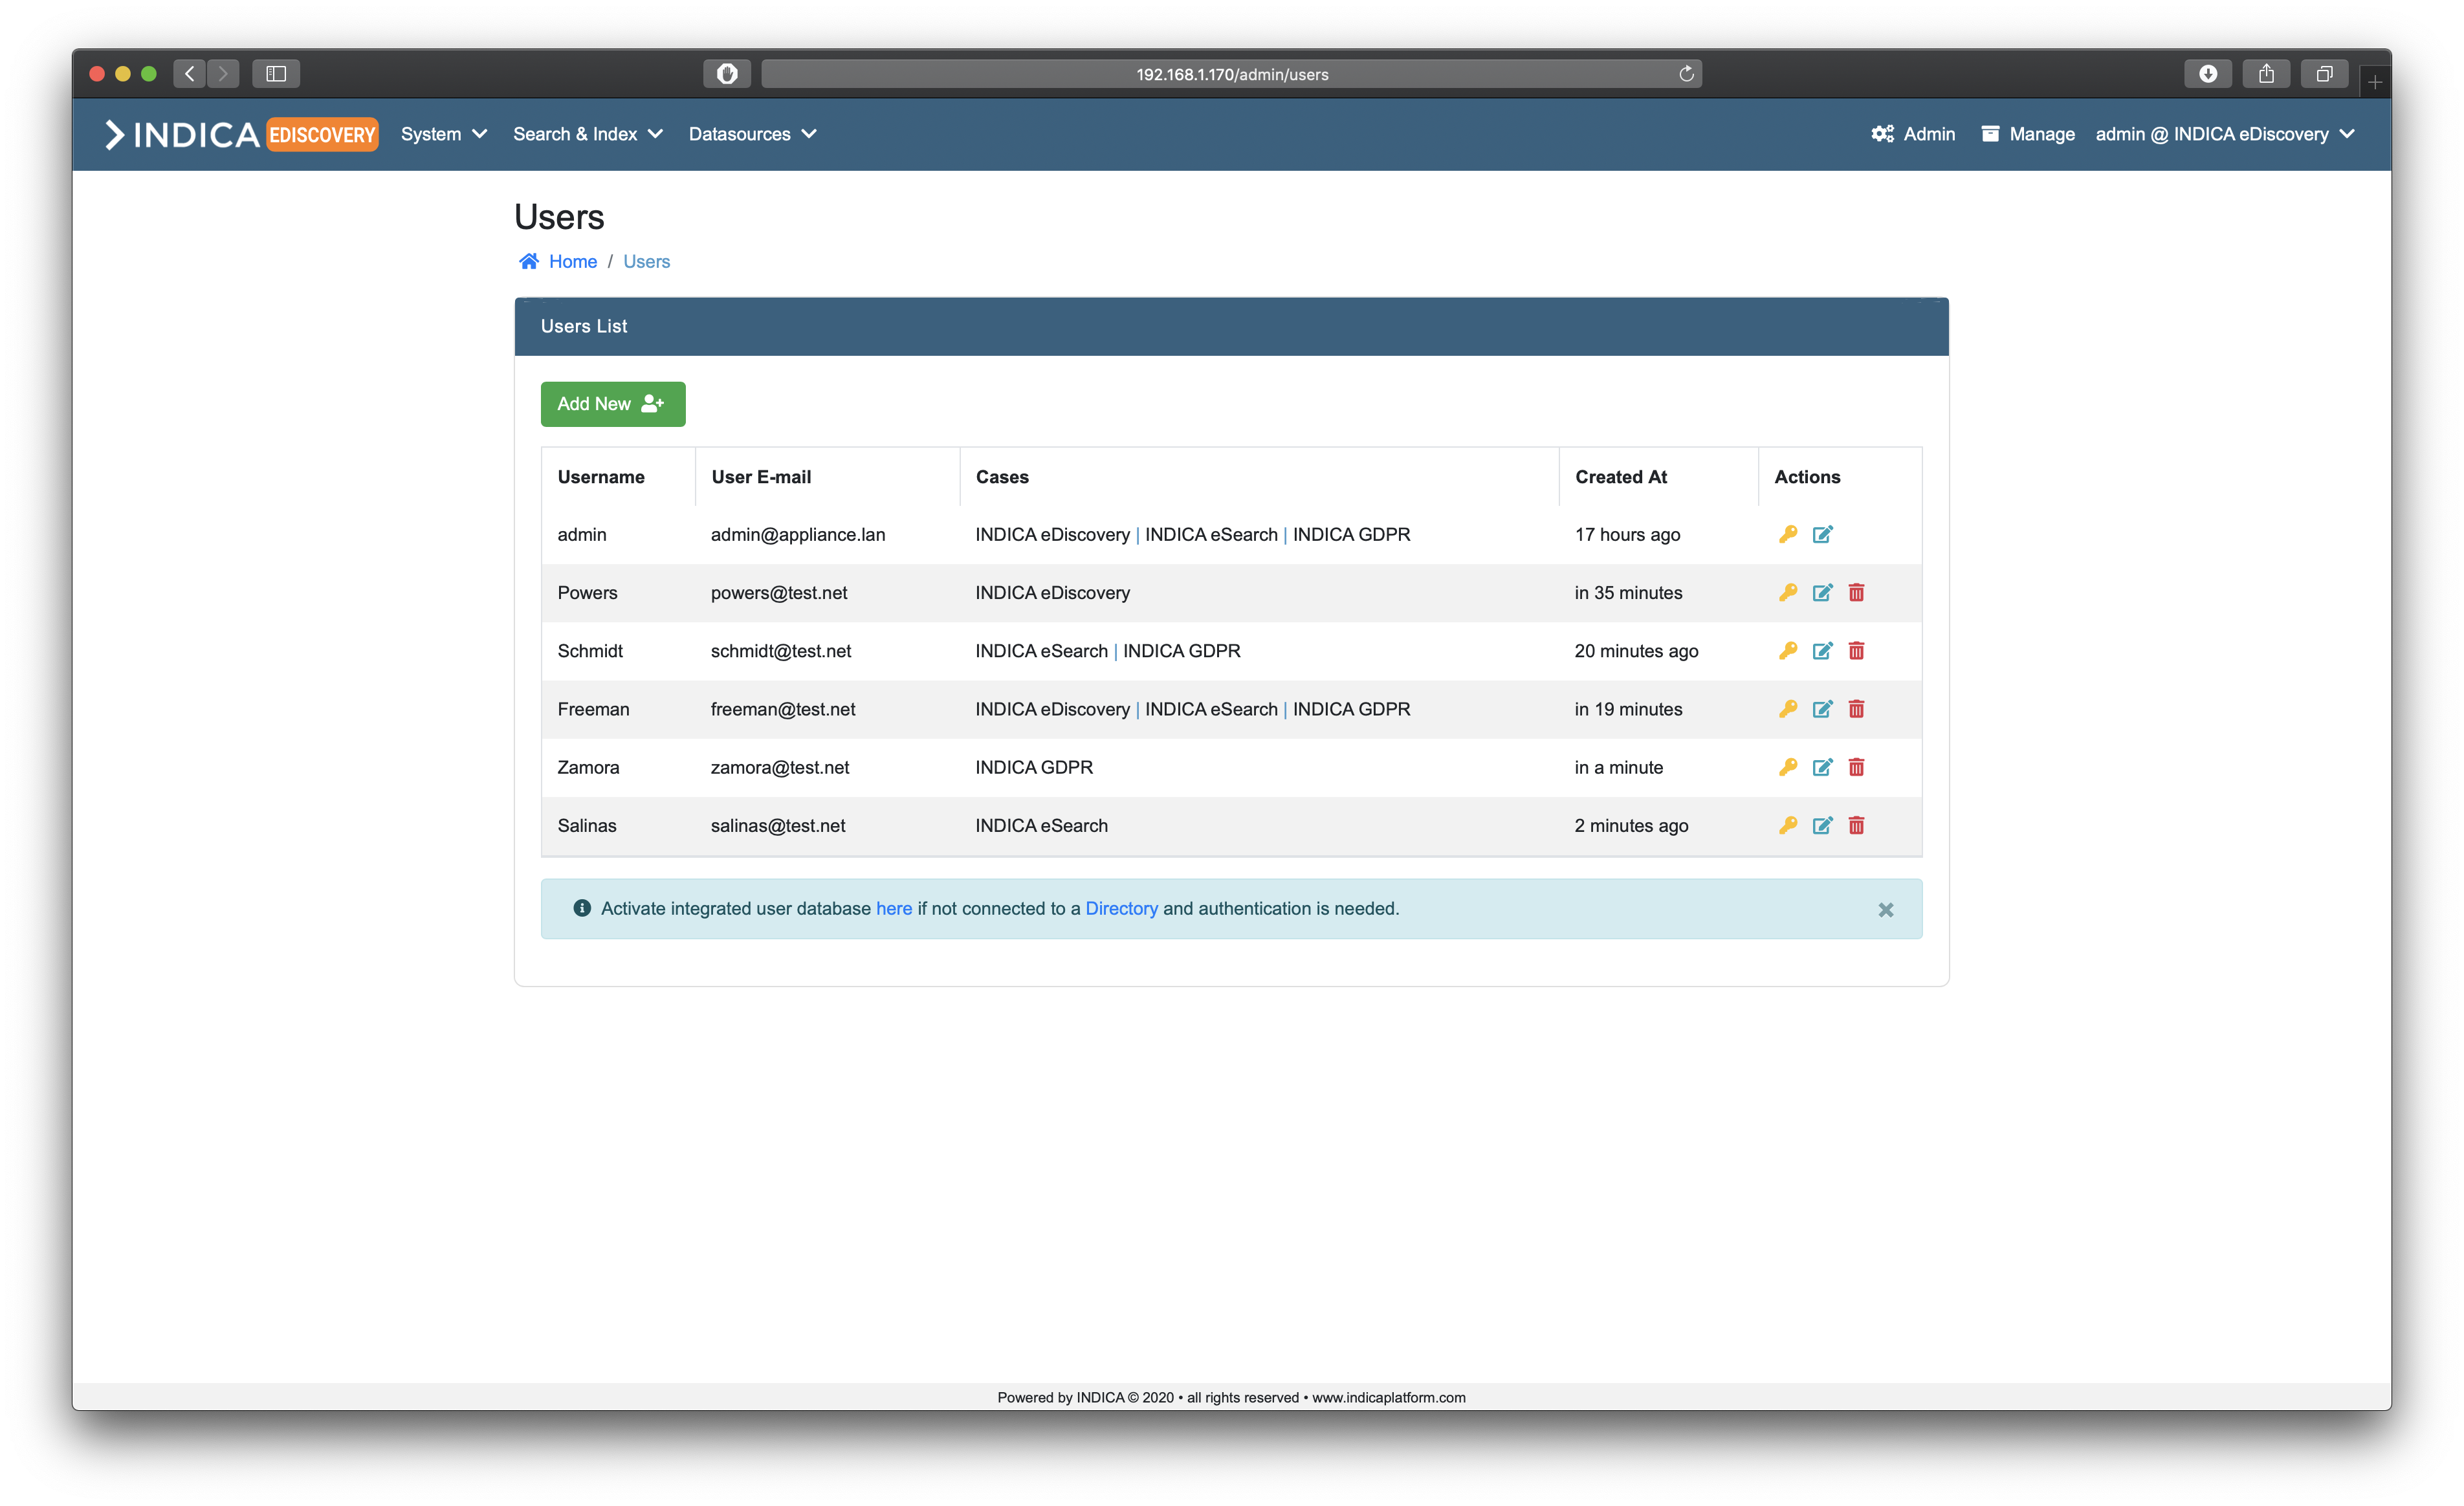
Users List
The listview provides administrators with some useful information and features. In the table the following columns are present:
- Username
Username of the user.
- User E-mail
E-mail address of the user.
- Cases
List of cases that the user has access to, separated by the pipe (“|”) symbol.
- Created At
Creation timestamp of the user.
- Actions
Yellow key button: Reset a user’s password.
Blue paper button: Edit a user.
Red trashbin button: Delete a user.
Creating a user
Creating a user is done by clicking the green “Add New” button. A popup will open:
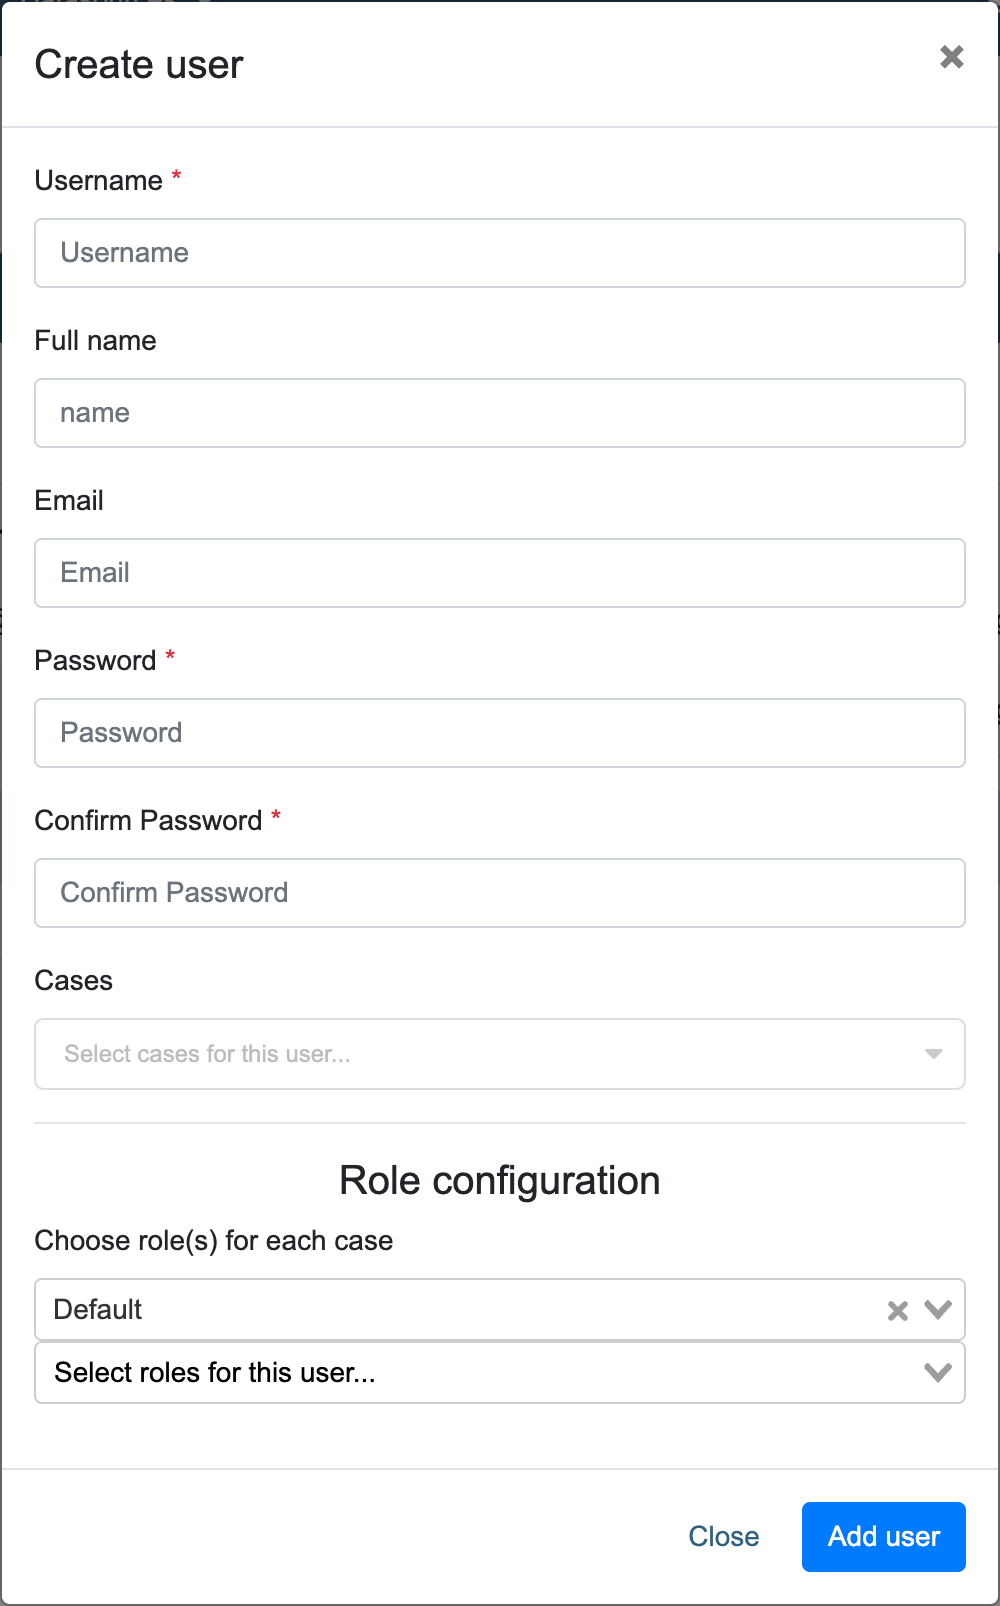
Simply fill in the following details, and click “Add User” when done.
- Username
- Username for the new user. The username must be unique.This username is used to sign in into INDICA.
- Full Name
- Full name of the user. If given, this name will be displayed instead of the username.
- E-mail address of the user.
- Password (2x)
- Choose a password for the user.Use a strong password to prevent unauthorised access.
- Case(s)
- Choose the case(s) that the user should have access to.
- Role configuration (only available when AD integration is not activated)
- Choose role(s) for the new user.Available roles are dependant on the setup of Roles and Permissions.In the top drop-down, cases can be selected. Once a case is selected, roles can be selected in the bottom dropdown for each case.
Note
Creating users is not needed when AD integration is enabled and configured. INDICA will import the user’s information from the AD upon signing in.
Editing a user
Editing a user is done by clicking the blue paper button in the “Actions” column of the “Users List”. A popup will open:
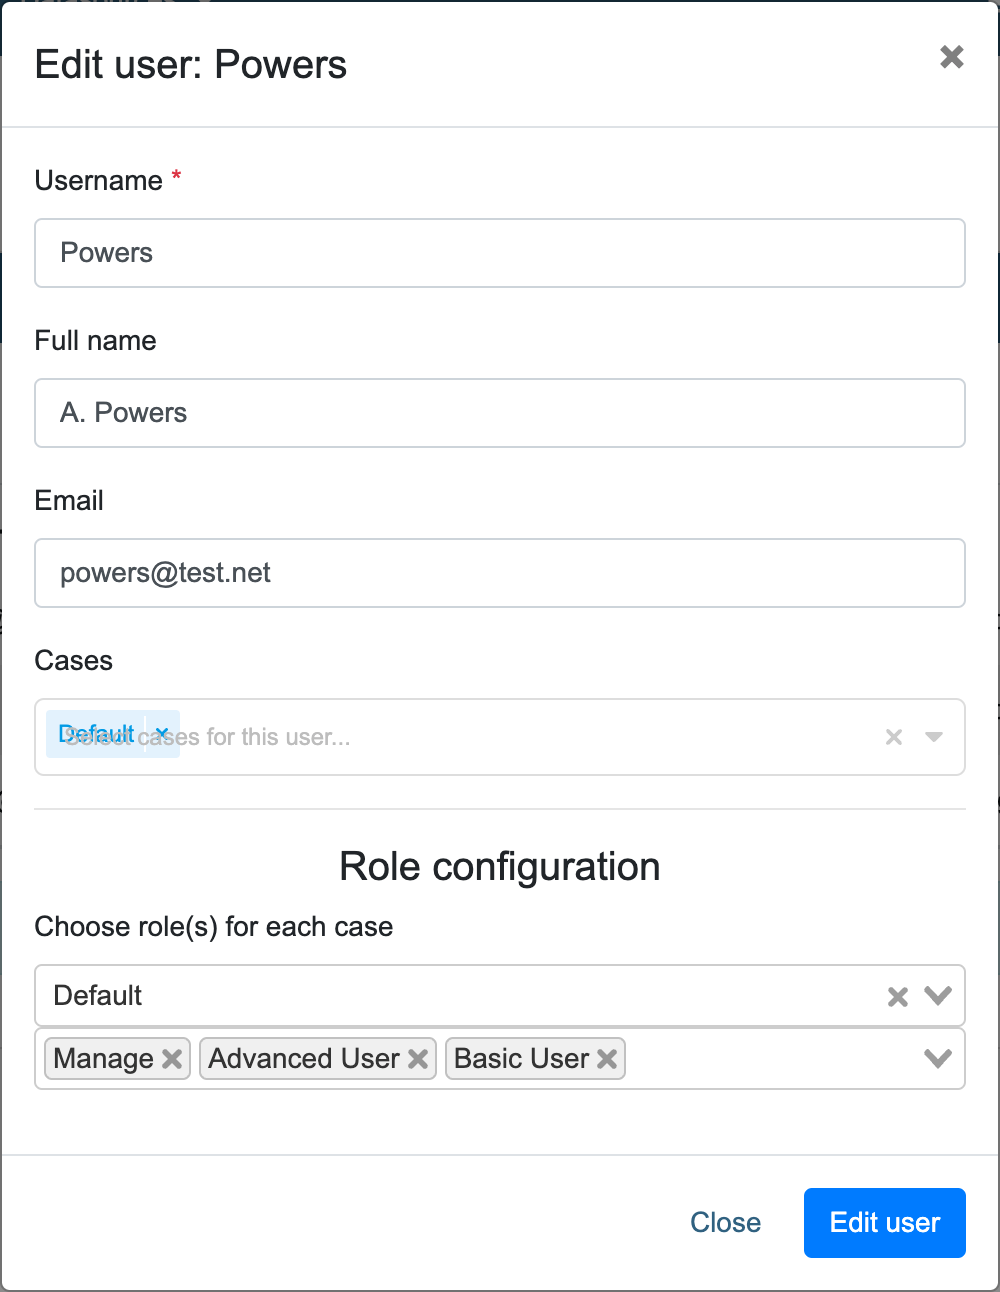
Here you can edit the settings of the user. When done, click “Edit user” to save the changes.
If AD is disabled it’s also possible to assign user to a local group. Local groups can be created in the Admin->Security page
Deleting a user
Deleting a user is done by clicking the red trashbin button in the “Actions” column of the “Users List”.
A confirmation popup will open. Click “Delete” to permanently delete the user. This action cannot be undone.
Note
Deleting a user that signed in using AD integration does not prohibit that user from signing in again. The user needs to be removed from the AD groups on the AD side.
Resetting a user’s password
Resetting a user’s password only works when there is no AD integration active.
Resetting a user’s password is done by clicking the yellow key button in the “Actions” column of the “Users List”. A popup will open:
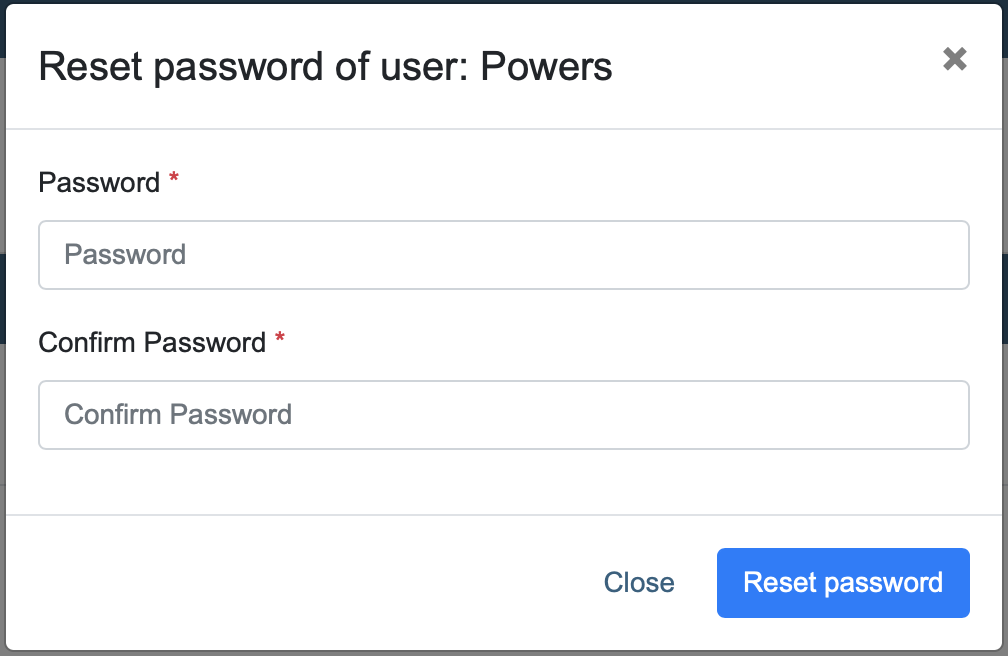
Simply pick a new password, confirm it, and click “Reset Password”. The user can now authenticate using the new password.
Note
The user will not be notified by INDICA that their password has changed.
Resetting the admin password
When the password of the only Admin account has been lost, there is a way to reset the password.
To do this, SSH access and root-level permissions on the appliance are needed. When logged in into the appliance, navigate to the following directory:
cd /net/www
Then, run the following command:
php artisan user:resetpw
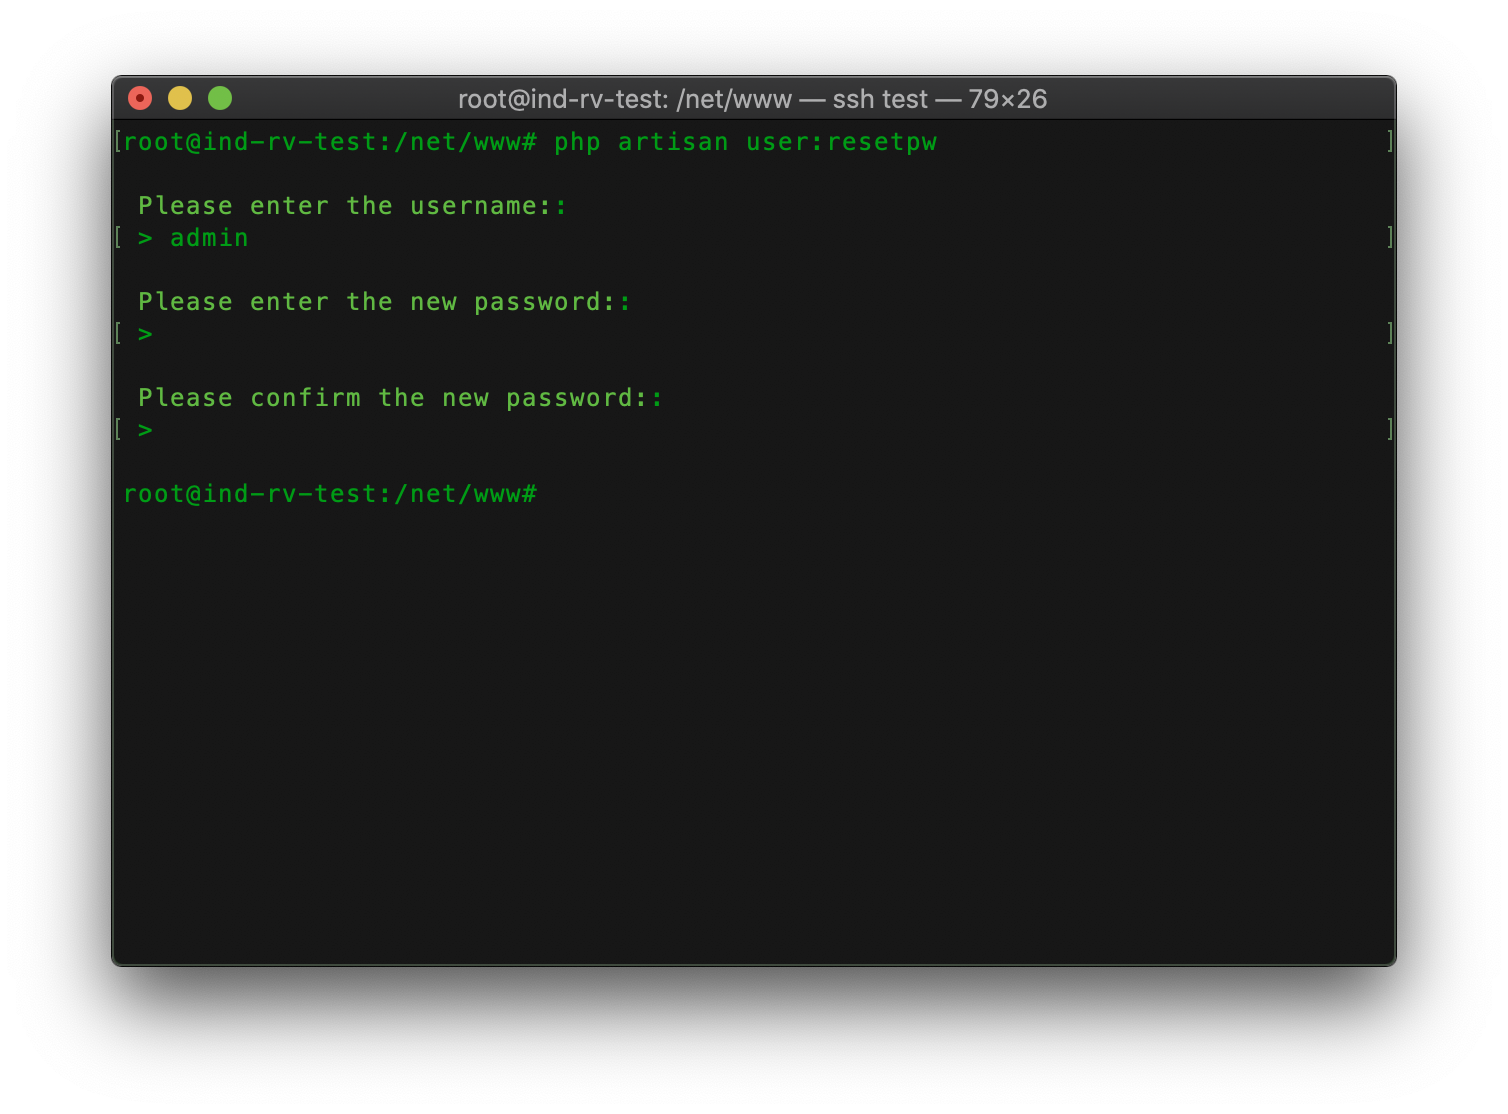
The command will ask for the username and then for a new password.
Note
When typing the new password, nothing will be displayed.
You should now be able to authenticate in the front-end with the new password.
Roles and Permissions
When working with sensitive data, protecting that data and making sure users will only see that they need to see is very important. To accommodate this, INDICA features a Roles and Permissions system. With this system, it is possible to define custom roles and assign permissions to those roles. This gives complete control over what a user can and cannot do, while still keeping it maintainable and scalable.
Introduction to Roles and Permissions
General information
Roles and Permissions are a part of the Admin portal. This means that only administrators (or anyone with the corresponding role, if assigned by an administrator) can change the setup of roles and permissions. Users with the Admin role are unlimited in their actions. However, every action an administrator takes is logged for audit purposes. Logged actions cannot be changed by any administrator.
Changing the setup of roles and permissions can (by default) only be done by Administrators. However, changing the roles and permissions is a permission in itself, meaning it can be assigned to other roles if desired.
Roles
A role can be assigned to a user or a group of users. These roles have permissions assigned to them. A user can have multiple roles, and roles can have multiple permissions.
Roles can be mapped to AD groups, more information about mapping can be found in the section `Mapping AD groups to roles`_.
The following roles are configured by default:
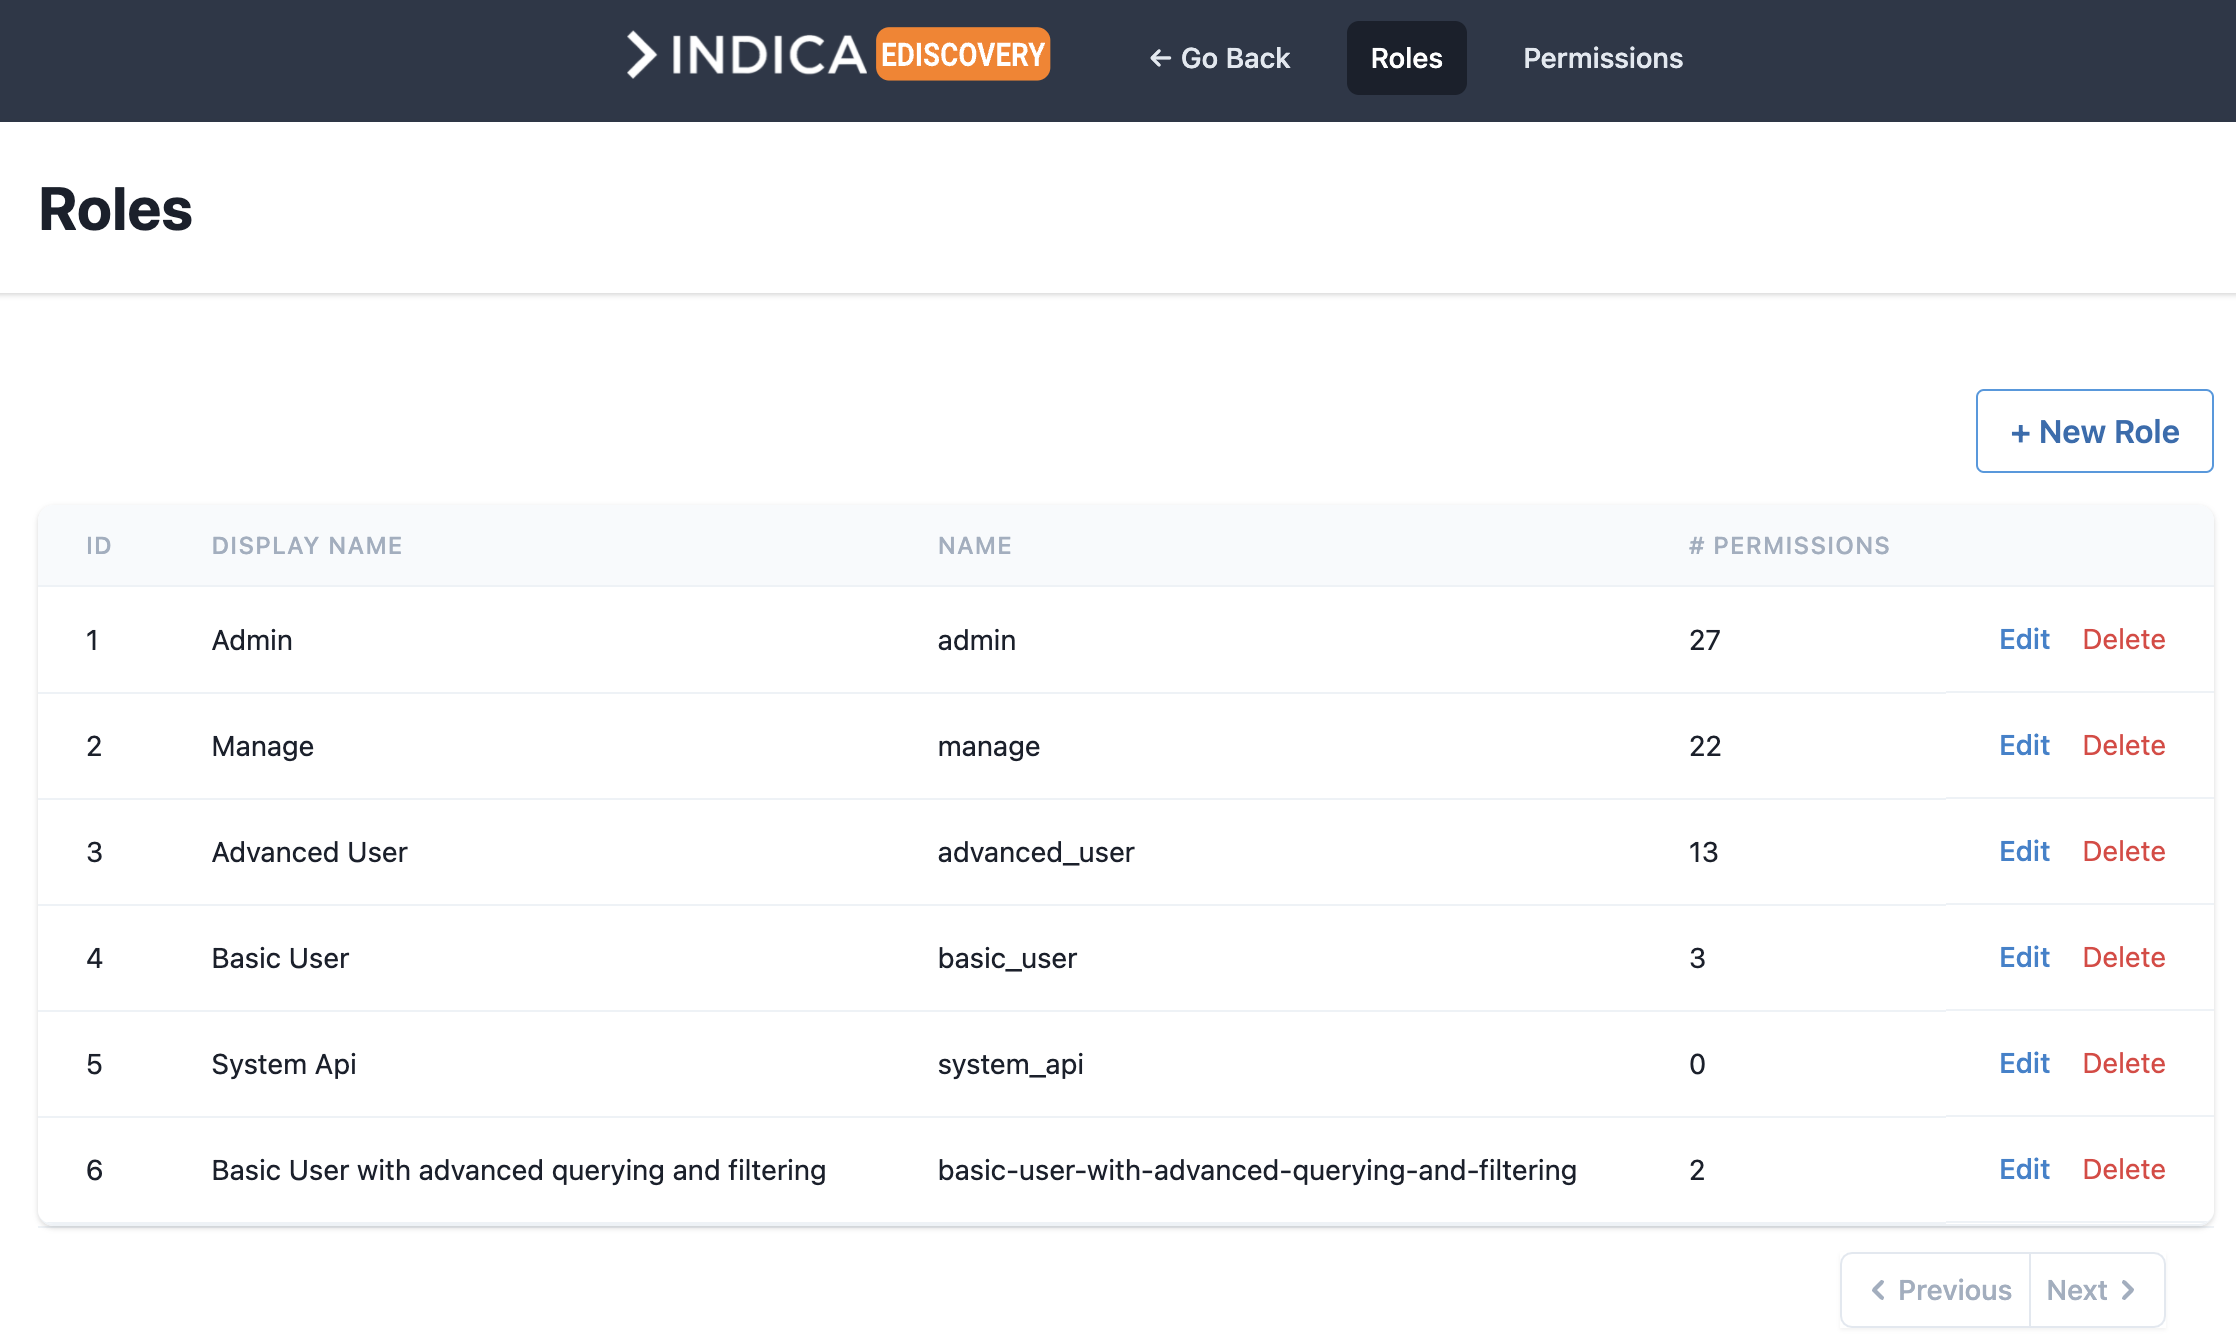
- Admin
- Typically assigned to administrators.Administrators can see and do anything on the system.They have unlimited access to all cases and all settings.Administrators are responsible for setting up and maintaining the INDICA Appliance.
- Case Admin
- This role is intended for Case Administrators.They have elevated roles over managers, meaning they can manage users and cases on an appliance,but do not have access to the system settings that administrators do.
- Manage
- This role is intended for Case Managers.Case managers can see and change settings to the cases they are assigned on.They are responsible for case settings like workflows, tags, data sources, etc.
- Advanced User
- The “Advanced User” role is for trained and experienced users.This role gives more information and features on the Search page.
- Basic User
- The “Basic User” role is for new users with limited rights.This role gives access to a limited Search page with only basic functionality.
- System Api
- Internal system user. Is only used for INDICA’s inner workings.Changing or assigning this role is not needed.
Note
Roles are system-wide. This means that when a role is edited, the permissions of that role will apply to all cases that use this role. If this behavior is not desired, it is possible to create roles for a specific Case and use those roles for that Case. This allows administrators to have Case-specific roles (and permissions).
Permissions
A permission is something a user can see or do in the system. This can be assigning a tag, viewing document content, changing settings, etc. These permissions are attached to a role, and roles are attached to users (or AD groups, see `Mapping AD groups to roles`_).
New permissions cannot be created by the administrator or any other user. This is because permissions are defined in the sourcecode of the INDICA Appliance. New permissions will be included in future releases of INDICA. If you’re an existing customer, they can also be requested. Contact INDICA for more details.
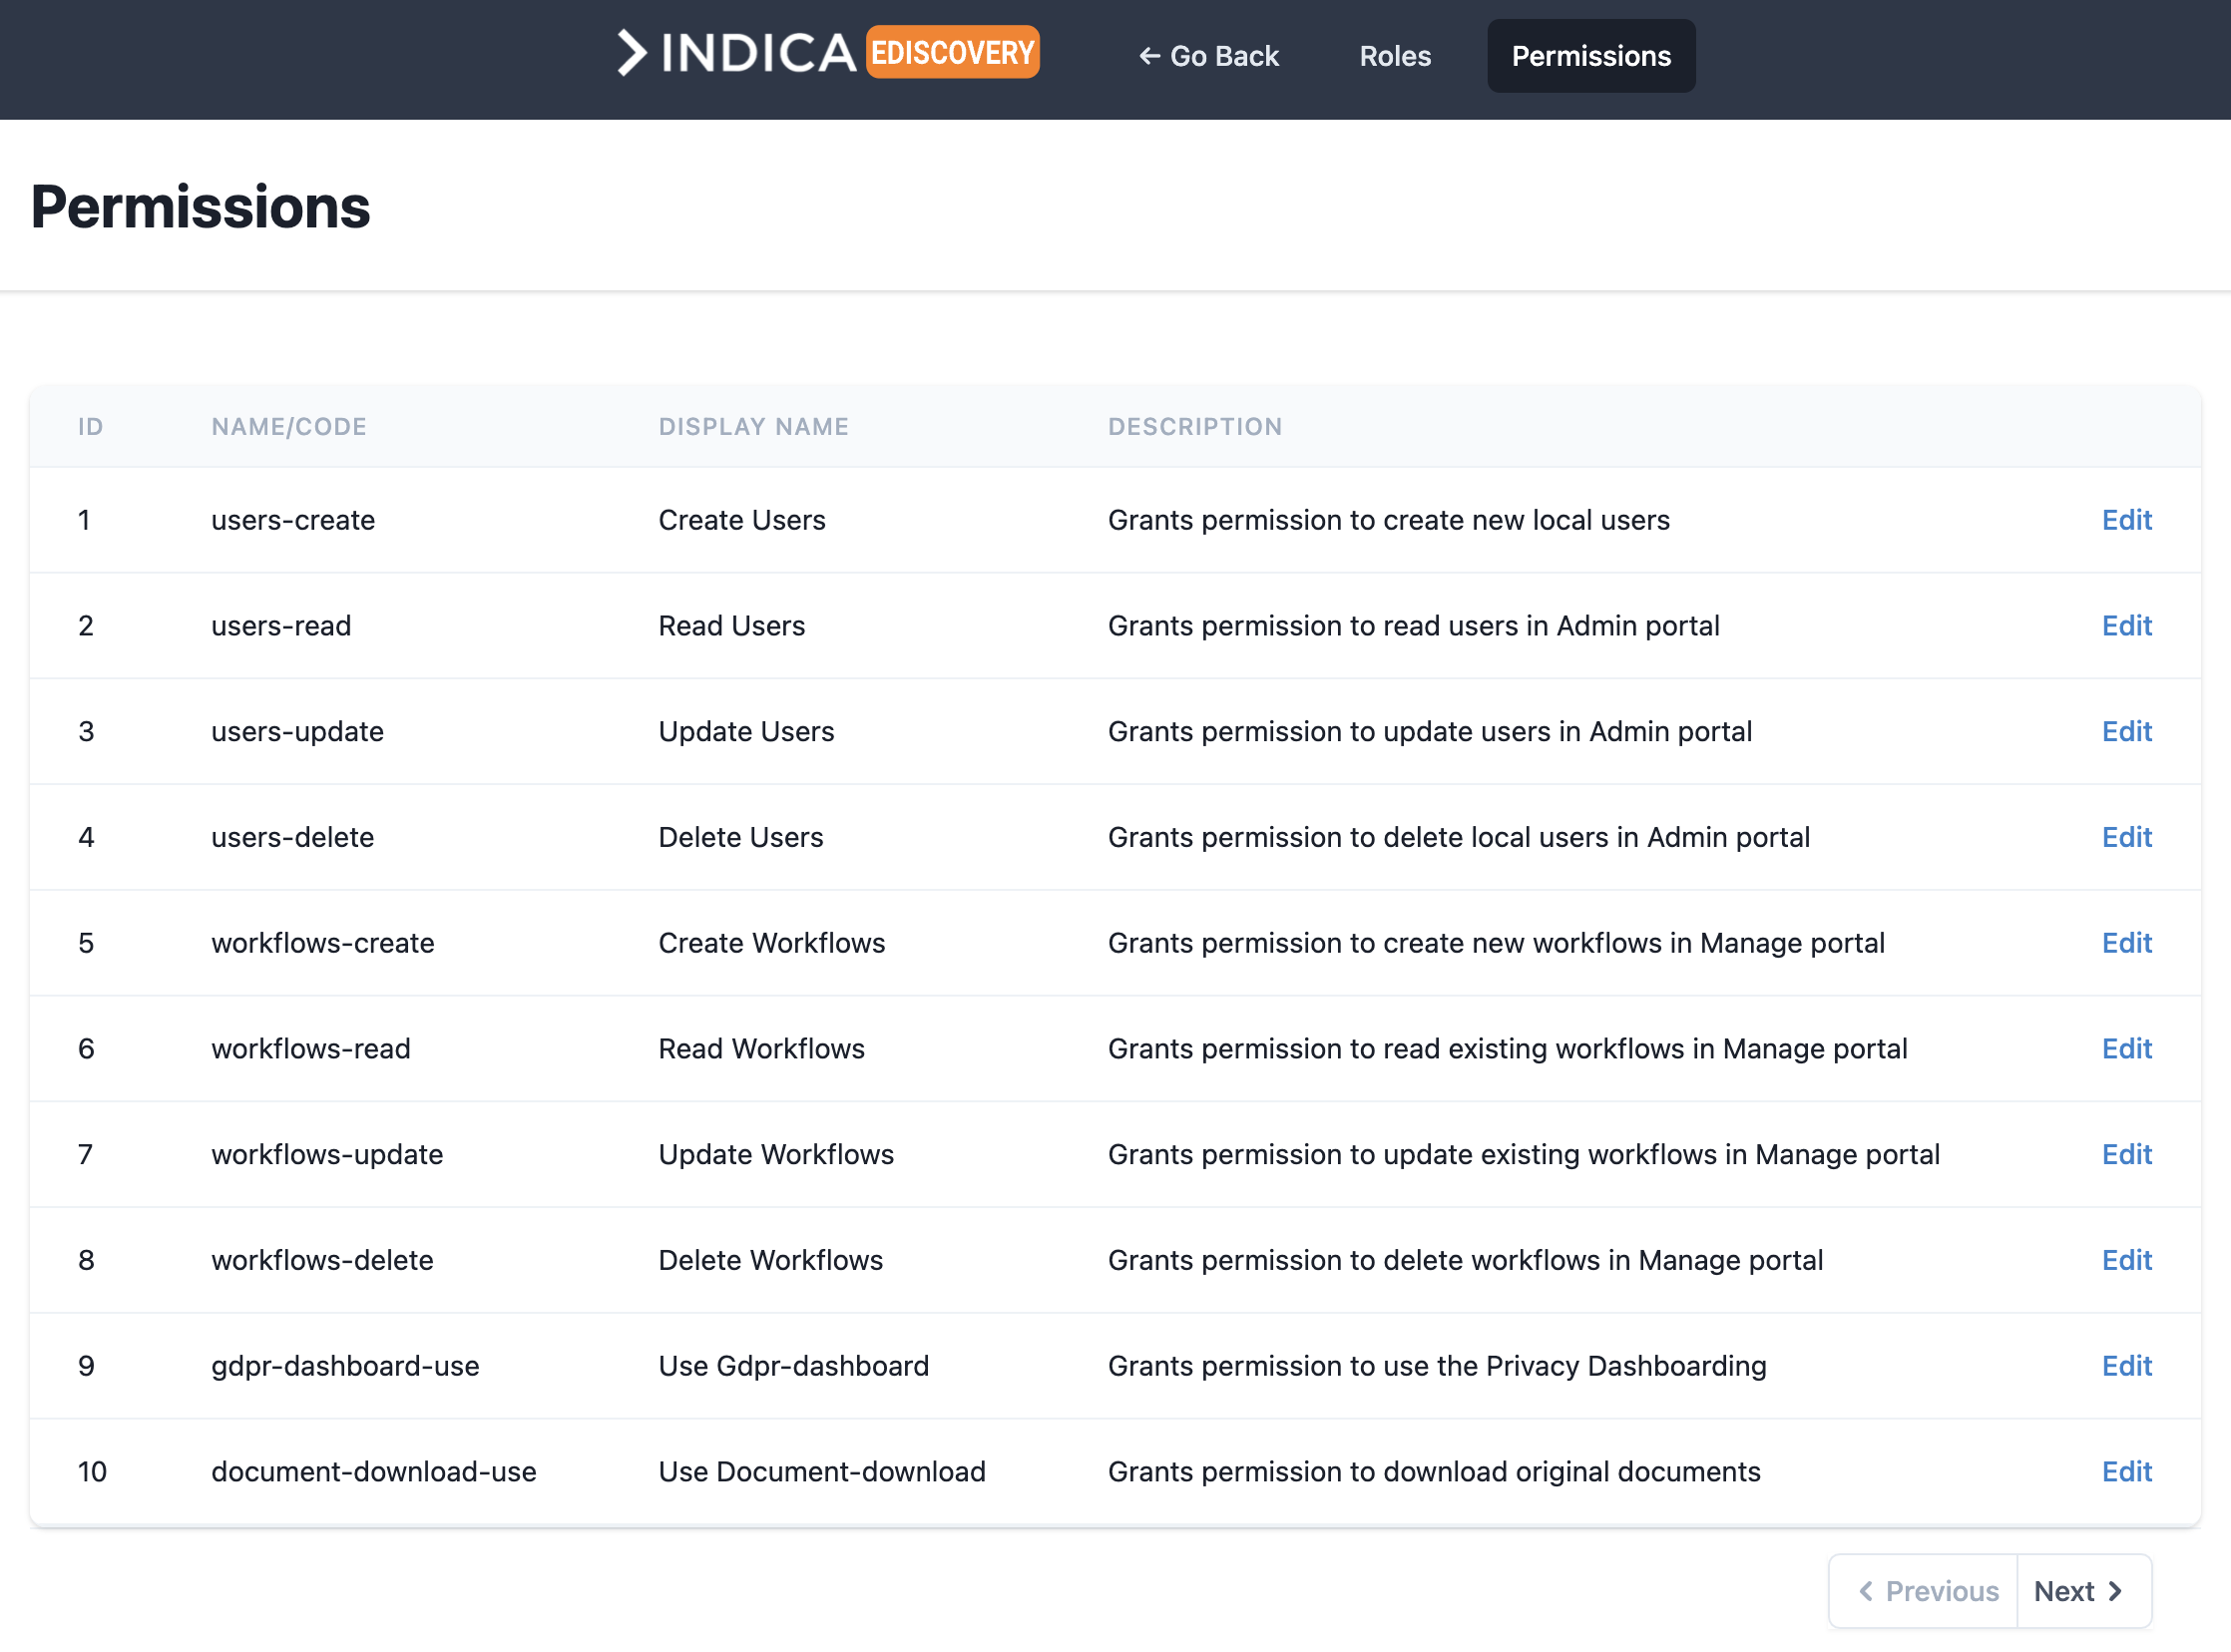
For a full list of all permissions, their description and which roles have which permission, please refer to the Default permissions matrix.
Note
Permissions cannot be deleted. They can be edited, but only the display name and the description can be changed.
Configuring Roles
Adding a new role
A new role can be created by clicking the “+ New Role” button on the “Roles” setup page. The following screen will open:
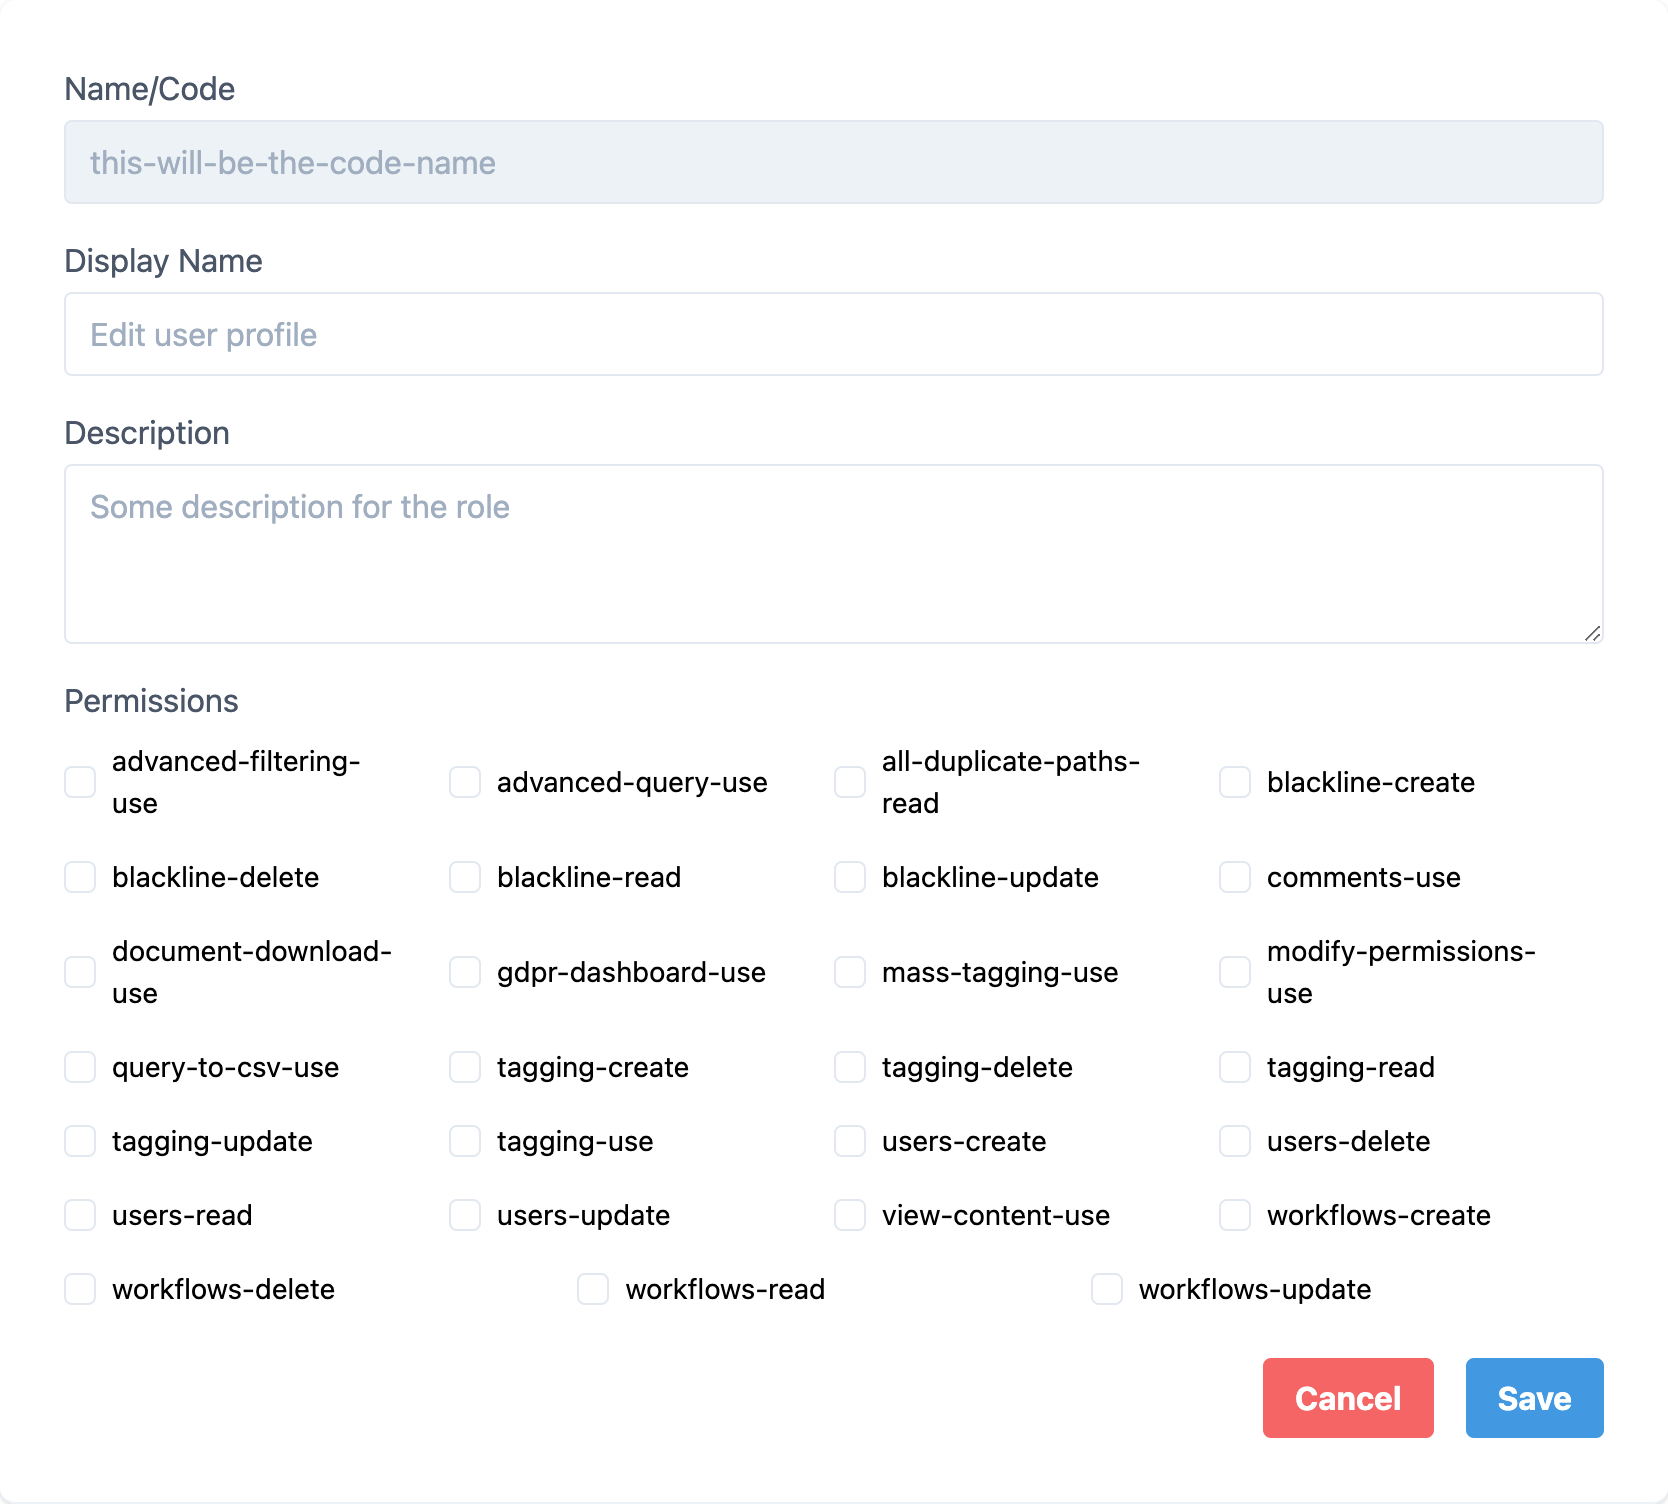
In this form, the following information is required:
- Name/Code
- Cannot be filled in by the user, will be generated based on the Display Name.
- Display Name
- Name of the role, for example “Basic User with advanced querying and filtering”.
- Description
- Description of this role, so they can be distinguished.
- Permissions
- Check the boxes for the required permissions.
Note
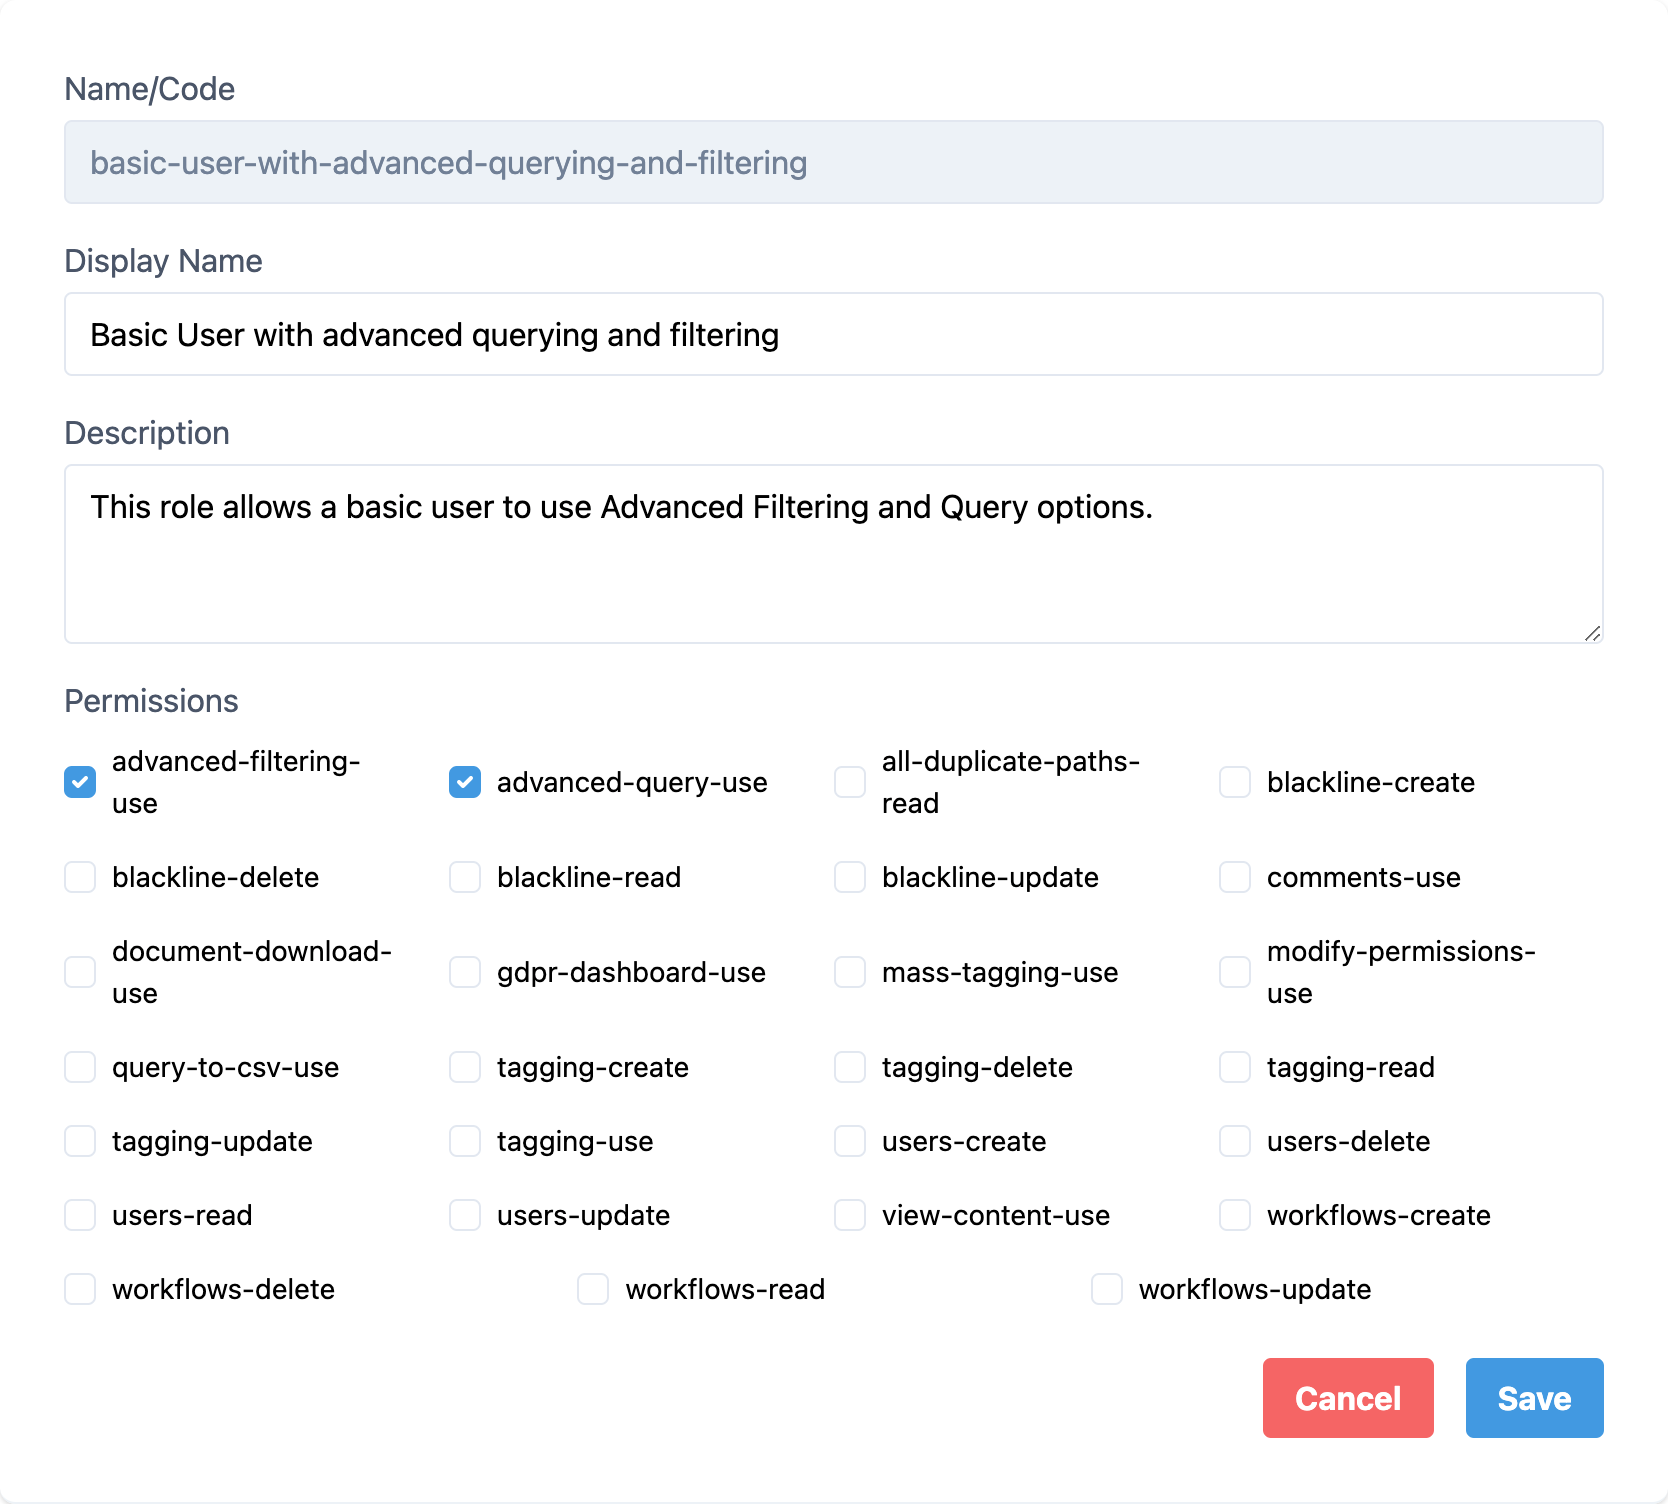
In this example, the new role is an extention of an already existing role. This means that if this new role is assigned to a user alongside the already existing role, the permissions of both roles will be combined. This makes it unnecessary to select all permissions while setting up this new role. The best course of action will be to select the extra permissions and assign both roles to the user(s). However, it is also possible to add the permissions of the “Basic User” role to this role as well, and only assign this role to the user(s).
Once all information is entered, it will look like the following image:
Once done, click “Save” to save your new role. It should now be displayed in the overview. This role can now be assigned to user(s).
Editing an existing role
To edit an existing role, click the “Edit” option. The following page will be displayed:
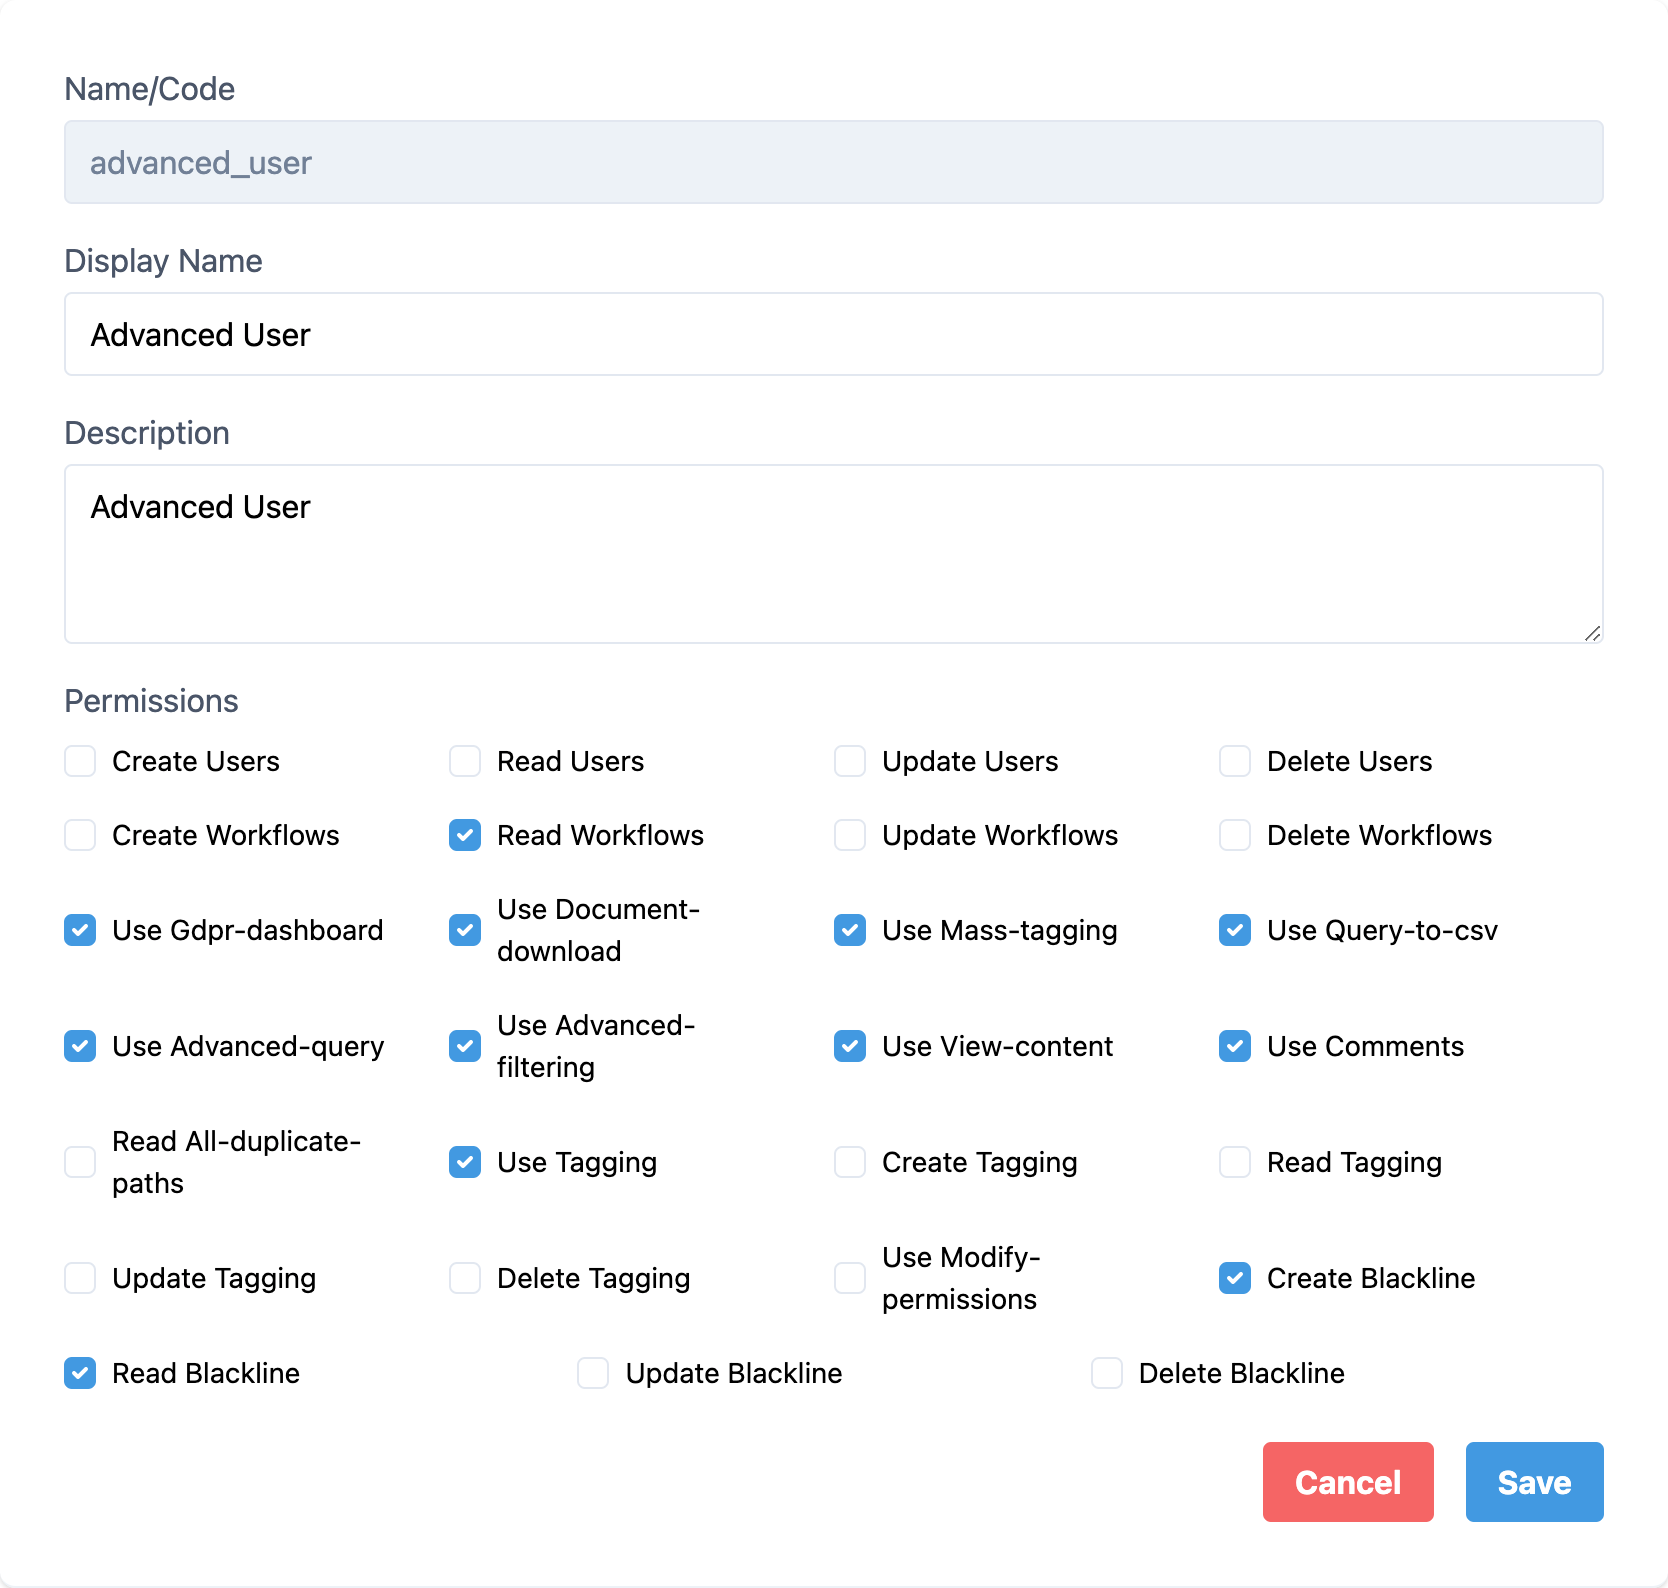
Simply make the edits needed, and click “Save” to save the changes.
Note
The system will immediately recognise the changes and assign the changed permissions to the users that have this role assigned. In some situations it may be necessary to sign out and sign back in for the changes to take effect.
Deleting an existing role
To delete an existing role, click the “Delete” option. A confirmation prompt will open, asking you if you’re sure you want to delete this record. Click “OK” to delete this role.
Note
Deleting a role that is assigned to user(s) may have implications on the permissions of the user(s). It is advised to deattach the role before deleting it.
Default permissions matrix
This table shows the Authorisation Matrix of the default roles and permissions.
users-create |
Grants permission to create new local users |
Admin |
|---|---|---|
users-read |
Grants permission to read users in Admin portal |
Admin |
users-update |
Grants permission to update users in Admin portal |
Admin |
users-delete |
Grants permission to delete local users in Admin portal |
Admin |
workflows-create |
Grants permission to create new workflows in Manage portal |
Admin |
workflows-read |
Grants permission to read existing workflows in Manage portal |
Admin |
workflows-update |
Grants permission to update existing workflows in Manage portal |
Admin |
workflows-delete |
Grants permission to delete workflows in Manage portal |
Admin |
workflow-report-use |
Grants permission to use the navbar item in the Manage portal |
Admin |
privacy-dashboard-use |
Grants permission to use the Privacy Dashboarding |
Admin |
document-download-use |
Grants permission to download original documents |
Admin |
document-history-download-use |
Grants permission to download the history of actions taking on a document |
Admin |
document-pages-delete |
Grants permission to delete pages from documents |
Admin |
document-name-change |
Grants permission to change document names |
Admin |
document-date-change |
Grants permission to change document dates |
Admin |
mass-tagging-use |
Grants permission to use tagging in batches by query and page |
Admin |
query-to-csv-use |
Grants permission to export query results to CSV file |
Admin |
advanced-query-use |
Grants permission to use the Advanced Query Builder |
Admin |
advanced-filtering-use |
Grants permission to use Advanced Filtering |
Admin |
search-visuals-use |
Grant permission to use Search Visuals |
Admin |
saved-queries-use |
Grant permission to use Saved Queries |
Admin |
saved-queries-create |
Grants permission to create Saved Queries |
Admin |
saved-queries-read |
Grants permission to view Saved Queries |
Admin |
saved-queries-update |
Grants permission to update Saved Queries |
Admin |
saved-queries-delete |
Grants permission to delete Saved Queries |
Admin |
exact-match-search-use |
Grants permission to use Exact Match Search |
Admin |
timeline-use |
Grants permission to use timeline |
Admin |
view-content-use |
Grants permission to view document content |
Admin |
comments-use |
Grants permission to create, read, update and delete comments on documents |
Admin |
all-duplicate-paths-read |
Grants permission to view all paths of a document with duplicates |
Admin |
tagging-use |
Grants permission to use the tagging functionality |
Admin |
tagging-create |
Grants permission to create new tags in Manage portal |
Admin |
tagging-update |
Grants permission to update existing tags in Manage portal |
Admin |
tagging-read |
Grants permission to view existing tags in Manage portal |
Admin |
tagging-delete |
Grants permission to delete tags in Manage portal |
Admin |
modify-permissions-use |
Grants permission to modify Roles & Permissions |
Admin |
redact-create |
Grants permission to redact documents |
Admin |
redact-read |
Grants permission to view redacted documents |
Admin |
redact-update |
Grants permission to update already redacted documents |
Admin |
redact-delete |
Grants permission to remove redacted documents |
Admin |
redact-generate-names-use |
Allows user to run name generation script for autoredacting |
Admin |
redact-settings-use |
Allows user to change redact settings on the landing page |
Admin |
report-builder-use |
Allows access to report builder in manage and case admin |
Admin |
reports-create |
Create reports and templates, do their exports |
Admin |
reports-update |
Update reports |
Admin |
reports-read |
View reports |
Admin |
reports-delete |
Delete reports and report templates |
Admin |
path-select-use |
Grants permission to use path selector on sidebar searchpage |
Admin |
datatabs-use |
Grants permission to use datatabs |
Admin |
sort-selection-use |
Grants permission to use button Set selection to sort |
Admin |
document-analyse-use |
Grants permission to analyse documents in previewer |
Admin |
previewer-breadcrumbs-use |
Grants permission to use breadcrumbs in previewer |
Admin |
original-tab-use |
Grants permission to use the original tab in the previewer |
Admin |
plain-tab-use |
Grants permission to use the plain text tab in the previewer |
Admin |
concept-tab-use |
Grants permission to use the concept tab in the previewer (only available for appliances where the redacting module is enabled) |
Admin |
redacted-tab-use |
Grants permission to use the redacted tab in the previewer |
Admin |
meta-tab-use |
Grants permission to use the meta tab in the previewer |
Admin |
exif-tab-use |
Grants permission to use the exif tab in the previewer |
Admin |
comments-tab-use |
Grants permission to use the comments tab in the previewer |
Admin |
datalineage-tab-use |
Grants permission to use the data lineage tab in the previewer |
Admin |
history-tab-use |
Grants permission to use the document history tab in the previewer |
Admin |
switch-table-list-use |
Grants permission to switch between table and list view of the search results |
Admin |
flip-table-use |
Grants permission to flip the table view vertically. Only works when switch-table-list-use is enabled. |
Admin |
Select-table-columns-use |
Grants permission to select the columns that the table view shows. Only works when switch-table-list-use is enabled. |
Admin |
sortOn-score-use |
Grants permission to sort on relevance |
Admin |
sortOn-date-use |
Grants permission to sort on document date |
Admin |
sortOn-file_name_sort-use |
Grants permission to sort on document name |
Admin |
sortOn-size-use |
Grants permission to sort on document size |
Admin |
sortOn-privacyscore-use |
Grants permission to sort on privacy score |
Admin |
pagination-use |
Grants permission to use pagination and see number of documents found |
Admin |
total-size-use |
Grants permission to see total size of documents found |
Admin |
sidebar-use |
Grants permission to use sidebar |
Admin |
specific-search-use |
Grants permission to search through specific fields in the index |
Admin |
nav-manage-use |
Grants permission to go to the Manage portal |
Admin |
nav-manage-settings-use |
Grants permission to use the navbar item in the manage portal: Settings |
Admin |
nav-manage-settings-general-use |
Grants permission to use the navbar item in the manage portal: Settings > General |
Admin |
nav-manage-settings-display-use |
Grants permission to use the navbar item in the manage portal: Settings > Display |
Admin |
nav-manage-settings-search-use |
Grants permission to use the navbar item in the manage portal: Settings > Search |
Admin |
nav-manage-settings-redact-use |
Grants permission to use the navbar item in the manage portal: Settings > Redact |
Admin |
nav-manage-settings-api-use |
Grants permission to use the navbar item in the manage portal: Settings > API |
Admin |
nav-manage-settings-privacy-use |
Grants permission to use the navbar item in the manage portal: Settings > Privacy |
Admin |
nav-manage-settings-classification-use |
Grants permission to use the navbar item in the manage portal: Settings > Classification |
Admin |
nav-manage-settings-lookandfeel-use |
Grants permission to use the navbar item in the manage portal: Settings > Look and Feel |
Admin |
nav-manage-sources-use |
Grants permission to use the navbar item in the manage portal: Sources |
Admin |
nav-manage-sources-collections-use |
Grants permission to use the navbar item in the manage portal: Sources > Collections |
Admin |
nav-manage-sources-datatabs-use |
Grants permission to use the navbar item in the manage portal: Sources > Datatabs |
Admin |
nav-manage-sources-email-use |
Grants permission to use the navbar item in the manage portal: Sources > Email |
Admin |
nav-manage-sources-fileshares-use |
Grants permission to use the navbar item in the manage portal: Sources > Fileshares |
Admin |
nav-manage-sources-local-use |
Grants permission to use the navbar item in the manage portal: Sources > Local |
Admin |
nav-manage-sources-queries-use |
Grants permission to use the navbar item in the manage portal: Sources > Queries |
Admin |
nav-manage-sources-s3 |
Grants permission to use the navbar item in the manage portal: Sources > S3 |
Admin |
nav-manage-sources-sites-use |
Grants permission to use the navbar item in the manage portal: Sources > Sites |
Admin |
nav-manage-sources-sharepoint-use |
Grants permission to use the navbar item in the manage portal: Sources > Sharepoint |
Admin |
nav-manage-sources-fileupload-use |
Grants permission to use the navbar item in the manage portal: Sources > File Upload |
Admin |
nav-manage-process |
Grants permission to use the navbar item in the manage portal: Process |
Admin |
nav-manage-process-automations-use |
Grants permission to use the navbar item in the manage portal: Process > Automations |
Admin |
nav-manage-process-tags-use |
Grants permission to use the navbar item in the manage portal: Process > Tags |
Admin |
nav-manage-process-filters-use |
Grants permission to use the navbar item in the manage portal: Process > Filters |
Admin |
nav-manage-process-savedqueries-use |
Grants permission to use the navbar item in the manage portal: Process > Saved Queries |
Admin |
nav-manage-process-workflows-use |
Grants permission to use the navbar item in the manage portal: Process > Workflows |
Admin |
nav-manage-process-export-use |
Grants permission to use the navbar item in the manage portal: Process > Export |
Admin |
nav-manage-process-pstcounts-use |
Grants permission to use the navbar item in the manage portal: Process > PST Counts |
Admin |
nav-manage-process-reindex-use |
Grants permission to use the navbar item in the manage portal: Process > Reindex |
Admin |
nav-manage-process-metadata-use |
Grants permission to use the navbar item in the manage portal: Process > Metadata |
Admin |
nav-manage-process-inventory-use |
Grants permission to use the navbar item in the manage portal: Process > Inventory |
Admin |
nav-manage-auditing-use |
Grants permission to use the navbar item in the manage portal: Process > Auditing |
Admin |
nav-manage-auditing-logreport-use |
Grants permission to use the navbar item in the manage portal: Auditing > Log Report |
Admin |
nav-manage-auditing-tagaudit-use |
Grants permission to use the navbar item in the manage portal: Auditing > Tag Audit |
Admin |
nav-manage-reporting-use |
Grants permission to use the navbar item in the manage portal: Reporting |
Admin |
nav-manage-reporting-mailreport-use |
Grants permission to use the navbar item in the manage portal: Reporting > Mail Reports |
Admin |
nav-manage-reporting-overview-use |
Grants permission to use the navbar item in the manage portal: Reporting > Overview Reports |
Admin |
nav-manage-setup-use |
Grants permission to use the navbar item in the manage portal: Setup |
Admin |
manage-files-download |
Grants permission to download files available in the manage portal |
Admin |
manage-files-delete |
Grants permission to delete downloadable files in the manage portal |
Admin |
case-claim |
Grants permission to claim a case |
Admin |
case-unclaim |
Grants permission to unclaim a case |
Admin |
case-create |
Grants permission to create cases |
Admin |
case-update |
Grants permission to edit cases |
Admin |
case-delete |
Grants permission to remove cases |
Admin |
case-admin-dropdown-use |
Grants permission to use the context dropdown in Case Admin |
Admin |
case-overview-use |
Grants permission to see case overview in Case Admin. |
Admin |
case-archive-use |
Grants permission to make case archives and restore them |
Admin |
case-categories-use |
Grants permission to create case categories and subcategories |
Admin |
redact-lists-delete |
Grants permission to delete inclusion/exclusion redact lists |
Admin |
search-results-view |
Grants permission to view search results |
Admin |
Cases
Overview of the Case administration page. Here it’s possible to create, edit, archive and restore cases.
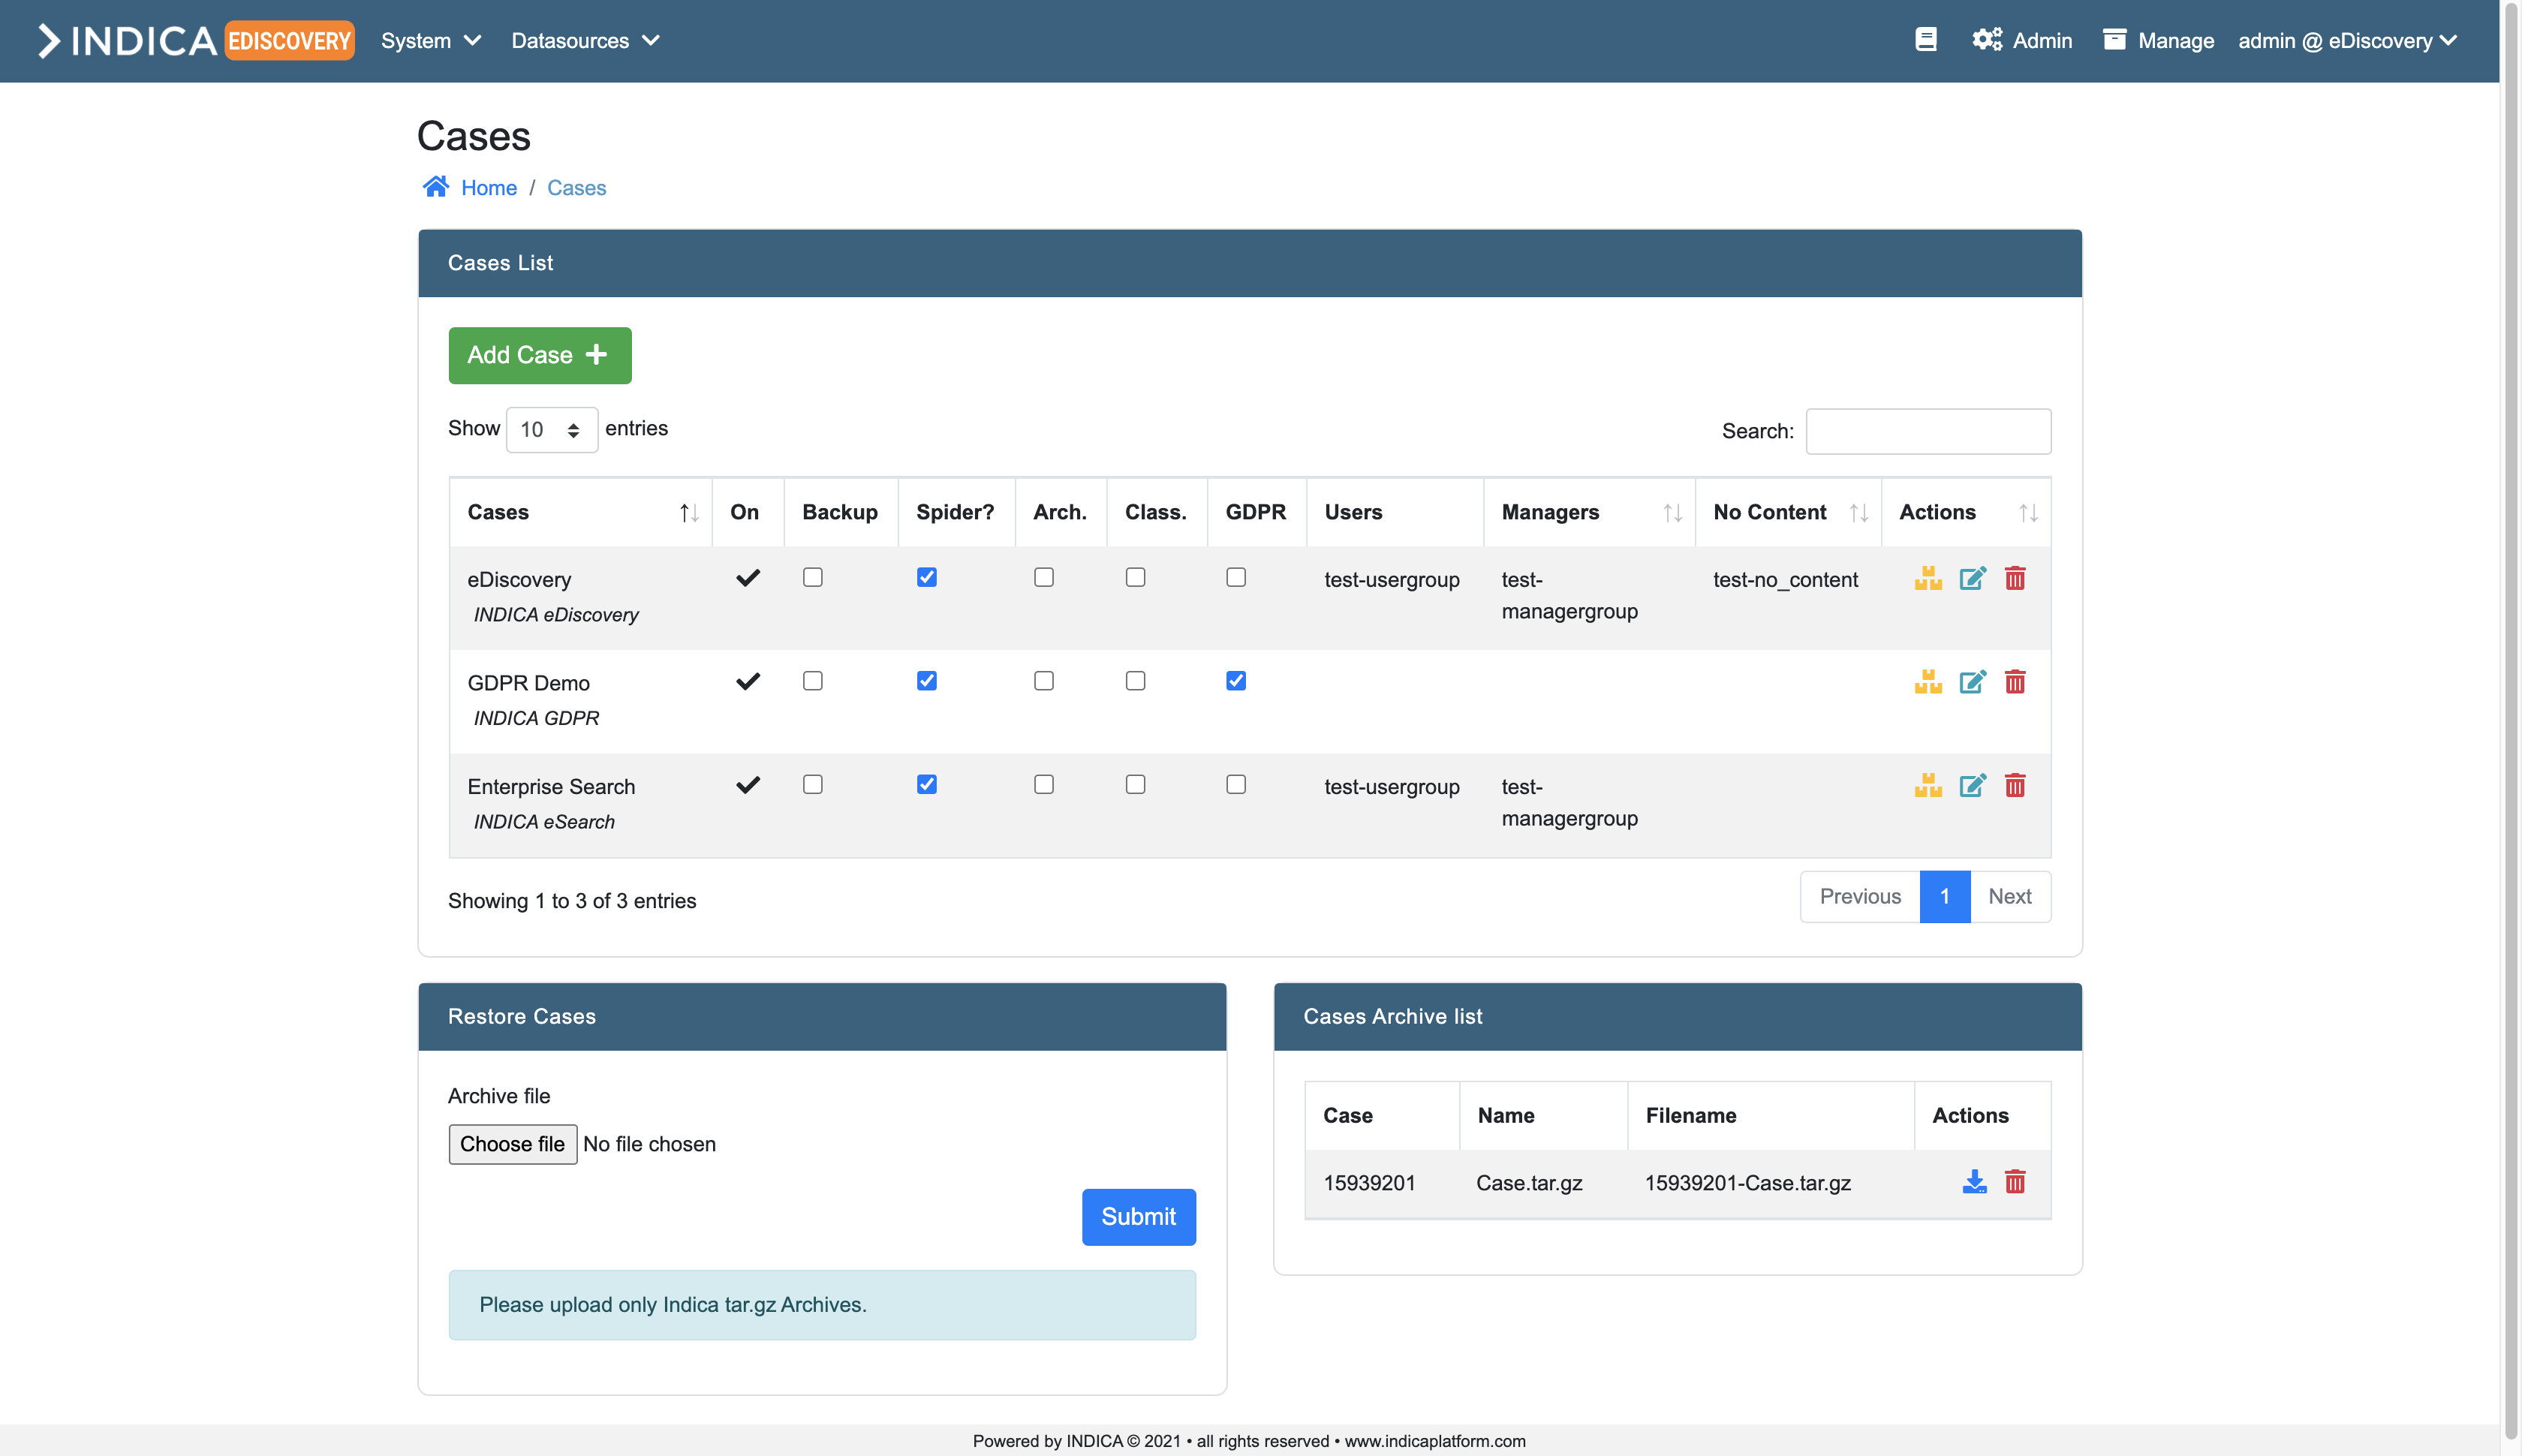
Cases List
The listview offers some settings and features. The checkboxes can be used to toggle functionality or settings on a case. The columns in the table are:
- On
Whether the case is enabled or not. This setting can be toggled on the “Edit Case” page.
- Backup
Whether the case will be backed up when backup settings are configured.
- Spider?
Enable or disable the spider for this case.
Caution
Do not disable the spider during indexing.
- Arch.
Whether the case is archived or not.
- Class.
Enable or disable the Classification Module.
- Privacy
Enable or disable the Privacy module.
- Users
Name of the Active Directory group to grant “User”-level access to this case.
- Managers
Name of the Active Directory group to grant “Manager”-level access to this case.
- Actions
Yellow boxes button: Click this button to archive the case.
Blue paper button: Edit this case.
- Red trashbin button: Delete this case.
Note
All but one case can be deleted. The system needs at least one running case.
Adding a case
From this page, it’s possible to create a new case on the appliance. Simply click the “Add Case” button. You can either create a case “manually”, meaning filling in the form yourself, or creating a case from a template. When creating a case manually, you will see the following form:
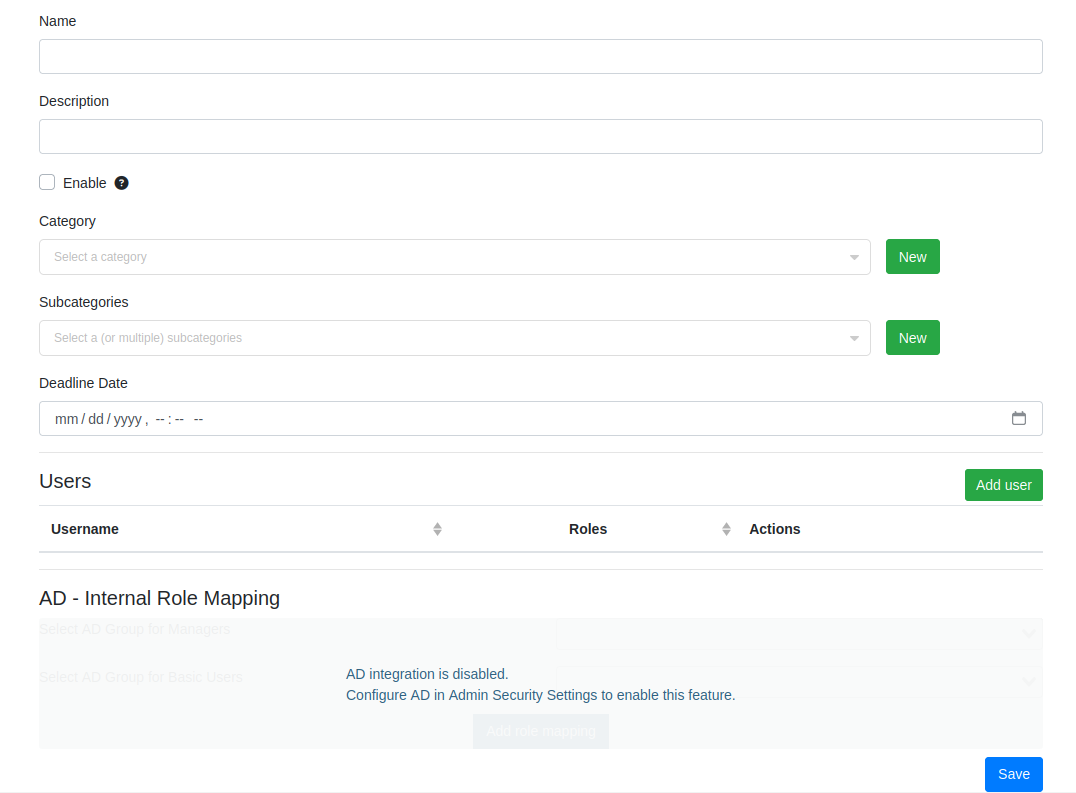
Here you can fill in the following details:
- Name
Name of the case.
- Description
Description of the case.
- Category (optional)
A category for the case. You can only assign one.
- Subcategory (optional)
Subcategories for the case. You can assign multiple.
- Deadline (optional)
A deadline for when the case needs to be completed/closed/etc.
- Enabled
Whether the case is enabled or not. If unchecked, the case will not show up for users and managers.
- AD Group for managers (Only available when AD integration is active and configured)
The Active Directory group that is used to grant users access to this case with “Manager”-level.
- AD Group for users (Only available when AD integration is active and configured)
The Active Directory group that is used to grant users access to this case with “User”-level.
- Extra role mappings (Only available when AD integration is active and configured)
This option allows you to map extra roles to AD groups. See `Mapping AD groups to roles`_.
Tip
If AD integration is not enabled, it is still possible to set up Roles and Permissions for users.
When all details are filled in, click the “Save” button. A new case will be created. This may take several seconds, depending on the size of the system and the amount of indexed data.
When creating a case through a template, the form looks almost the same except most of the fields are replaced with a file upload. You still need to provide a name and a description for the case, as well as any additional AD configuration. The rest can be configured into a template. You can either use a template formerly created with Import/Export Setup, or you can download an example from the file upload field and fill it in yourself.
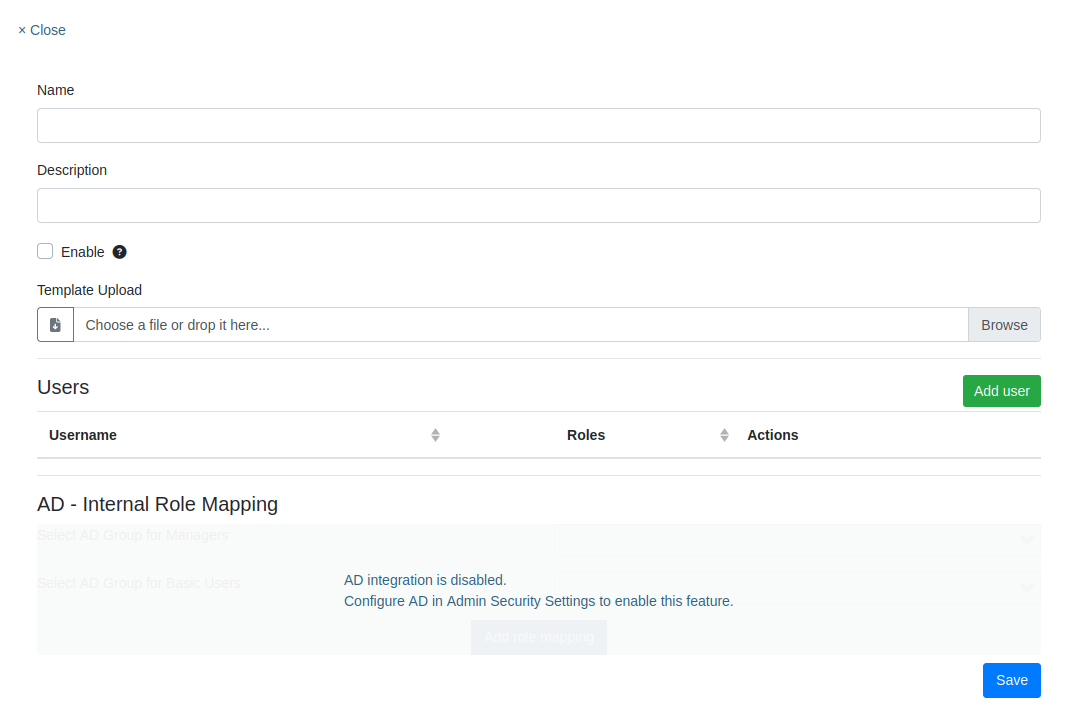
Setting User Roles
User roles can be set individually per case. Like so:
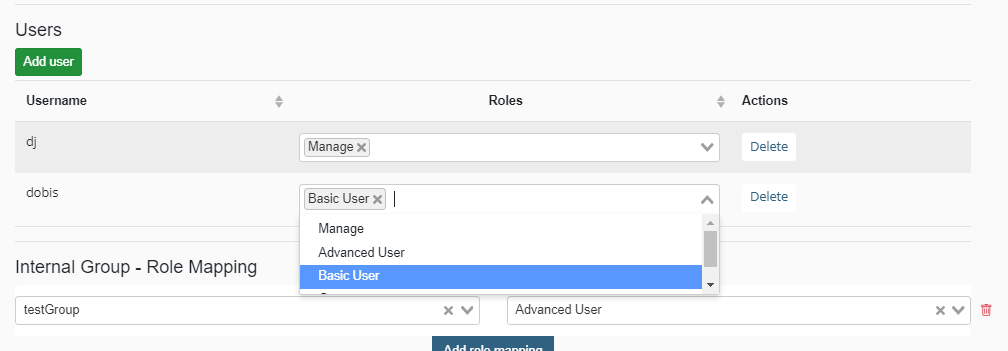
Users can be added by clicking “Add user” button. Users can be removed by clicking the “Remove” button.
Tip
If Internal/AD groups to roles Mapping is used and user has a group assigned that is mapped. Individual roles will be overwritten by the mapping.
Mapping Internal/AD groups to roles
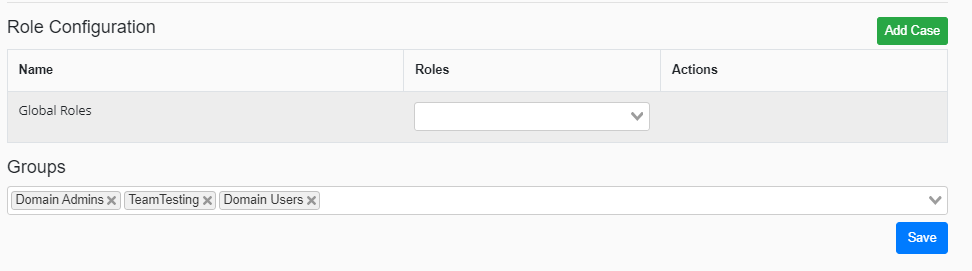
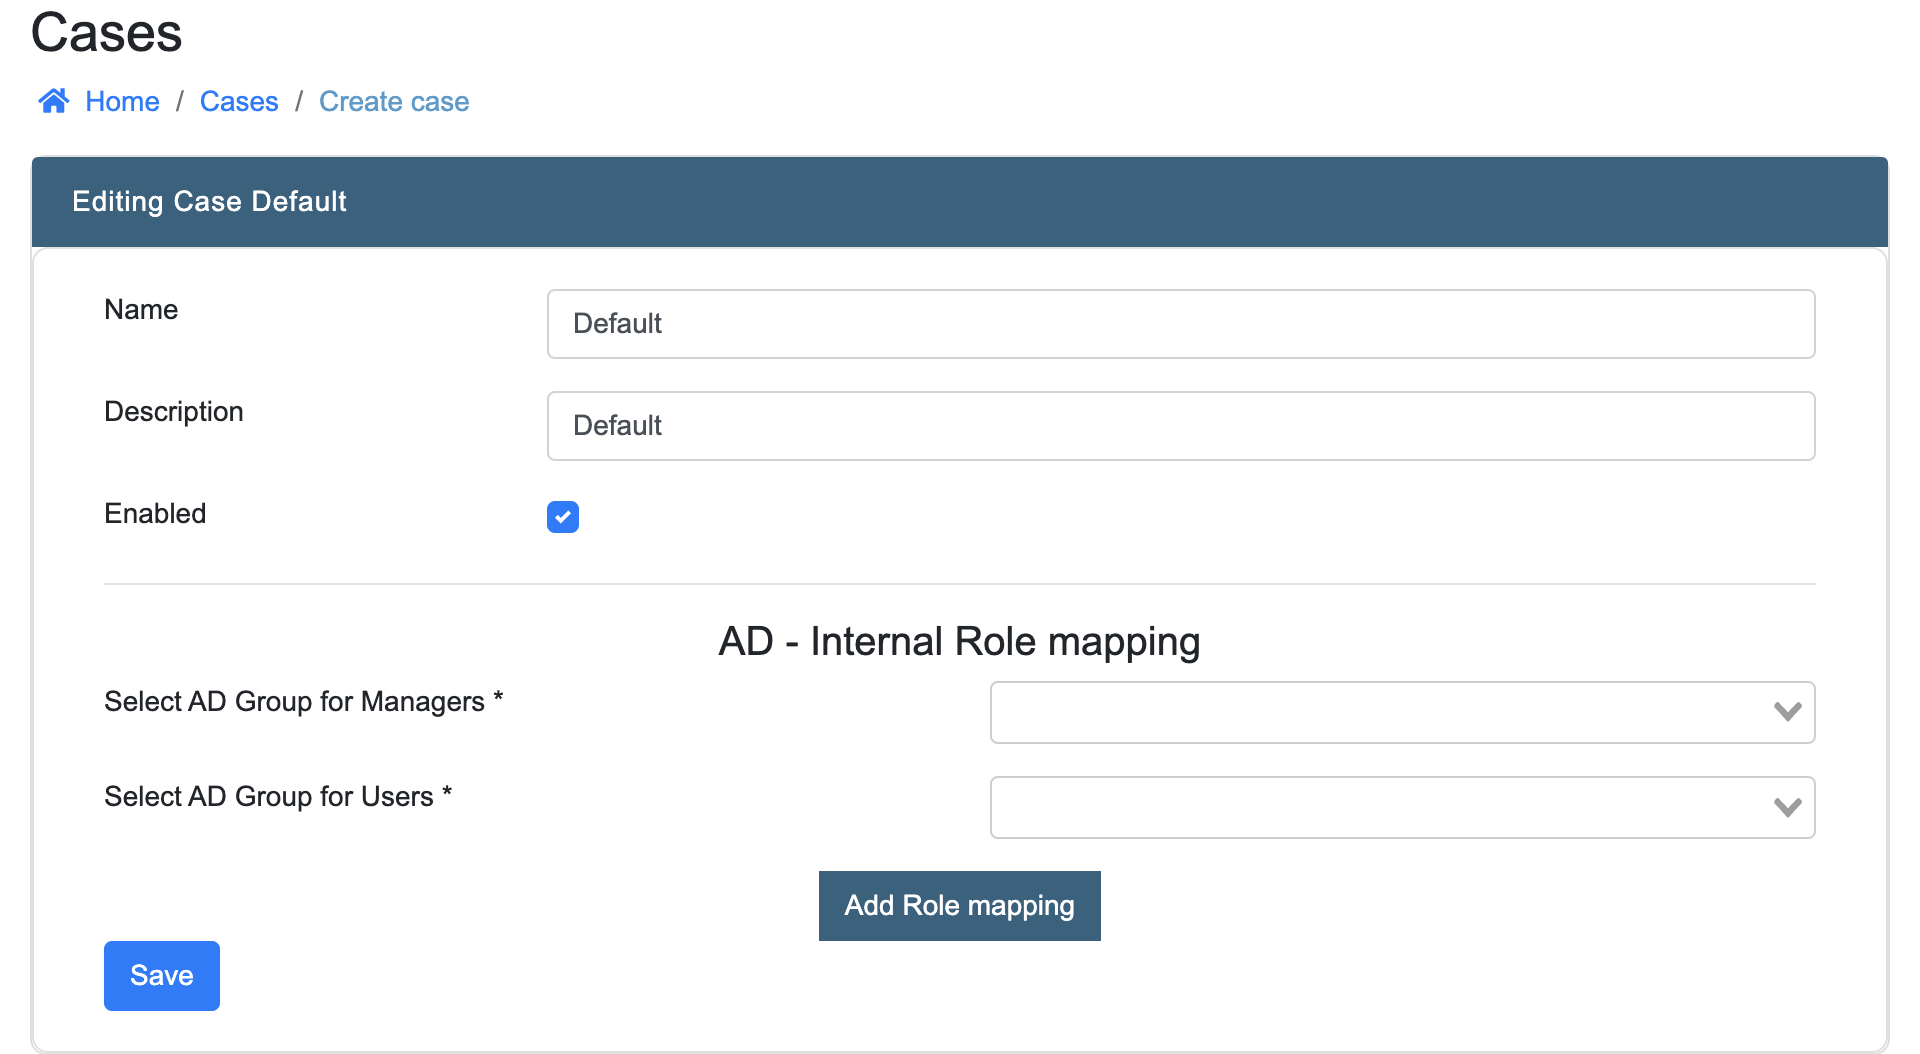
If more roles need to be connected to AD/internal groups, it is possible to map them. To do this, navigate to the Case settings page and edit the case in question.
It can also be setup during the creation of a new case.
You will see the following:
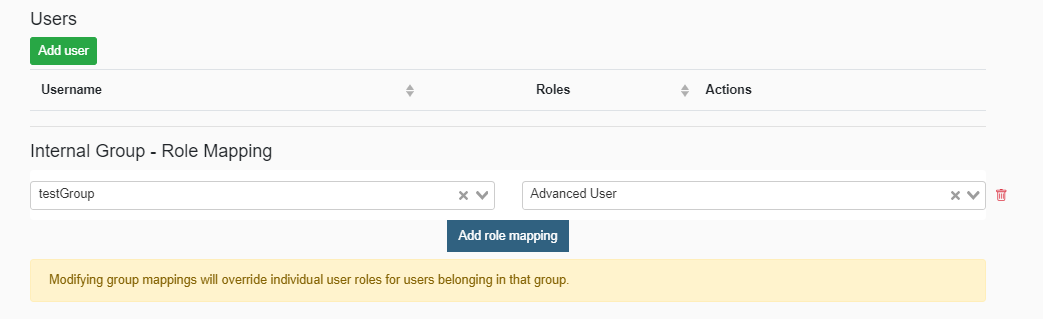
In this line, select the desired group on the left side and the corresponding AD role on the right side. This step can be repeated for every role that needs an AD mapping. Mappings can also be removed by clicking the red trashbin icon on the right side of the row.
When done, click “Save” to store the settings.
Editing a case
To edit a case, navigate to the “Cases List” and click the blue paper icon in the “Actions” Column. The following page will open:
From here, it’s possible to edit the case. See “Adding a case” for details about the fields. Click “Save Changes” when the desired changes have been made.
This page also shows the users that have access to this case and the created collections in this case.
Archiving a case
To archive a case, navigate to the “Cases List” and click the yellow boxes icon in the “Actions” column. INDICA will now automatically archive this case. The case will be disabled and cannot be accessed anymore.
When the archiving is done, the case will be displayed in the “Cases Archive list”.
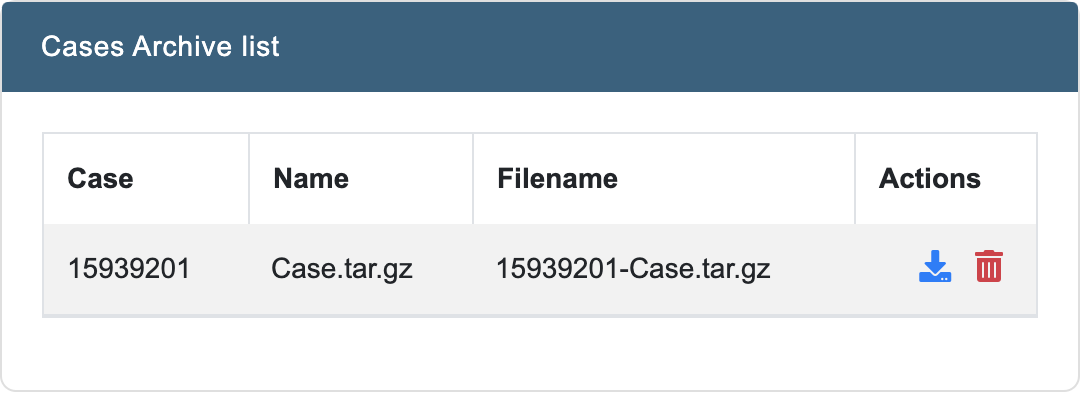
Note
This list displayes the archived cases by their Case ID as this is unique for every case.
From this list, the archived case can be downloaded in a .tar.gz format. The downloaded file will contain everything that is needed to later restore the case.
If the archived case is no longer needed, it can be deleted by clicking the red trashbin icon.
Caution
This action is irreversible and the data is lost permanently.
Restoring an archived case
INDICA offers the possibility to restore a previously archived case. To do this, navigate to the “Cases List” page. Here a section is shown where you can upload INDICA .tar.gz files.
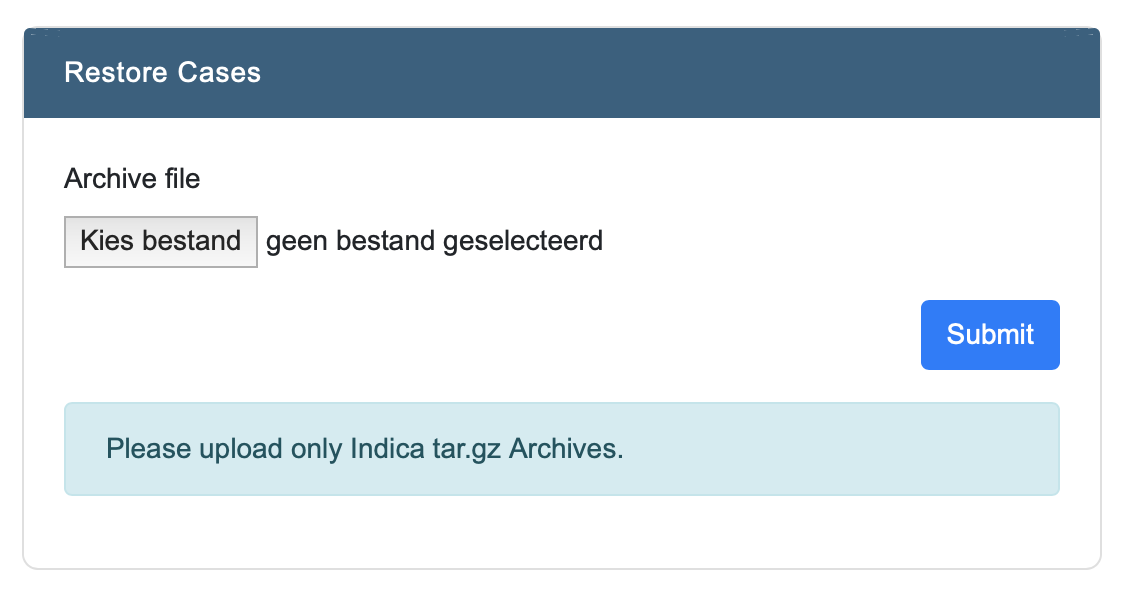
Click the “Choose File” button to select the .tar.gz archive. After choosing the correct file, the upload will start. When the upload is done, click the “Submit” button to restore the case from the archive. The case will now be restored and displayed in the “Cases List”.
Deleting a case
Deleting a case is done from the “Cases List” page. In the “Actions” column, a red trashbin icon is displayed. When that icon is clicked, a confirmation box will pop up. This is to prohibit accidental deletion.
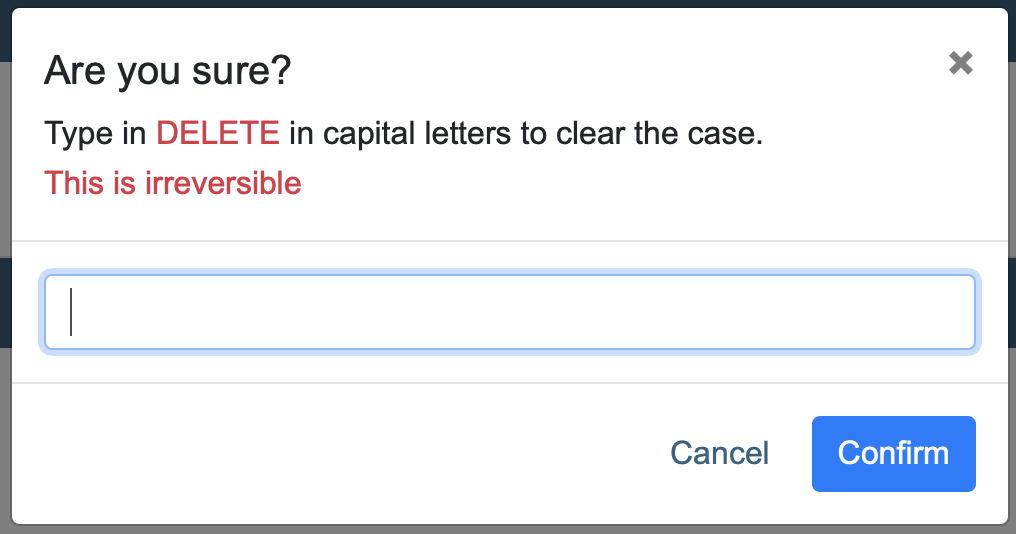
Caution
Deletion of a case is permanent and irreversible. This action cannot be undone.
There must always be one case in the system. The last case cannot be deleted.
Networking
Overview of the Networking page.
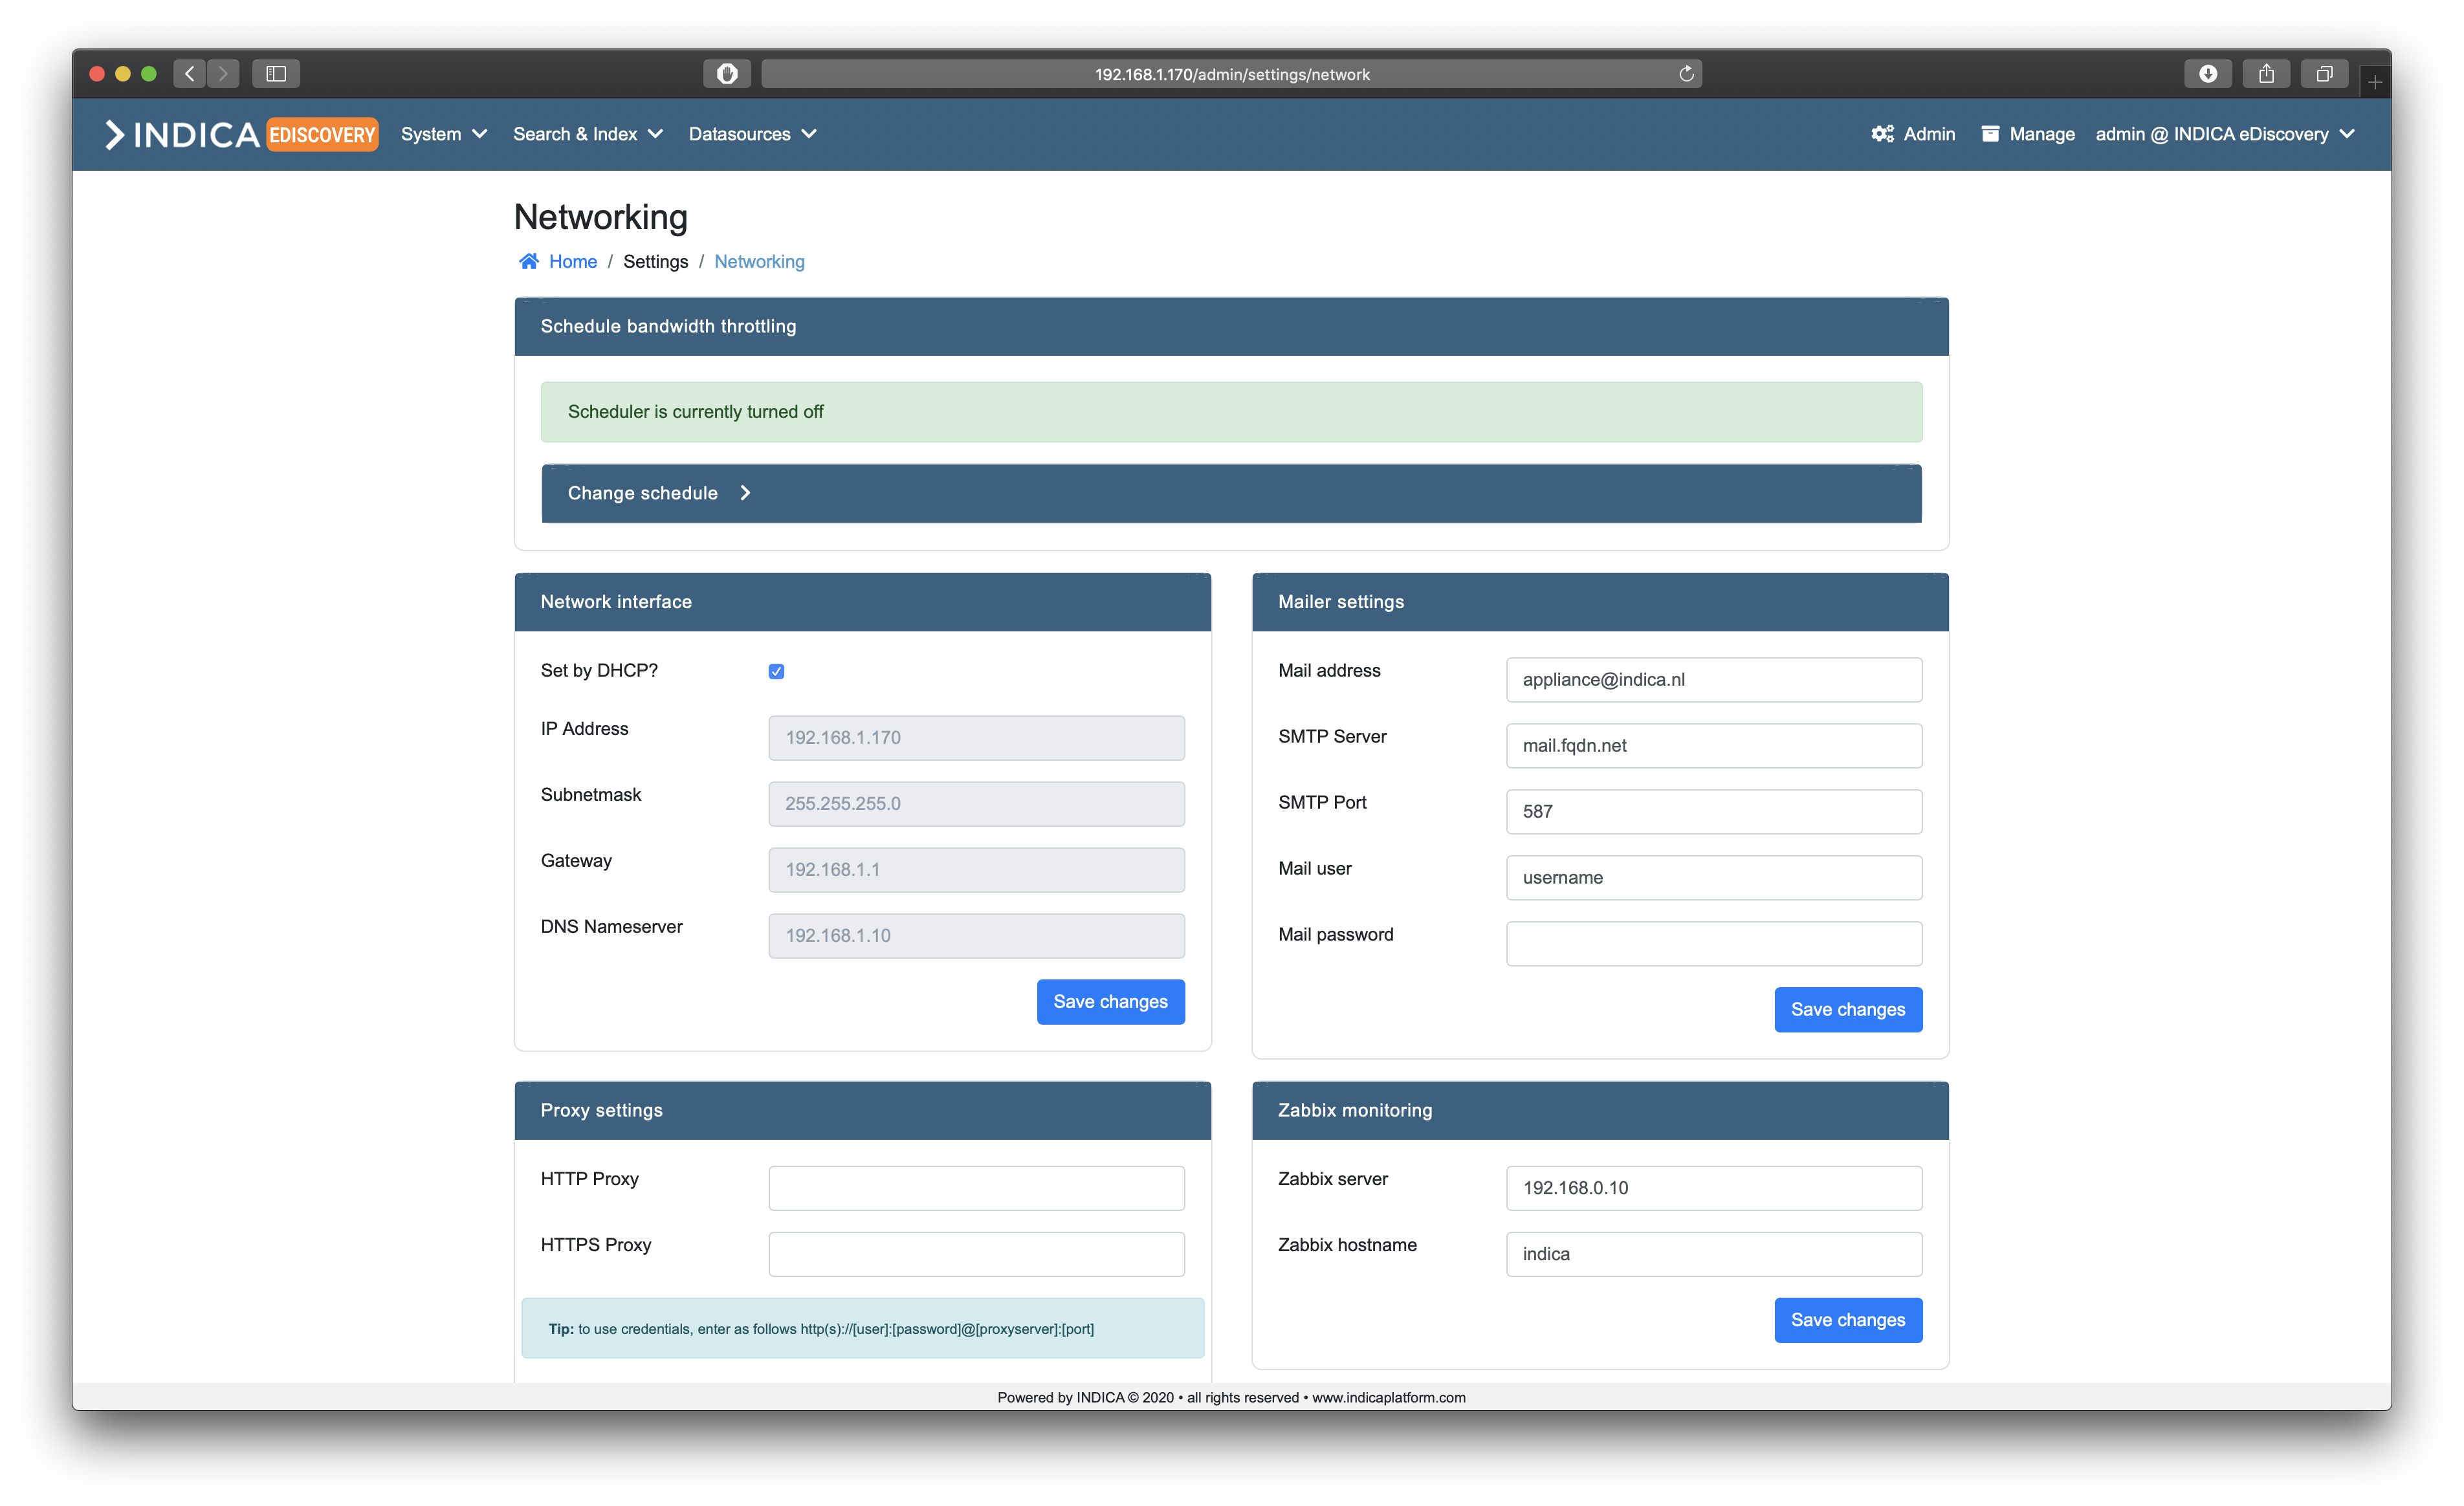
On this page, several settings regarding networking can be configured:
- Schedule bandwith throttling
Schedule how much bandwith the INDICA appliance may use at certain times/days.
- Network interface
Basic settings for configuring the network interface
- Mailer settings
Connect INDICA to a mail server so it can send out notifications
- Proxy settings
Configure a proxy server
- Zabbix monitoring
Configure zabbix monitoring
- SSL Settings
Configure a Secure Socket Layer certificate for the web front-end.
Schedule bandwith throttling
While indexing, the INDICA appliance can take up quite a bit of network bandwith. To make sure that the infrastructure will not be overloaded, you can schedule the maximum allowed bandwith to be used by the INDICA appliance.

There are two options for scheduling:
- Daily Schedule
This schedule will apply every day. It allows you to set a throttle start time and stop time, and the maximum Mbps it may use.
- Custom Schedule
This schedule allows you to select the days. It allows you to set a throttle start time and stop time, and the maximum Mbps it may use.
Setting a daily schedule
First, click the “Change schedule” button. You will be presented with the following options:
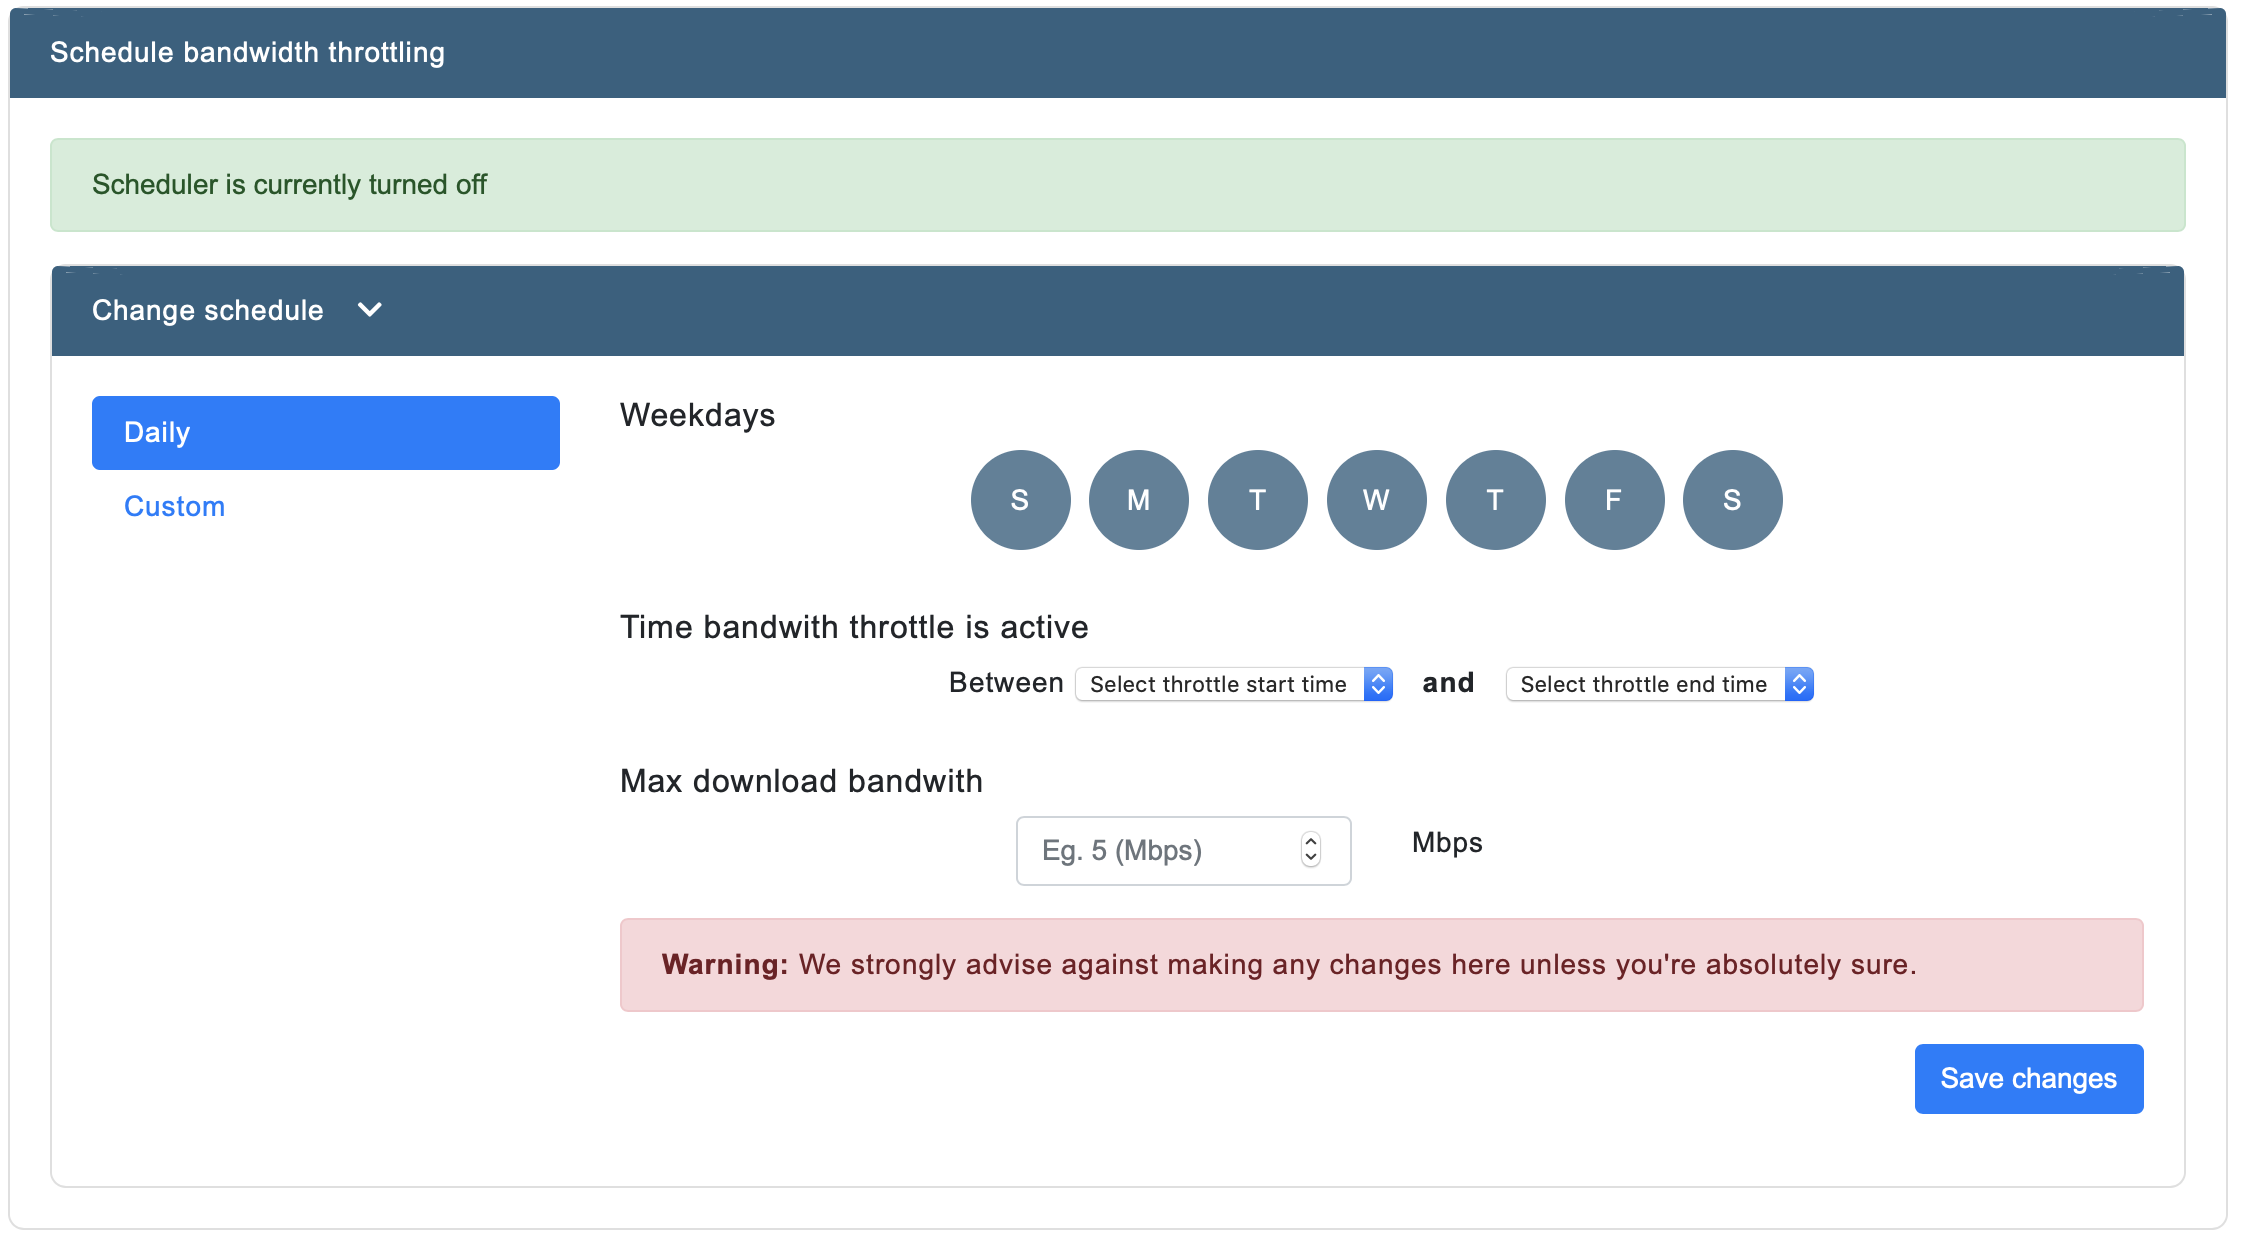
Then, pick a time for the throttle to start and to stop. Lastly, enter a value for the maximum Mbps the appliance may use.
Click “Save changes” to apply the schedule. The schedule should now be active.
Setting a custom schedule
First, click the “Change schedule” button. You will be presented with the following options:
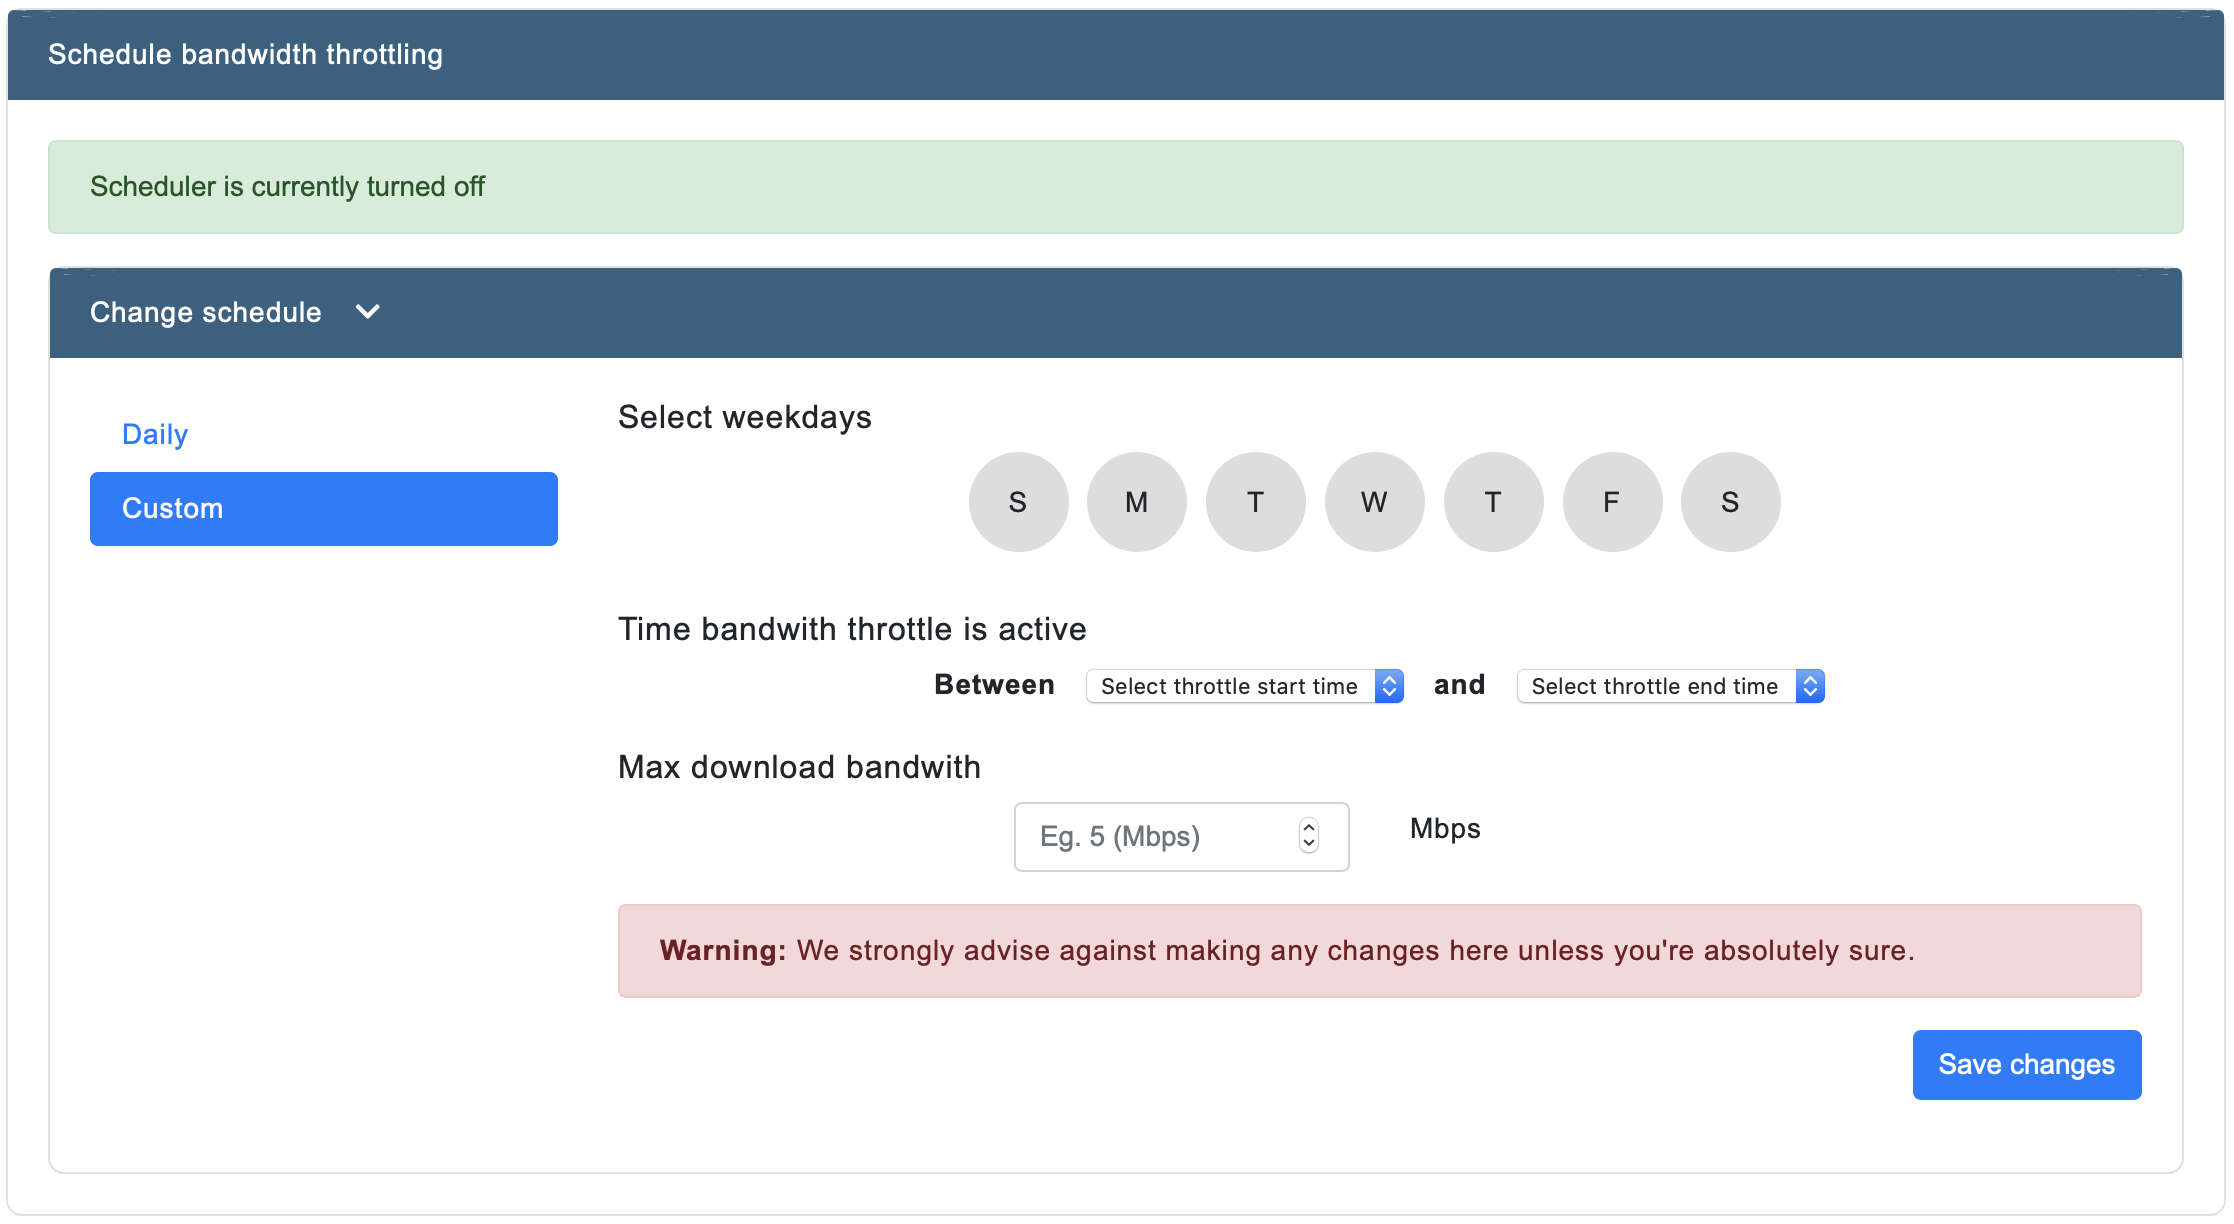
Now click the days you want the schedule to be active. Then, pick a time for the throttle to start and to stop. Lastly, enter a value for the maximum Mbps the appliance may use.
Click “Save changes” to apply the schedule. The schedule should now be active.
Network interface
In most cases, the network will be configured by DHCP. In case that is not true in your setup, this panel allows you to set the correct network settings.
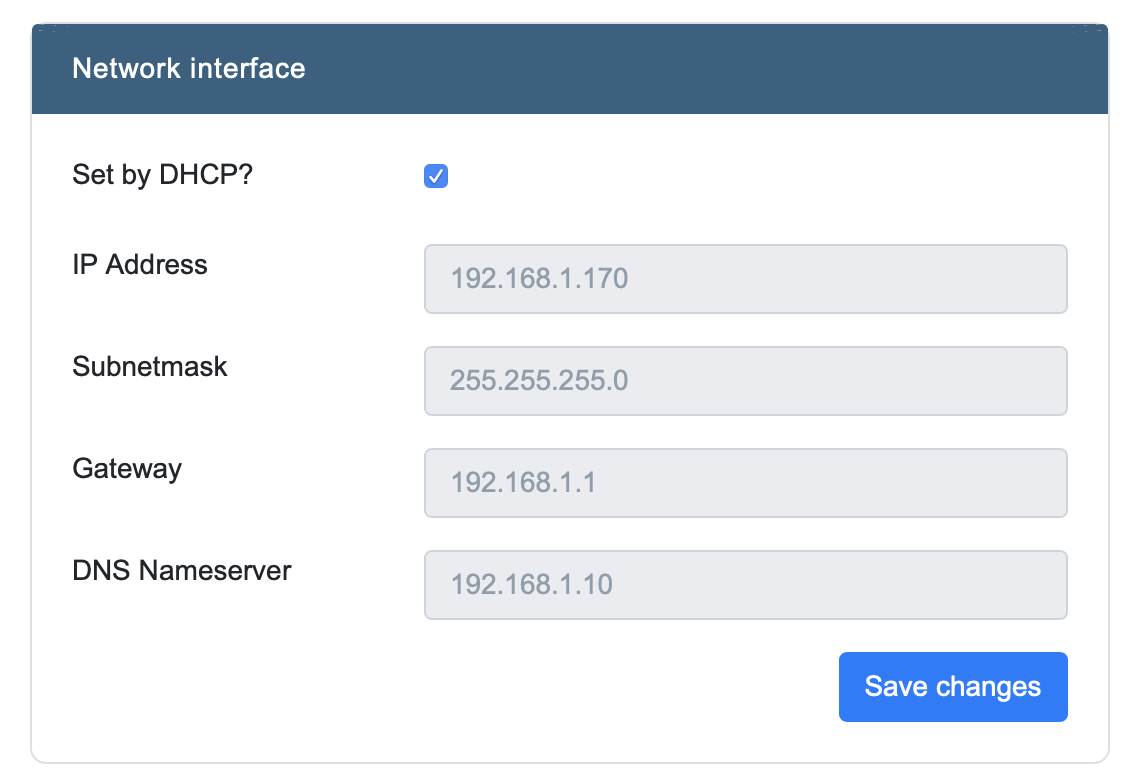
Here you can configure the following settings:
IP address
Subnetmask
Gateway
DNS Nameserver
Note
When the checkbox “Set by DHCP?” is checked, these settings cannot be changed.
Mailer settings
Here you can configure INDICA to connect to a mail server so it can send out emails.
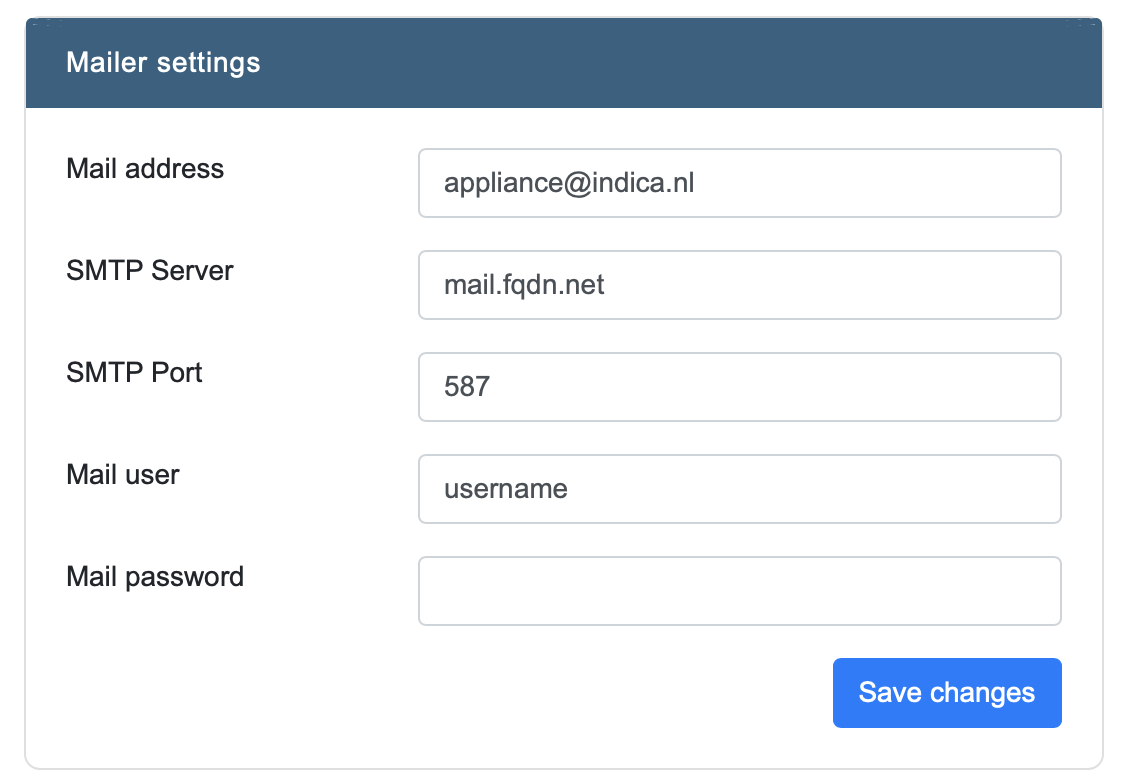
It needs the following information:
Mail address
SMTP server
SMTP port
Mail user
Mail password
After entering the correct information, click “Save Changes” to apply the changes.
Proxy settings
This panel contains the Proxy settings.
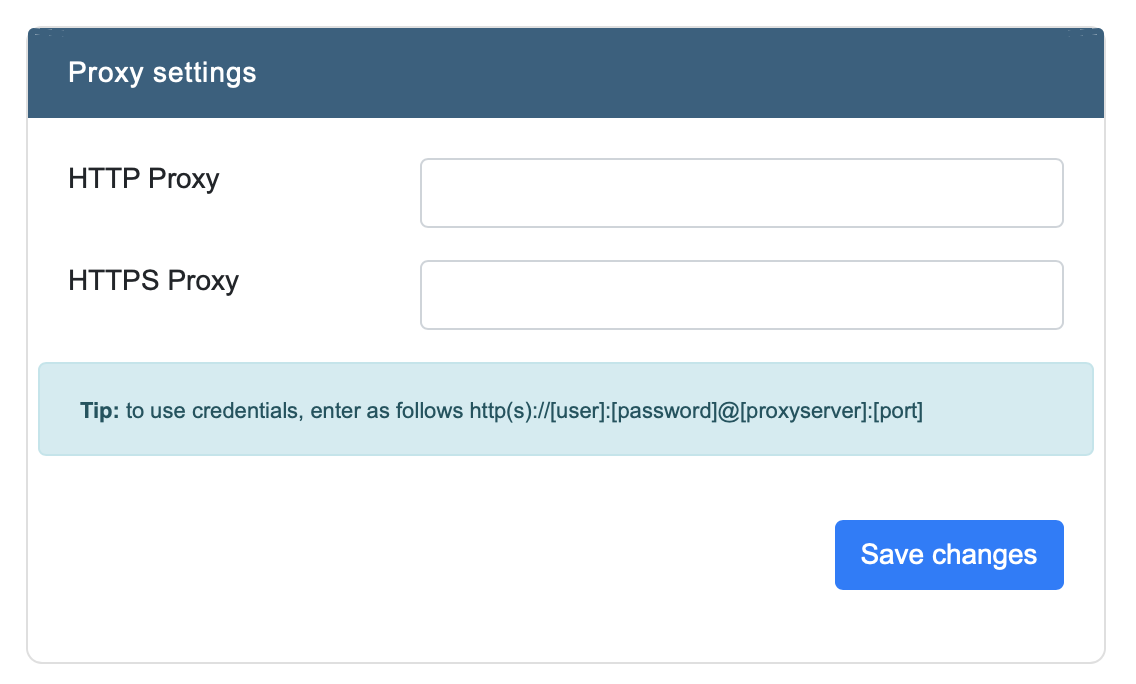
Note
To use credentials, enter the settings in the following format:
http(s)://[user]:[password]@[proxyserver]:[port]
Zabbix monitoring
Here you can enter the settings for Zabbix monitoring.
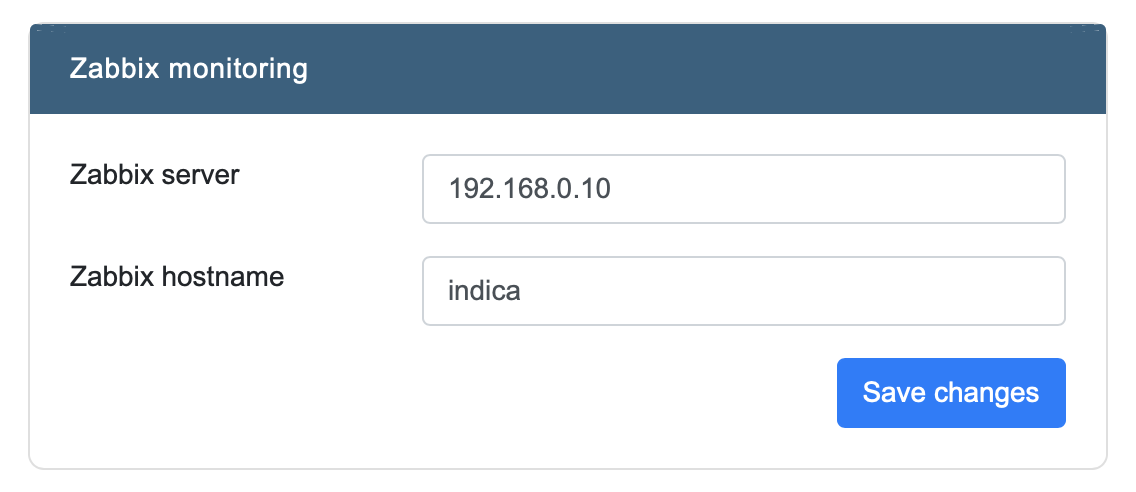
It needs:
Zabbix Server (IP address)
Zabbix Hostname (usually ‘indica’)
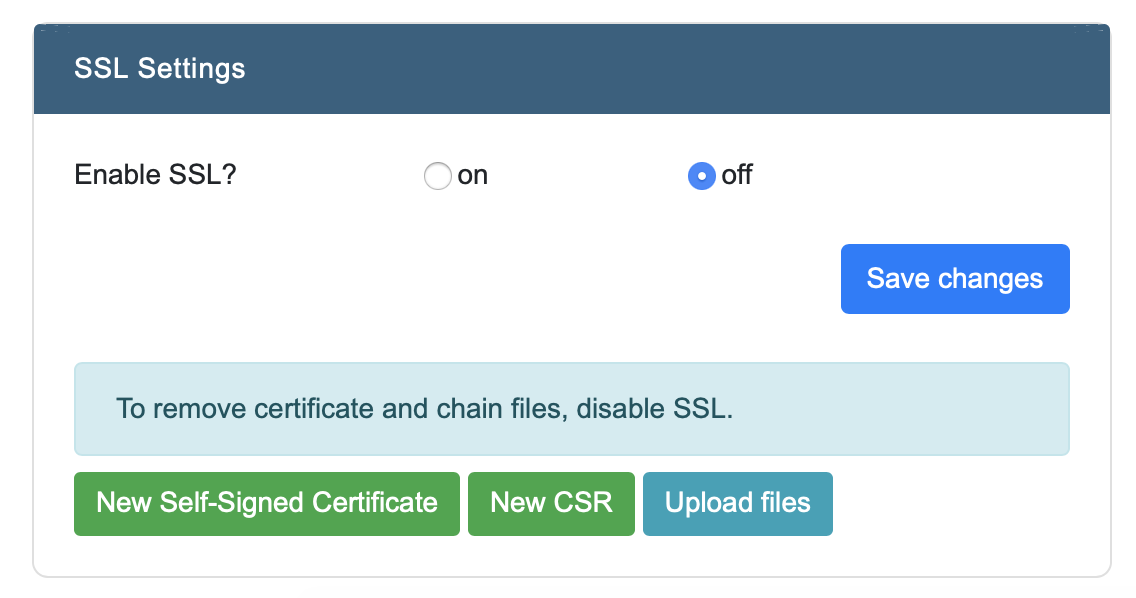
SSL Settings
SSL Settings allows you to use SSL to secure the client-server traffic of the web-based frontend.
Note
Make sure all configuration is added correctly before enabling SSL. If SSL is enabled before all information is given, it may make the front-end inaccessable.
SSL can be set up in three ways:
Use a self-signed certificate
Submit a CSR (Certificate Signing Request)
Upload own certificate and keyfiles
Use a self-signed certificate
When clicking the button “New Self-Signed Certificate”, you will be prompted to fill in some information:
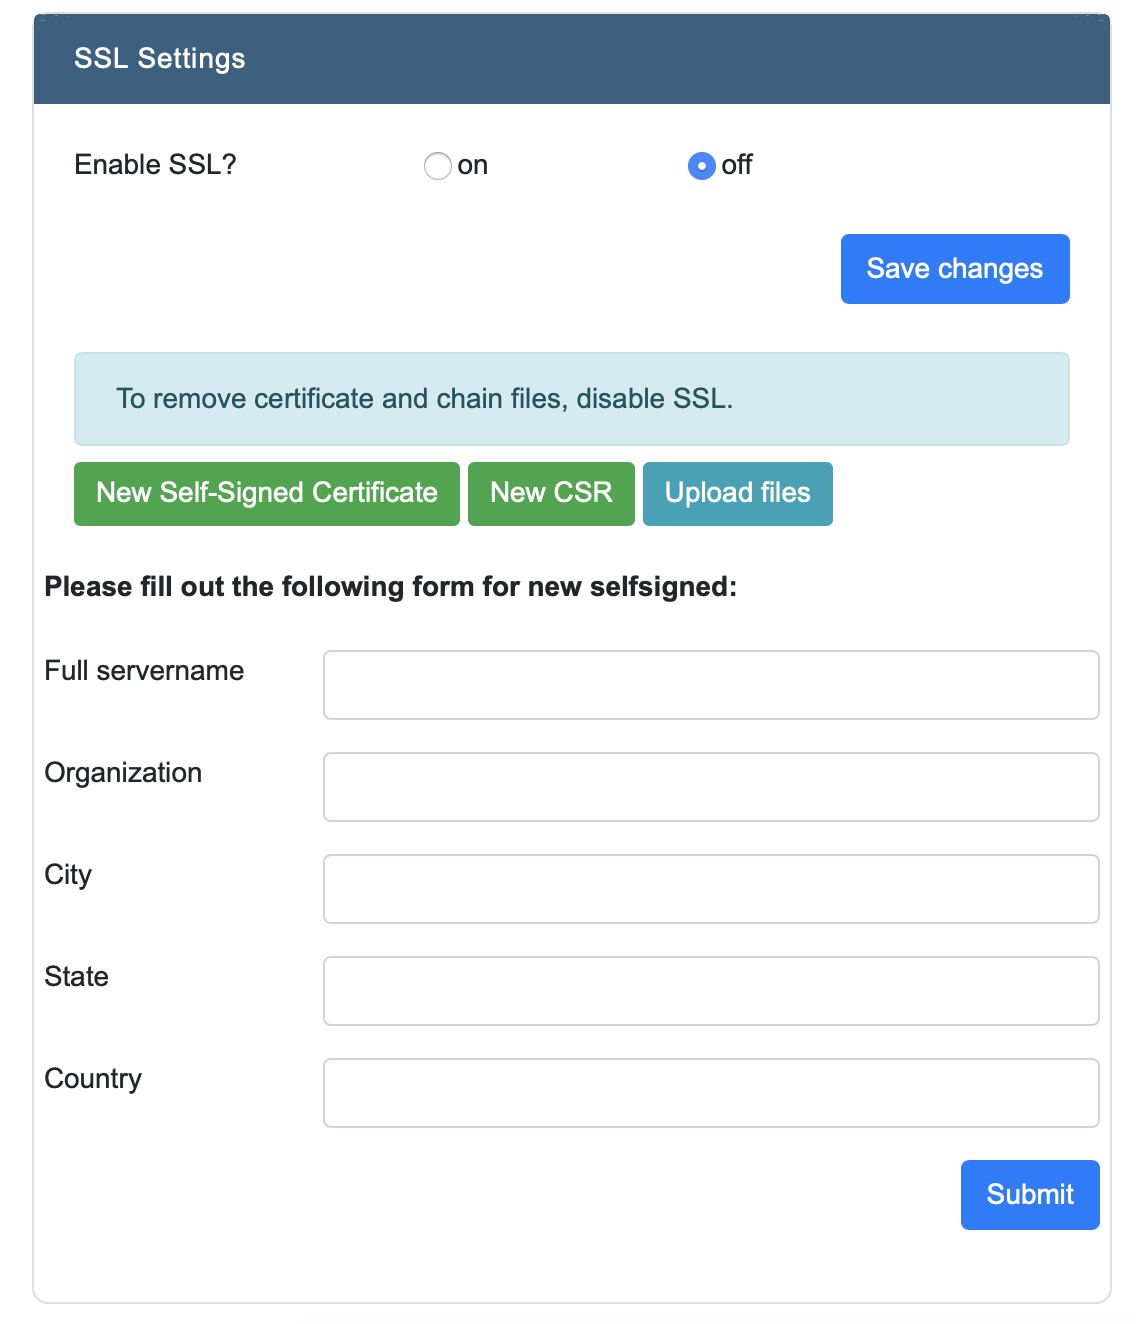
After filling in the fields, click “Submit”. The certificate is now active.
Important
Modern browsers may still notify to the user that the connection may not be secure when a self-signed certificate is used.
Submitting a CSR
When clicking the button “New CSR”, you will be prompted to fill in some information:
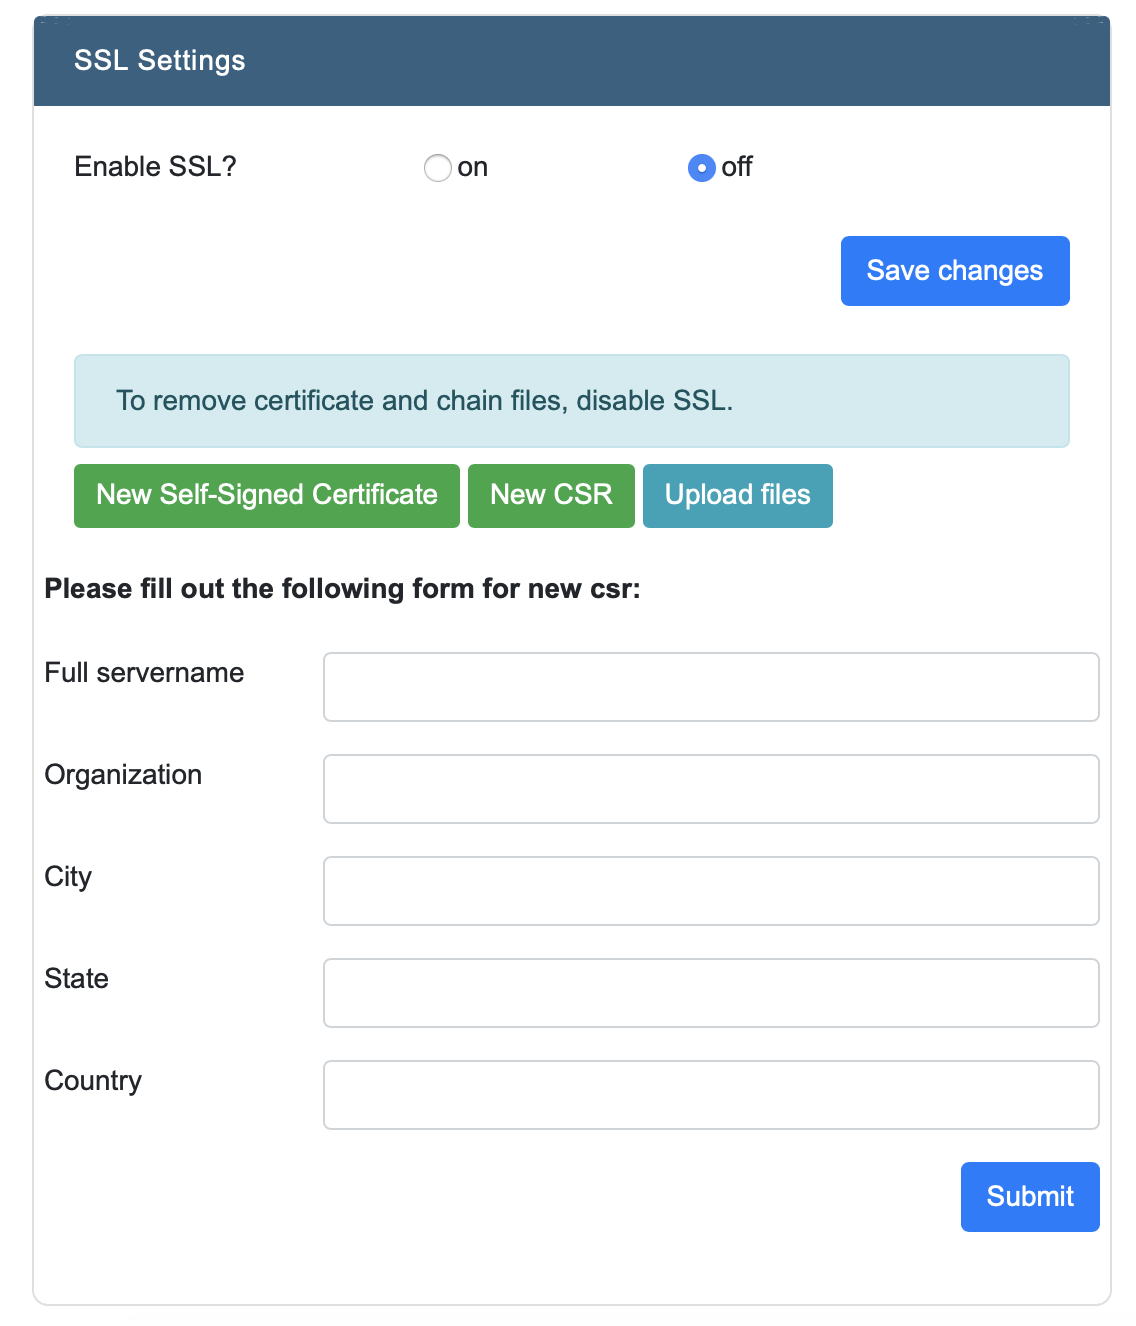
After filling in the fields, click “Submit”.
Upload own certificate and keyfiles
INDICA also provides the option to use your organisation’s own certificate and keyfiles. They can be uploaded after clicking the “Upload files” button. It wil then prompt the following files:
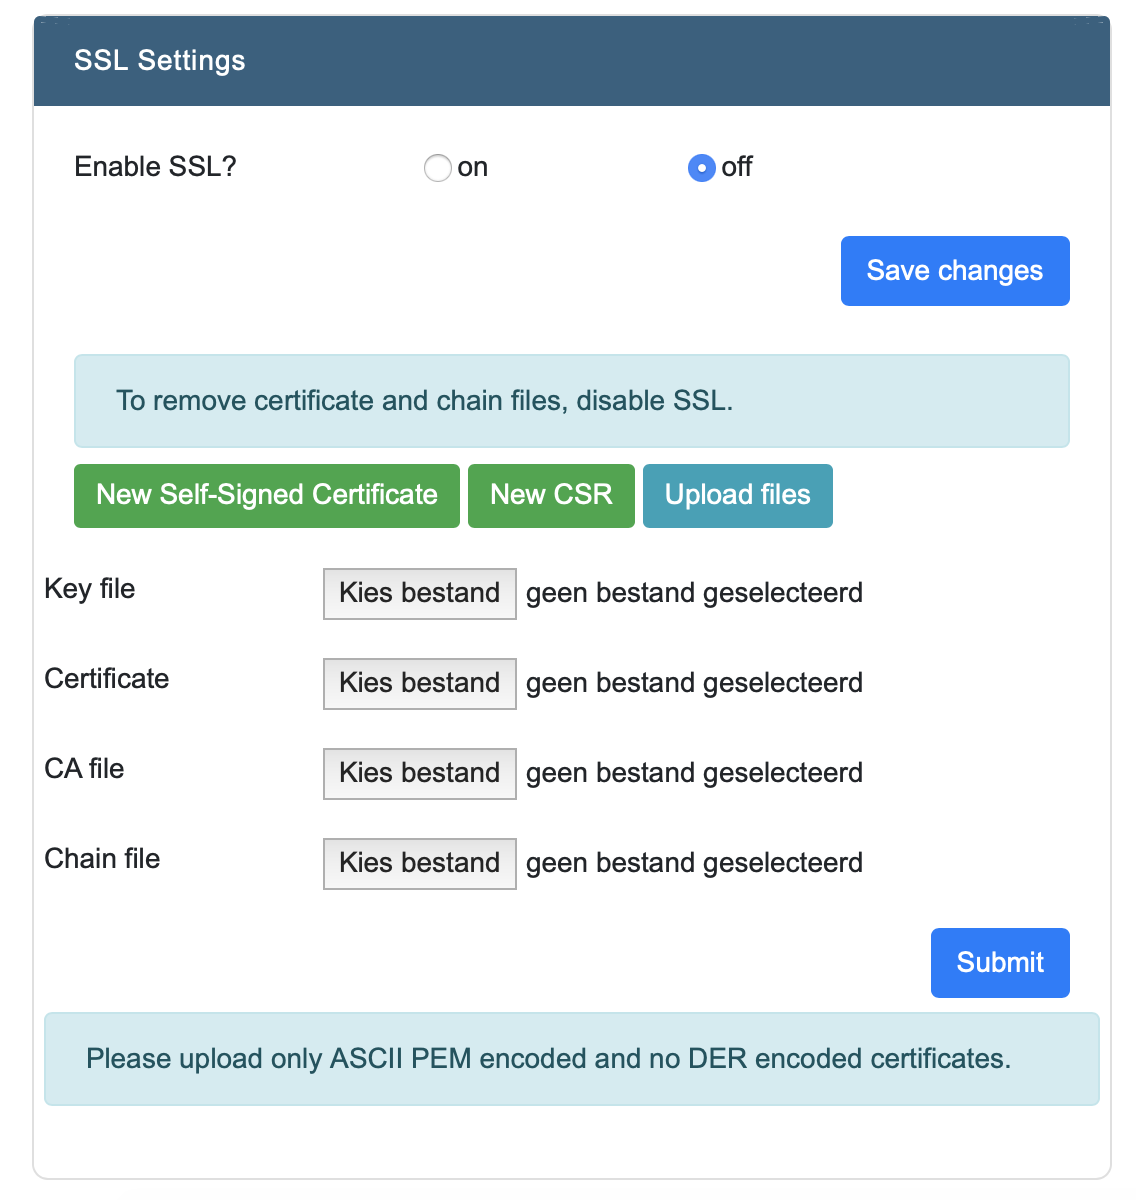
Upload the corresponding files, and then click “Submit” to activate.
Security
Security Settings allows different ways to authenticate users. It is possible to setup an integration with an Active Directory (AD) and OpenLDAP, as well as Single Sign On (SSO). There is also a setting to disable reading the ACL from shares. This means that every user in INDICA can see all documents, regardless of Whether or not they are allowed to see the document on the original data source.
Local User Groups
If Active Directory is not enabled local user groups are available for assigning users to specific groups and to map the groups to roles during case creation.
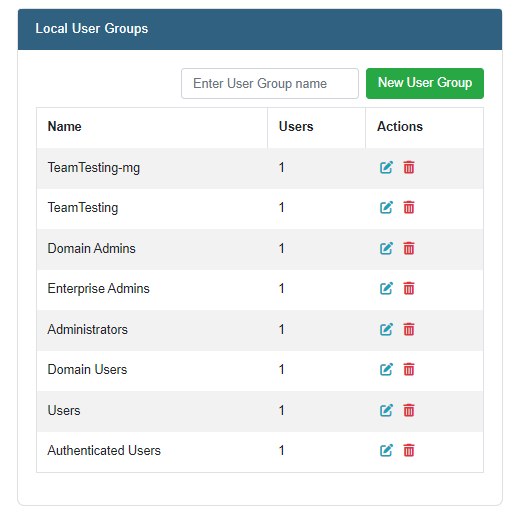
When group is created it is possible to assign user to the group in the local user management page.
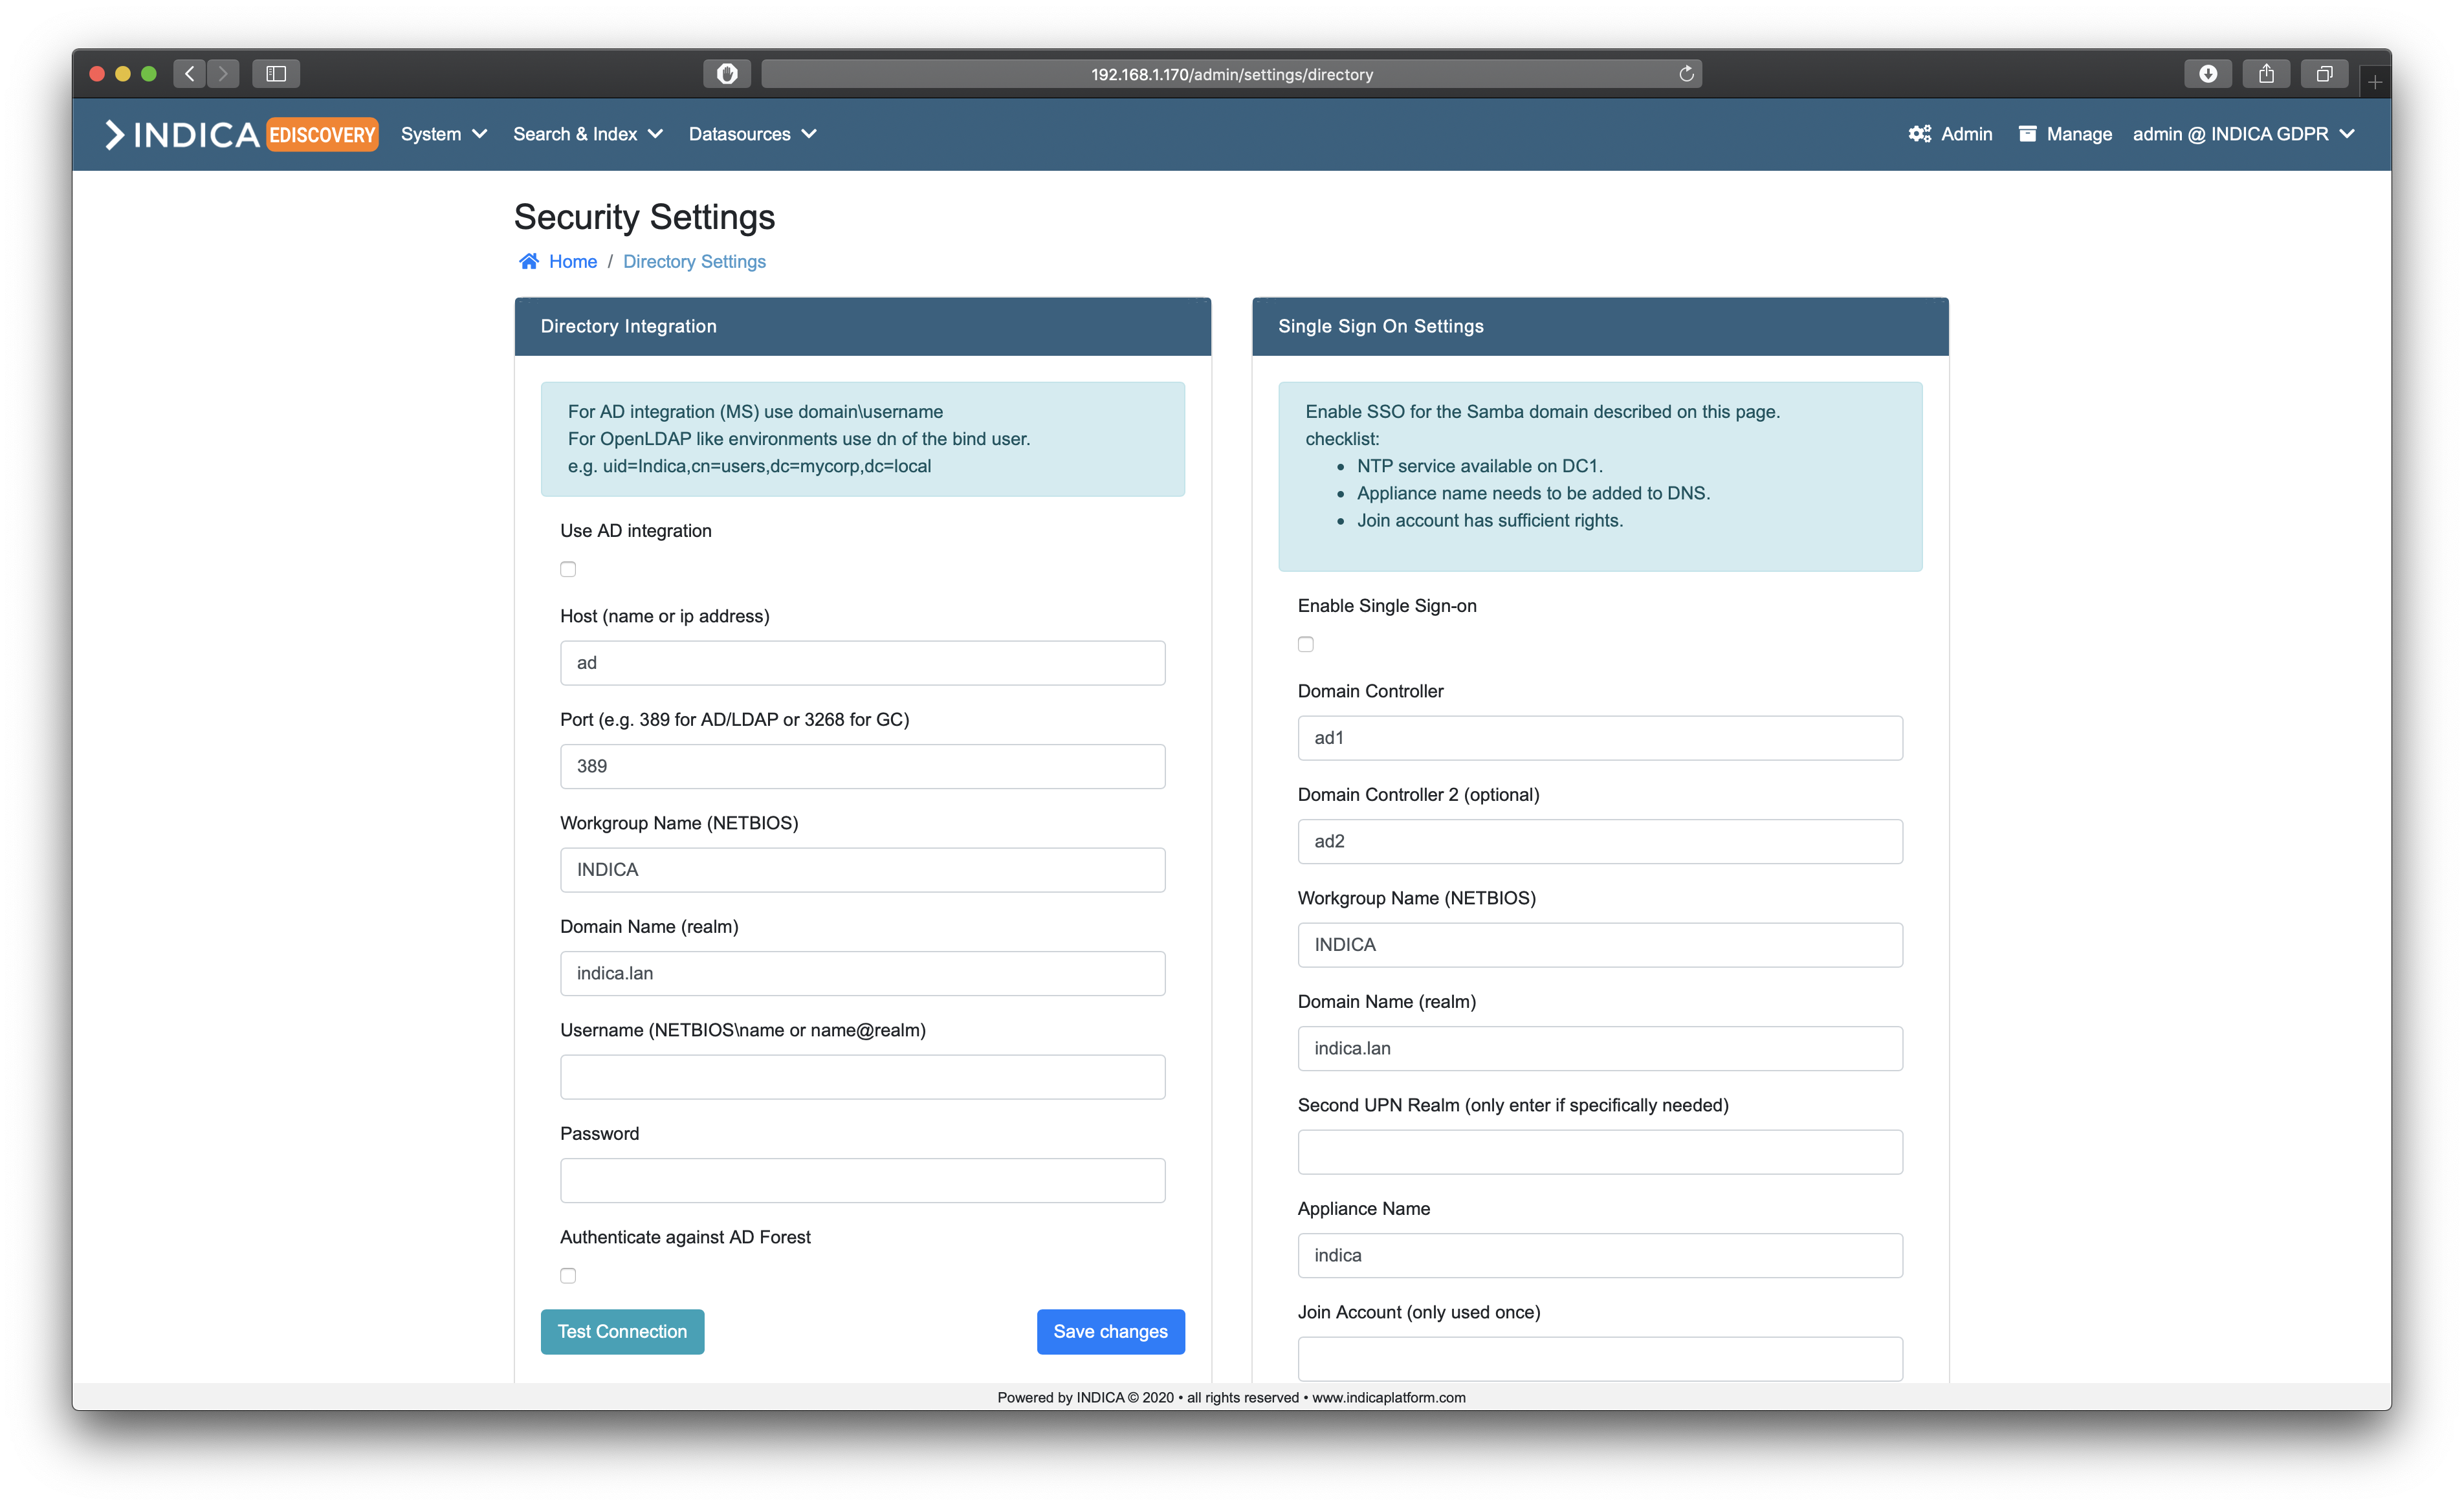
Enabling Active Directory integration
Active Directory integration allows for user and group management in the existing AD/LDAP environment. To make use of it, an account which can be used to ‘bind’ to the AD/LDAP is needed. Then, fill in the following information:
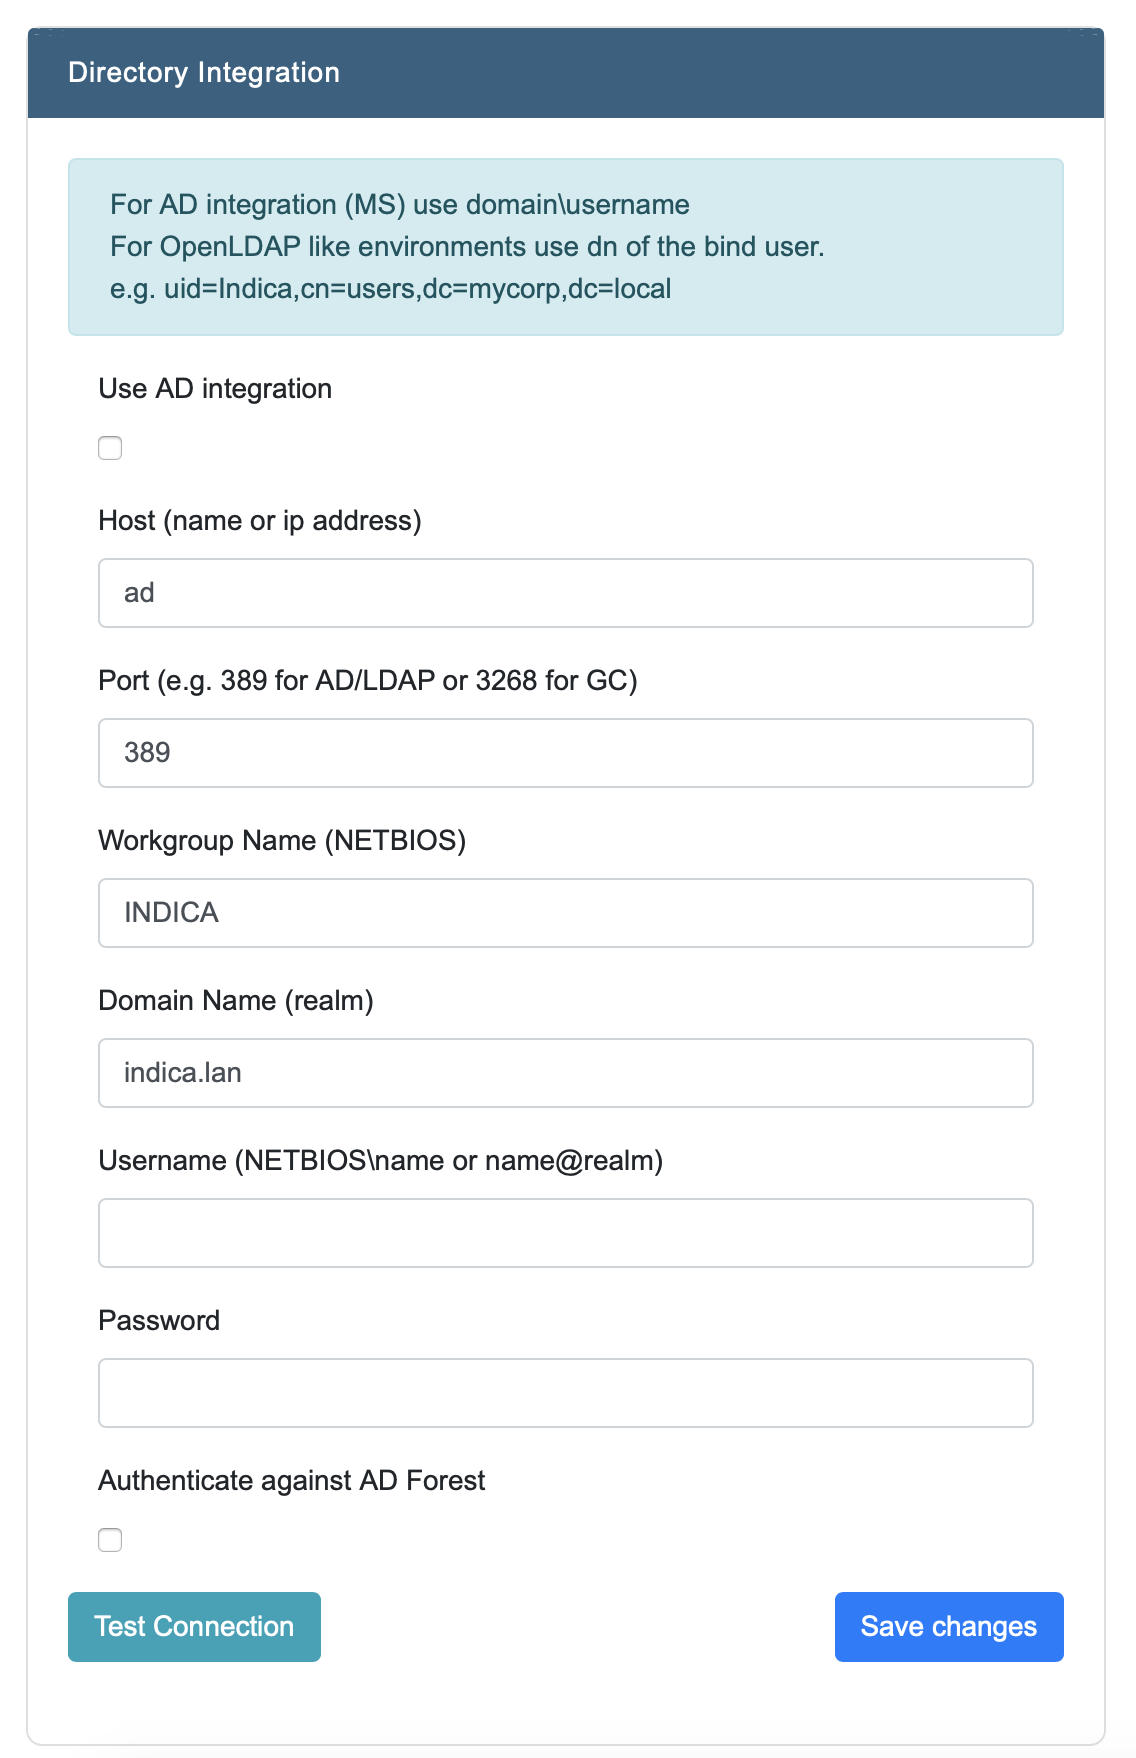
Check the ‘Use AD integration’ box
Enter the hostname or IP. Usually, IP works better due to resolving the name.
Enter the correct port
Enter the Workgroup Name (NETBIOS)
Enter the Domain Name (realm)
Enter the Bind Username (with NETBIOS/realm notation)
Enter the password of the Bind User
(optional; if needed) Check the box ‘Authenticate against AD Forest’
Then, click on ‘Test Connection’. If everything is setup and entered correctly, INDICA should report back the first 10 AD groups it can find. If this is the case, click ‘Save Changes’ to store and apply the settings.
Now, the existing AD structure can be used to map existing AD groups to INDICA cases and roles.
This is done by setting up two (or more, depending on the Roles and Permissions setup) groups per INDICA case:
A User-level access group.
A Manager-level access group.
These two groups can then be linked to the corresponding INDICA case in the Case Settings. When all groups are set up, users can be added to or removed from the group at will. Edits to the groups in the AD/LDAP environment will be reflected in INDICA immediately.
Tip
More groups can be created and mapped to specific roles. See Mapping AD groups to roles for more information.
Enabling Single Sign-on
Single Sign-on(SSO) allows users to access the INDICA interface without having to bother with a username and password. INDICA will automatically sign in users if they are already authenticated.
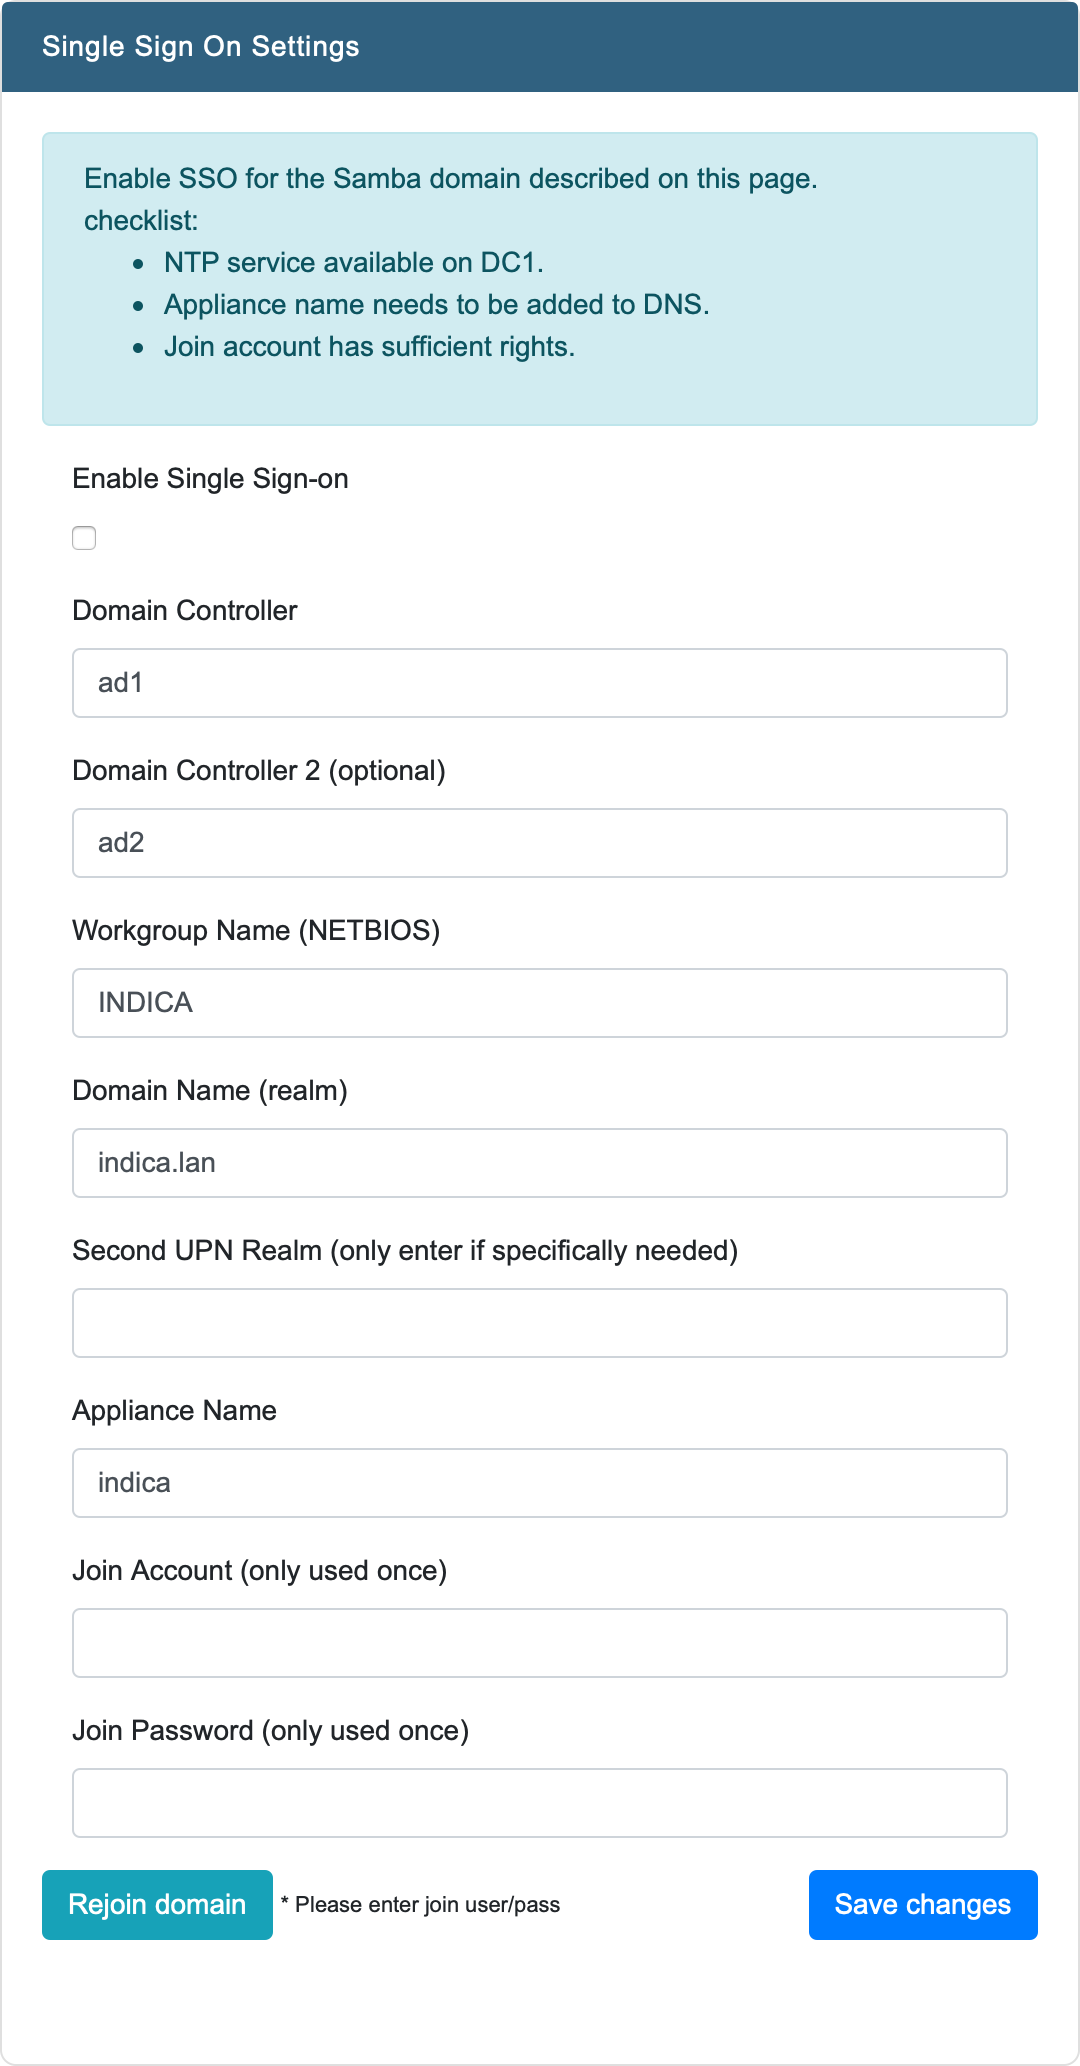
SSO needs the following information:
Domain Controller
Domain Controller 2 (optional)
Workgroup Name (NETBIOS)
Domain Name (realm)
Second UPN Realm (only enter if specifically needed)
Appliance Name
Join Account (only used once)
Join Password (only used once)
When using SSO, some actions may be required on different parts of the infrastructure (outside the INDICA appliance). Use the following list to make sure everything is set-up properly:
NTP service available on DC1.
Appliance name needs to be added to DNS.
Join account has sufficient rights.
When everything is set-up properly, users should be able to access the INDICA interface without having to authenticate themselves.
Software & Support
The Software & Support section helps managing the current license, software versions, and support connection.
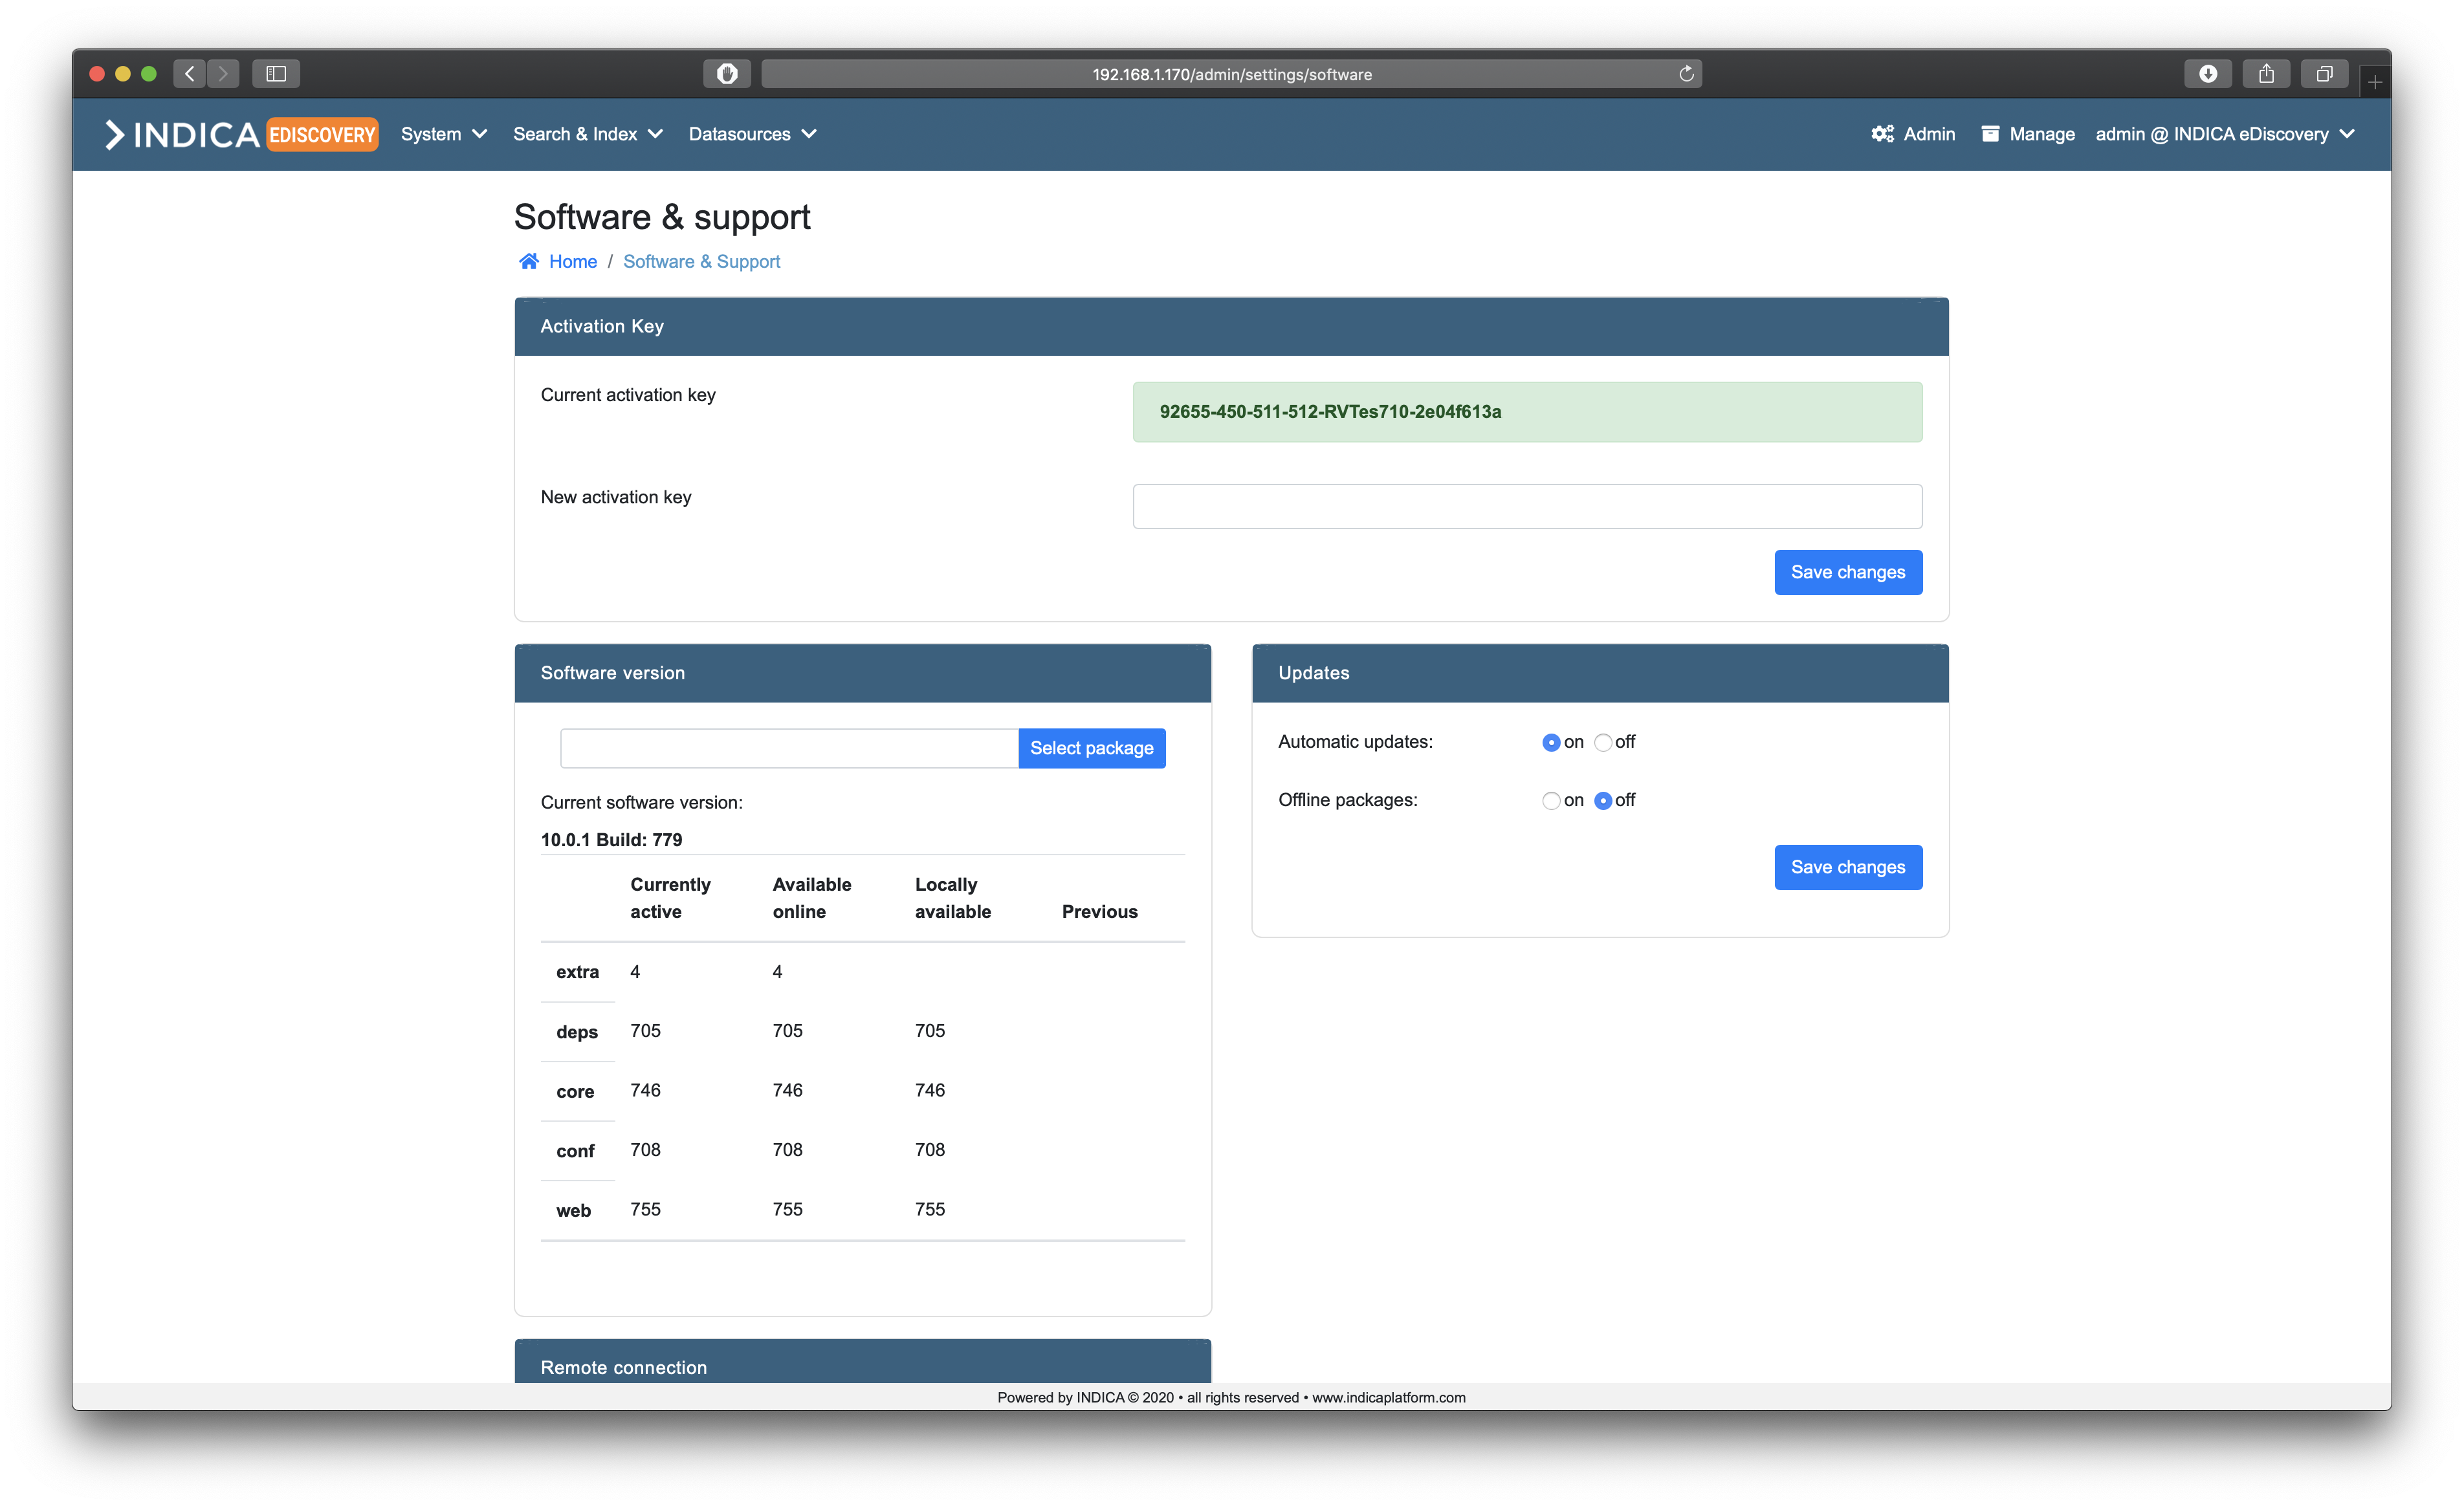
Activation Key
Here you can view and edit the software key that is used to activate your INDICA appliance.
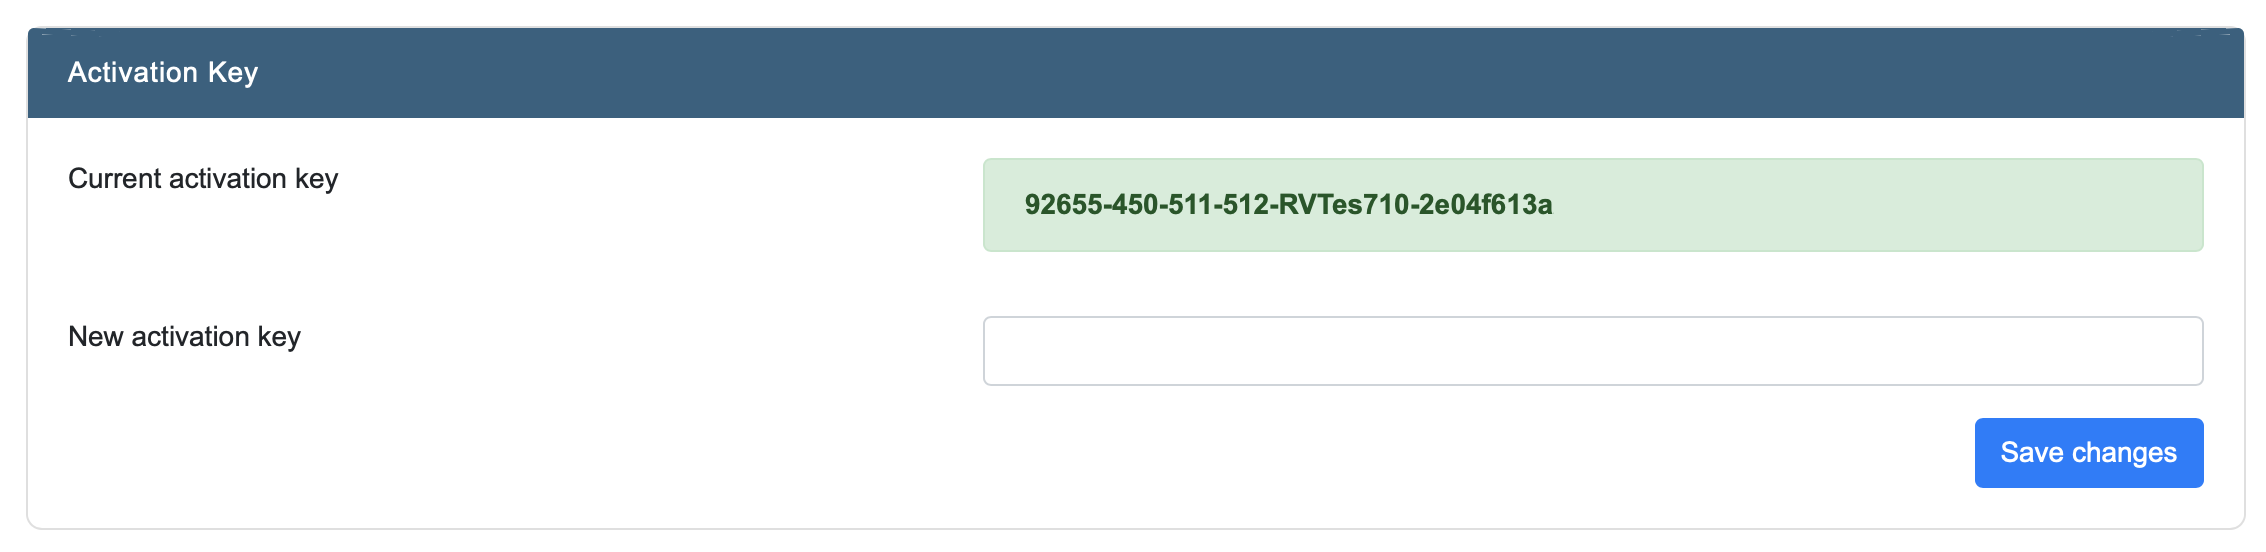
Note
Please keep in mind that the keys are not interchangable between appliances, as they are tied to the hardware as well. In case a new appliance needs to be activated, contact INDICA support to assist you.
Software version
This panel allows you to check the current software version.
It shows you the current version number, as well as the version numbers of all the packages as well. It is possible to update packages by hand, and if needed, roll back to previous versions. This can only be done if there was a previous version installed on the appliance.
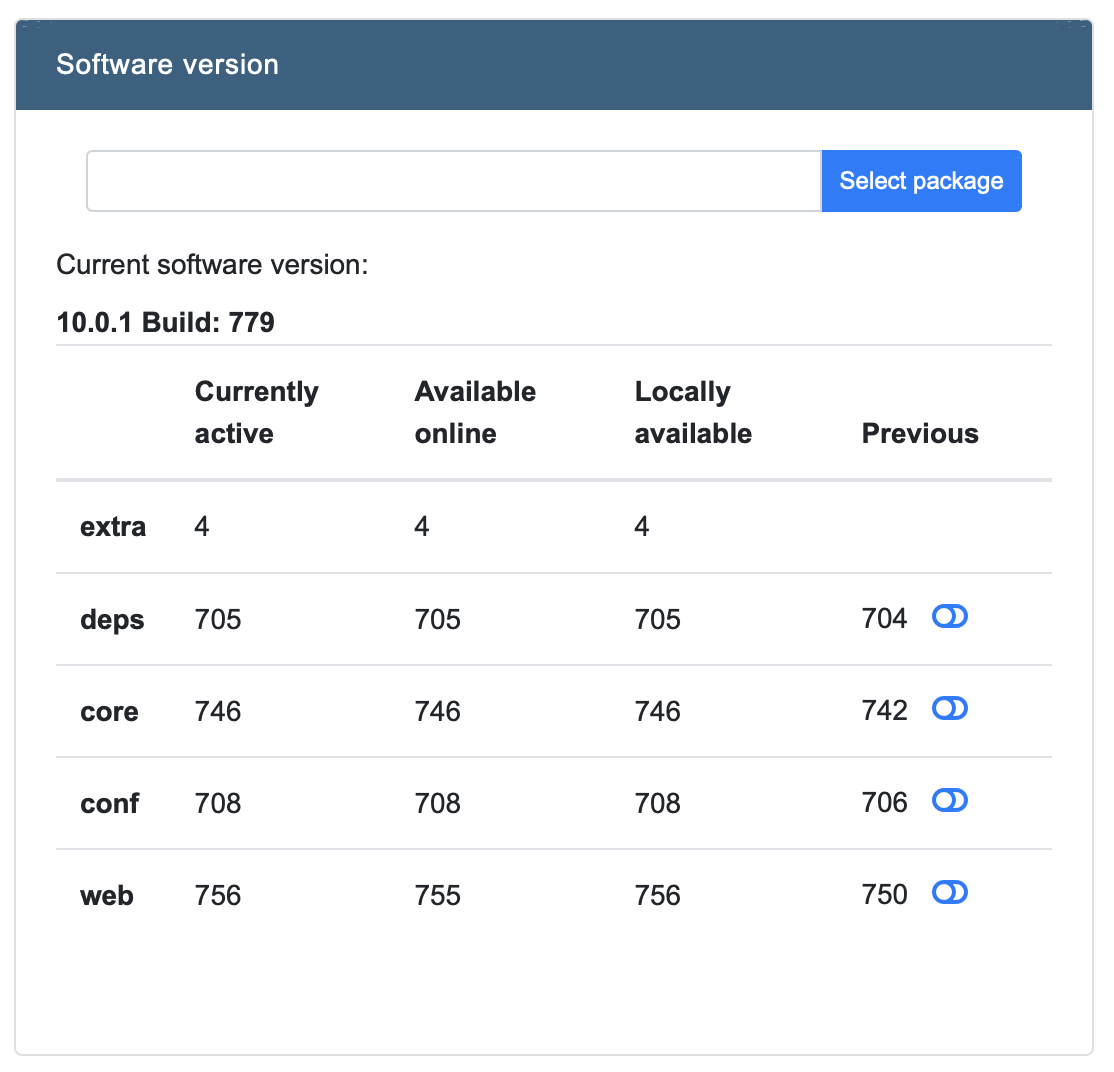
With the ‘Select package’ option, a package can be uploaded to the appliance. INDICA will automatically recognise the type of package uploaded, and it’s version and add the package to the overview if it has a newer version than currently active.
Clicking the switch in the ‘Previous’ column rolls back the version of active package.
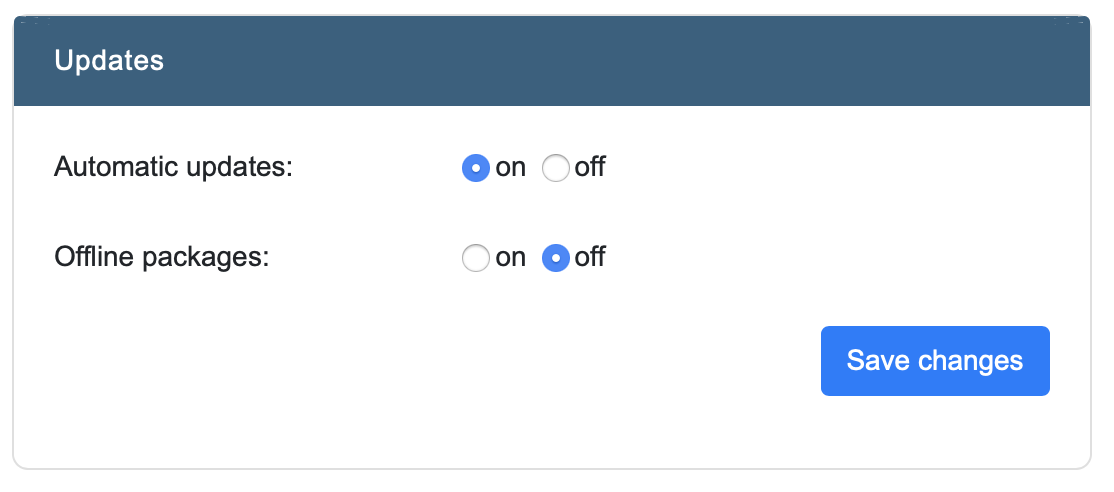
Updates
This panel allows you to toggle automatic updates on or off. You can also specify Whether offline packages should be used or not.
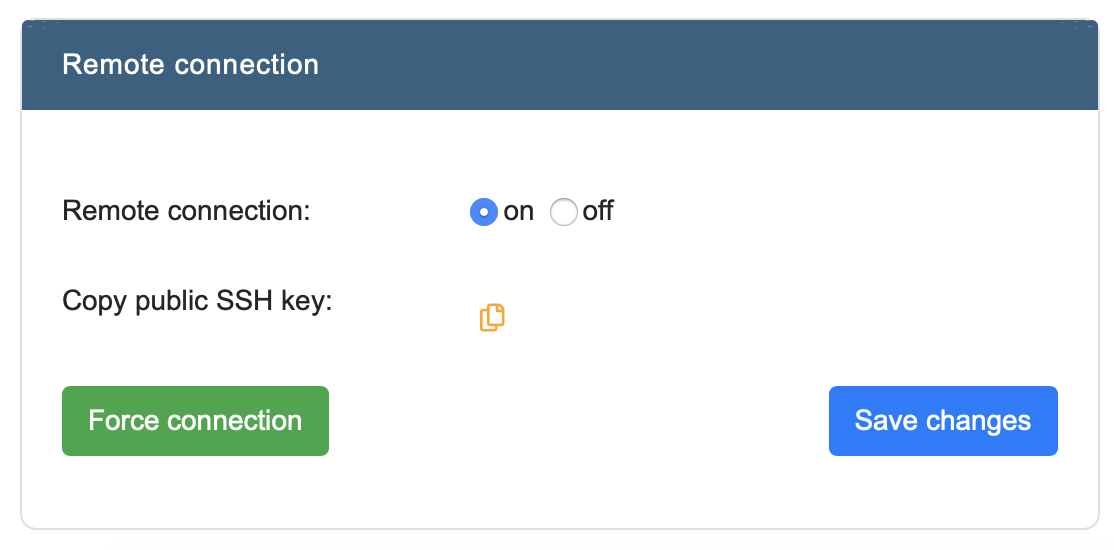
Remote Connection
This option allows appliance administrators to toggle remote connections. The remote connections are used by INDICA engineers to remotely troubleshoot and support your appliance. It is advised to leave this setting turned on.
Here you can also copy the public SSH key of the appliance, and force a remote connection to the INDICA server.
General Settings
This section of the settings allow you to configure a few things:
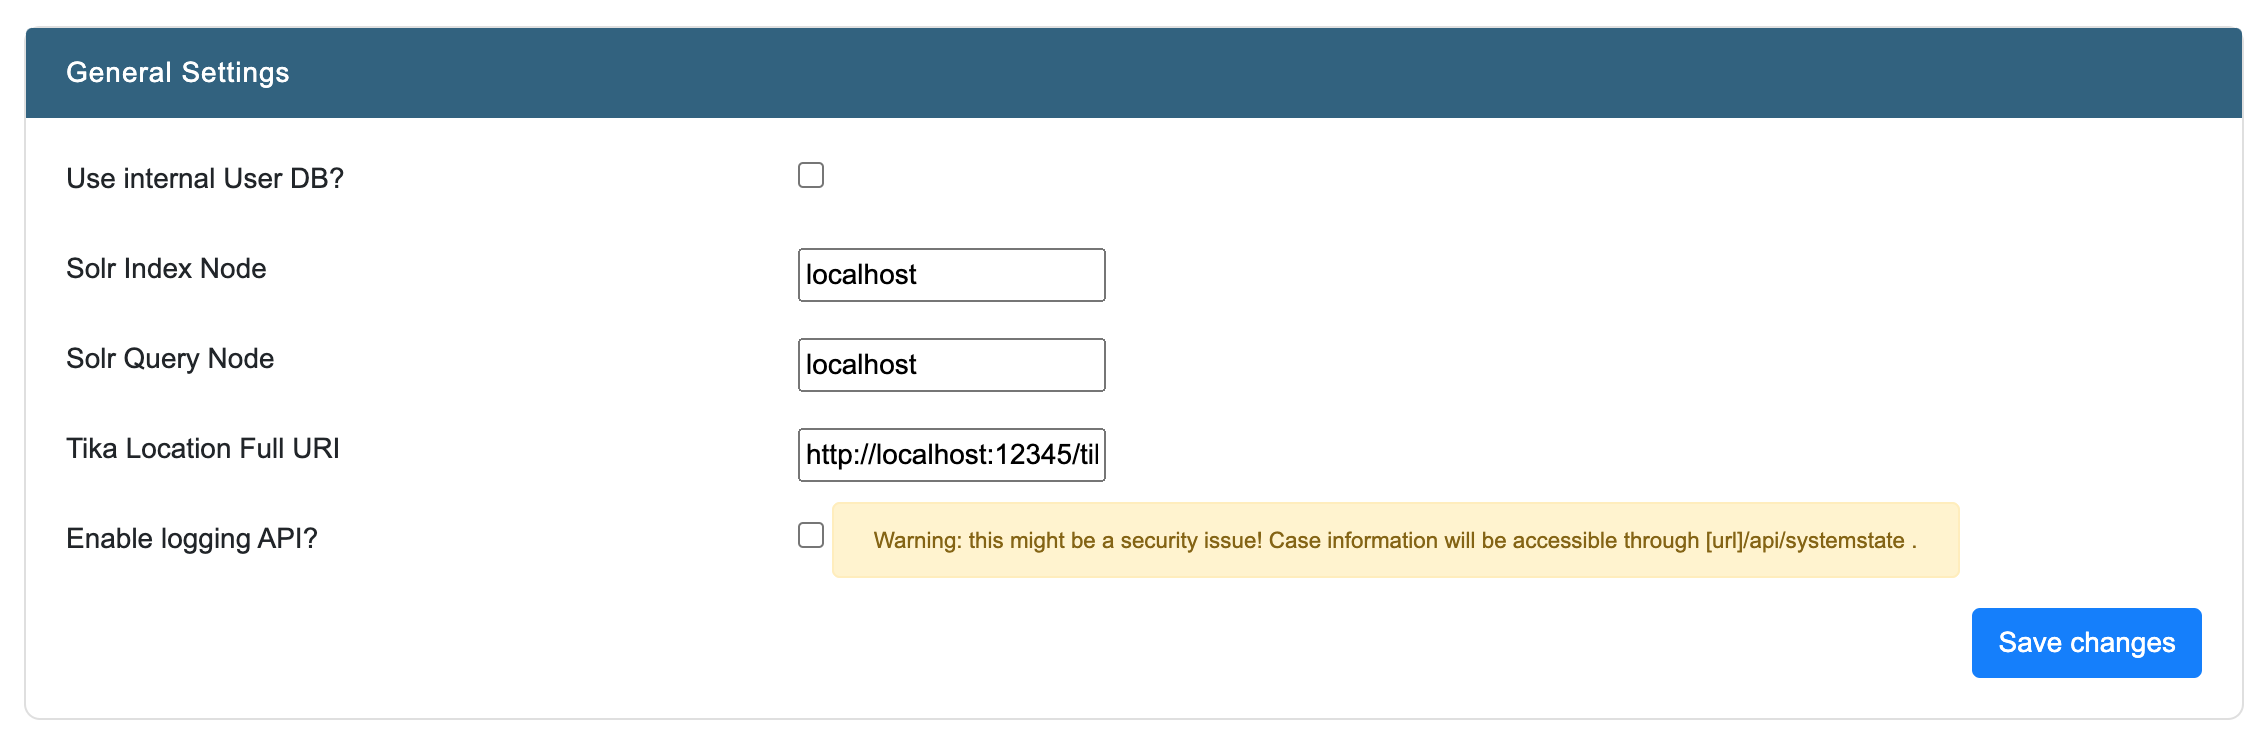
- Use internal user DB
When not connected to an external authentication service, it is possible to use the internal authentication database.
- Solr Index Node
Location of the Solr index node. Only to be edited when running in a cluster Be careful, as changing this setting may lead to an unstable/broken cluster
- Solr Query Node
Location of the Solr query node. Only to be edited when running in a cluster Be careful, as changing this setting may lead to an unstable/broken cluster
- Tika Location Full URI
If Apache Tika is hosted externally, then edit this value to point the indexer to the correct location
- Enable logging API
Enable logging API so logging can be used with external programs/services
Warning
This might be a security issue! Case information will be accessible externally
- Enable Case Admin
Enables Case Admin for the appliance. This means it will be accessible for any users with the correct permissions and allows for the creation of Case Administrator users.
- Enabled PDF Viewer with advanced redacting
Toggles the advanced PDF viewer for the entire appliance. The PDF viewer also needs to be enabled case-wide in Manage Settings.
Note
The Advanced PDF Viewer is not available on all INDICA appliances.
- Document lock time limit
The maximum amount of time that a document is locked for other users when opened in the previewer. This setting is in minutes. This setting prevents documents from being locked indefinitely.
- Automations process worker limit
The queue workers that can run automations at the same time.
- Enable Landing Page
This toggles the landing page for users. This means that instead of the search page being the home page, a landing page is presented to the user where they can see an overview of all the cases available to them and select which case to go to. You are also able to select from different landing page configurations.
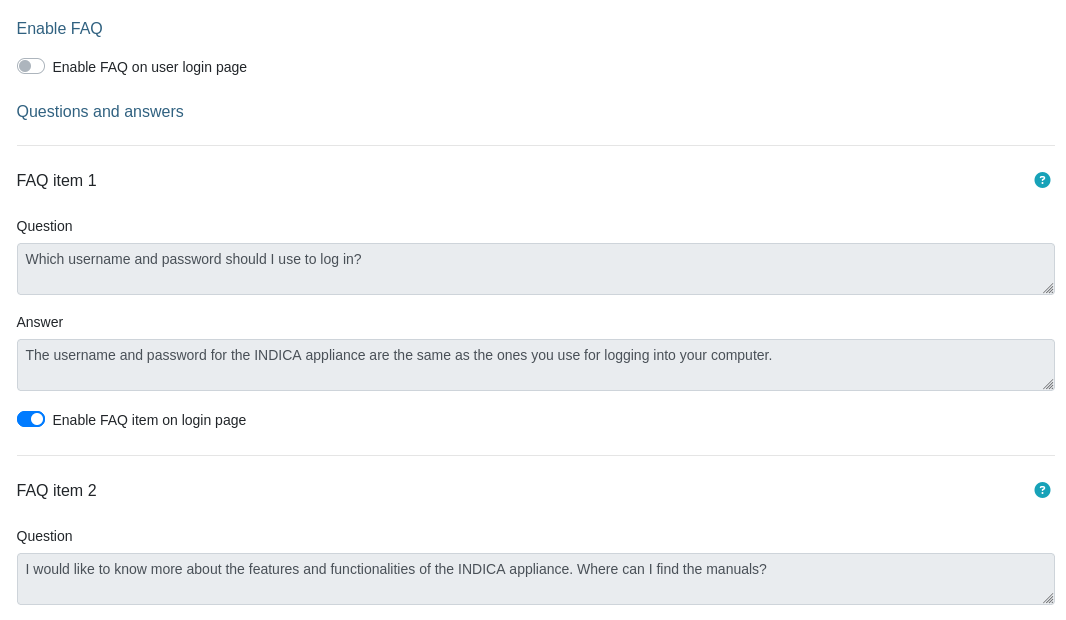
FAQ Settings
In these settings, you can configure the Frequently Asked Questions that show to the user on the login page, as well as enable/disable this section. There are a few default items that cannot be deleted. However, you can always add new questions by pressing the “Add New Question” button. You can also toggle which questions show and which don’t.
Backup Settings
This page allows you to setup the backup location. It needs the following information:

- UNC path of the backup location
Location where INDICA can read and write it’s backups to
- Backup username
Username for INDICA to authenticate on the backup location
- Backup password
Password of the corresponding user that INDICA can use to authenticate on the backup location
Look and Feel
INDICA allows you to apply your custom Look and Feel to the appliance. This can be done on two levels:
- Appliance level
This is configured in the admin interface and applies to the admin section
- Case level
This is configured in the case management interface and applies to that case only This allowes for customised look and feel in different cases
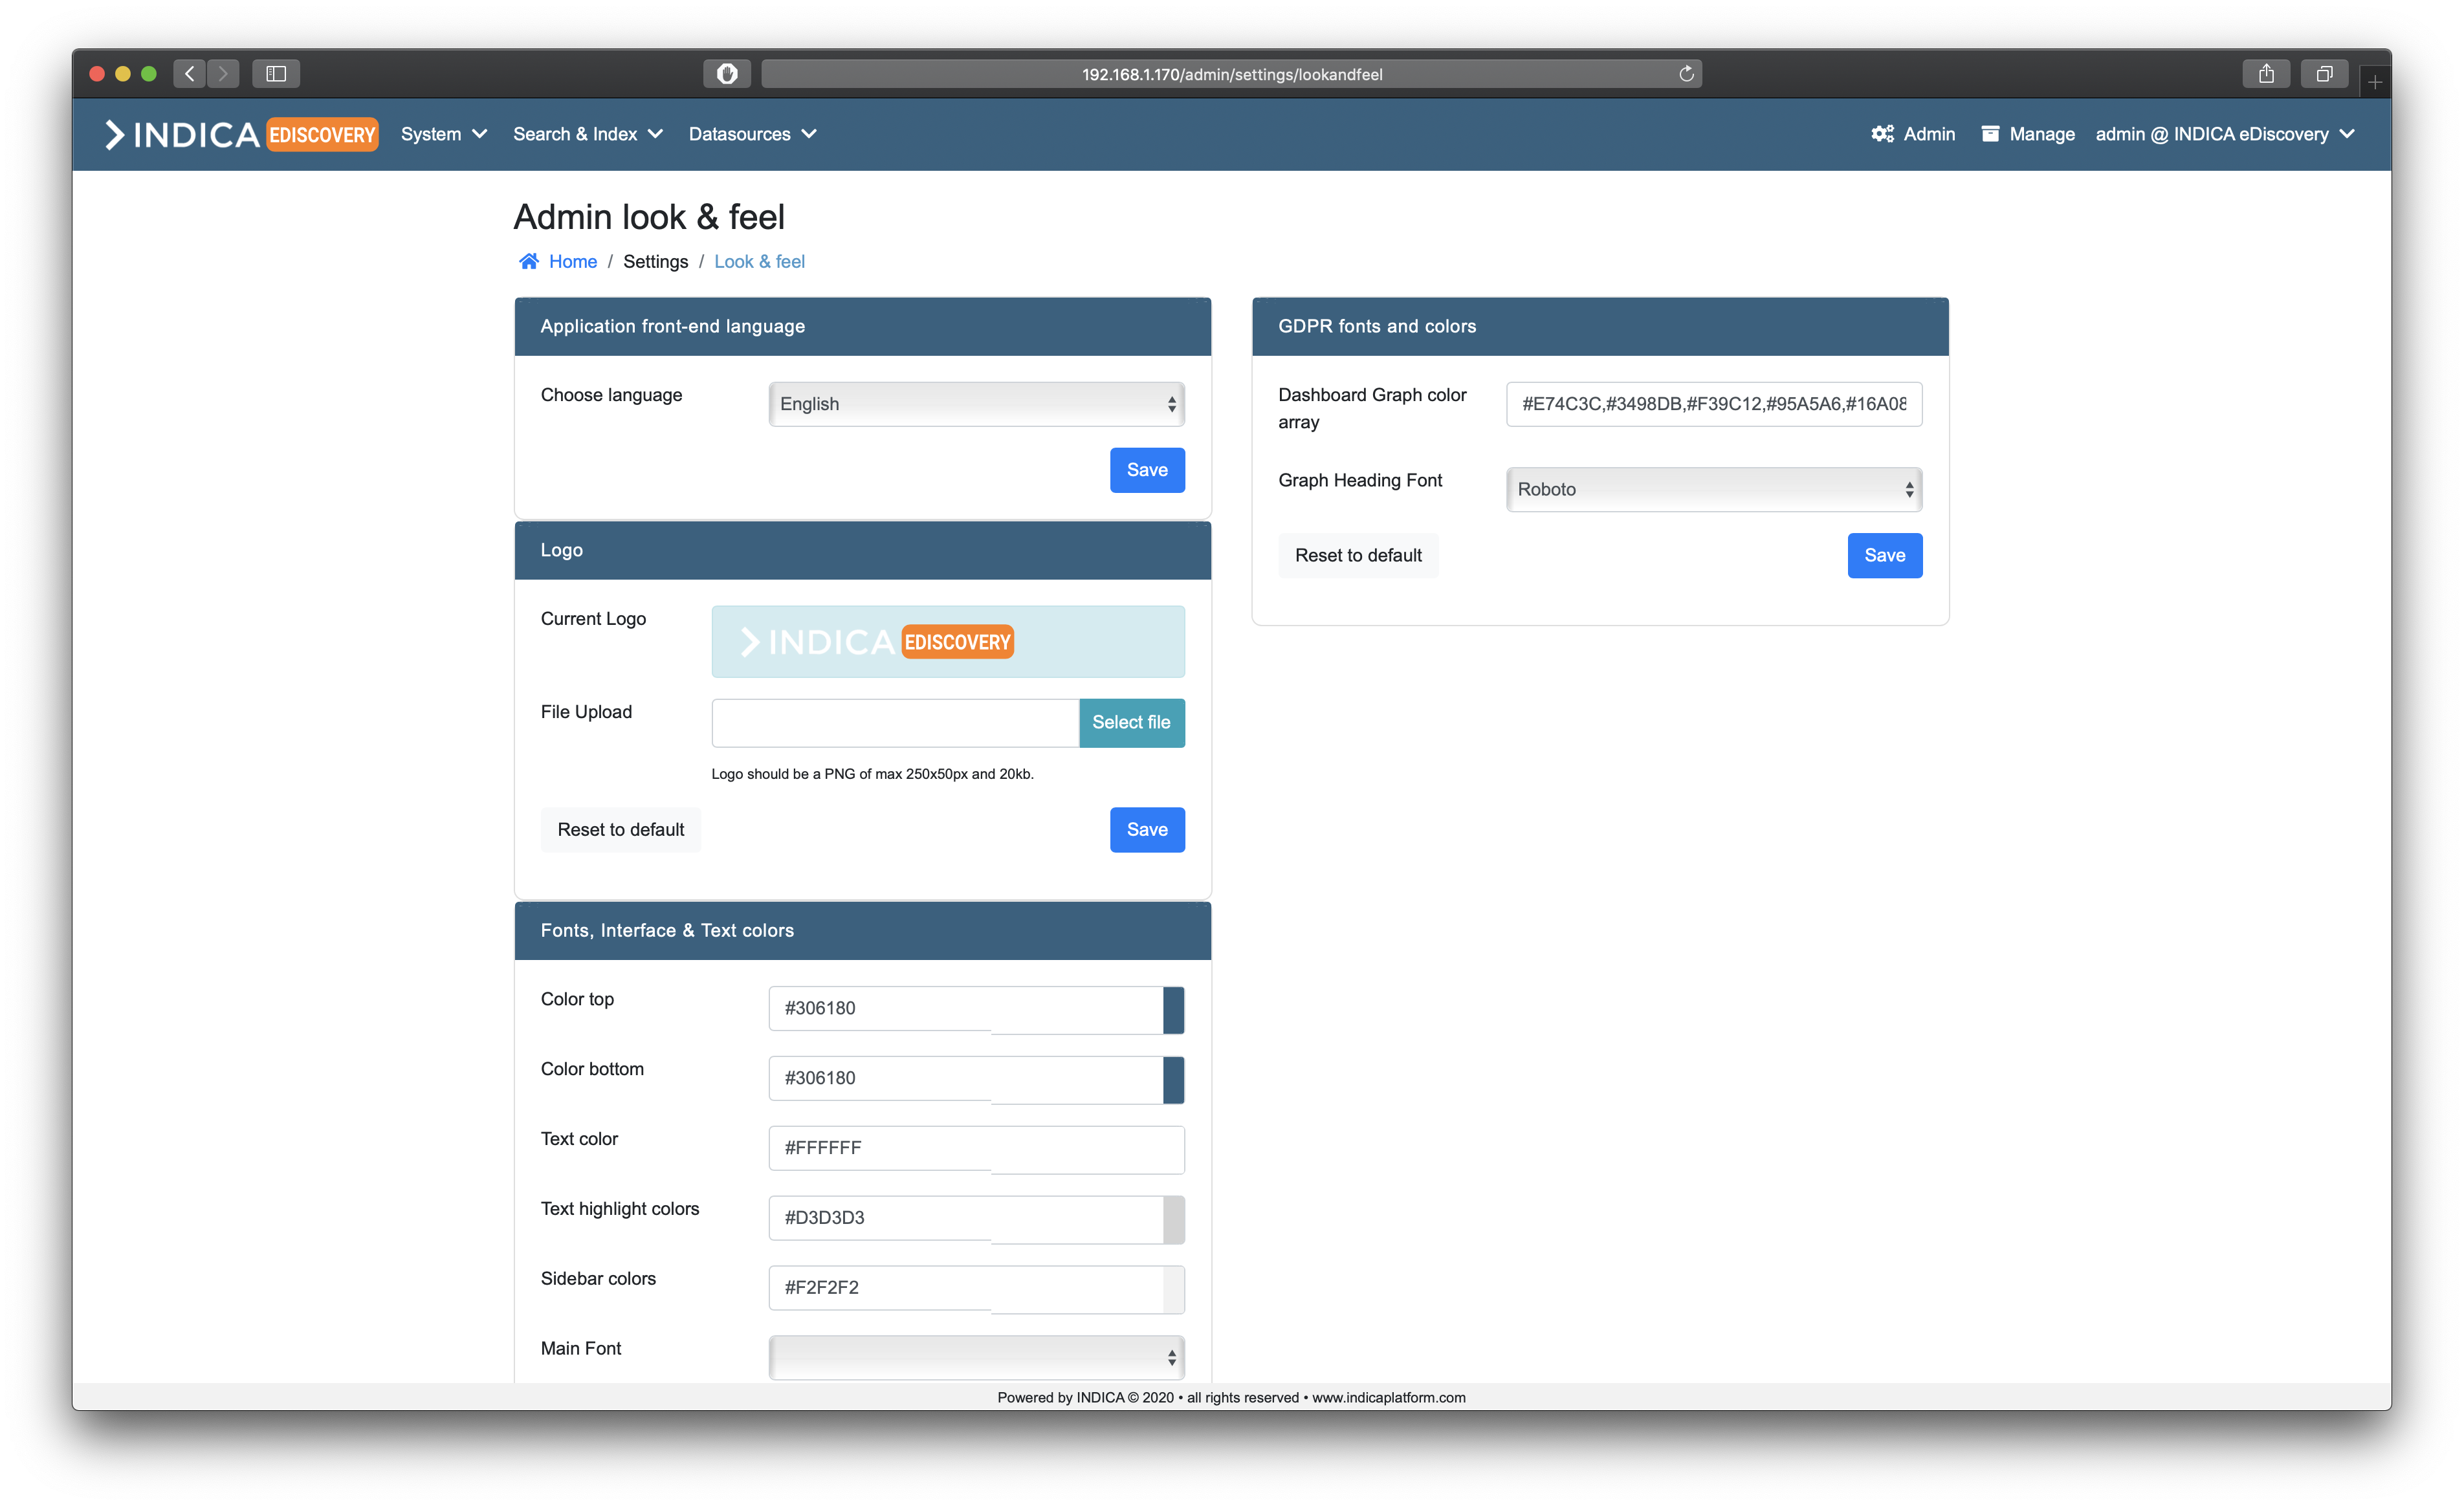
The settings allow you to change the following:
- Application front-end language
Supported languages: Dutch, English, French, German
- Logo
PNG format, 250x50 pixels, max 20kb
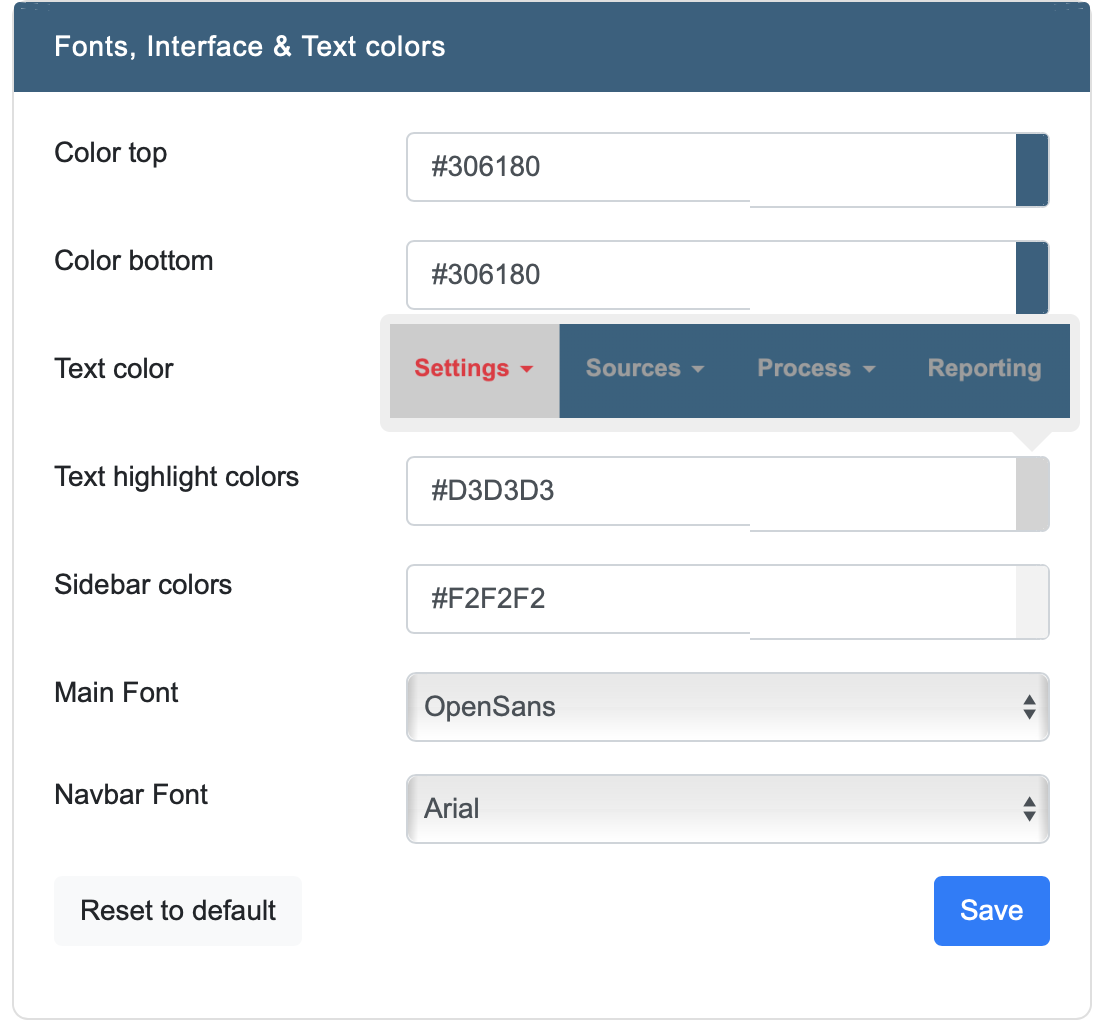
- Fonts, interface and text colors
Allows changing the colors and fonts of the main interface
- Privacy fonts and colors
Allows changing the colors and fonts of the Privacy interface
When hovering the mouse over the color pickers, a preview is shown:
All values can be changed individually, and reset to default if needed.