Data Sources
Table of Contents
INDICA supports several data sources out of the box. These sources are:
Collections
Datatabs
E-mail
Fileshares
Local
Queries
S3 Buckets
SharePoint
Box
Connecting a source is easy; for some sources no additional rights are required. In some cases it is needed to assign additional rights to a special ‘System user’ that INDICA uses to read the data. Typically, the needed rights are limited to read-only rights. By design, INDICA does not alter, move, or delete the source data.
Collections

A collection allows you to group multiple sources in one collection. This makes it possible to have a collection that contains multiple data sources belonging to a department or person, or a type of data source. It allows you to group the data sources in such a way that it benefits the end user.
There is no limit on the number of collections in a case.
Caution
The name of the collection is stored in the index. Changing the name of a collection or deleting the collection may break your index. Please do not edit or delete collections after data has been indexed.
Adding a collection
When adding a data source, INDICA will ask you to enter a collection name. An existing collection name can be entered to add the new source to the existing collection. If needed, a new collection name can also be picked. INDICA will then create a new collection and add the data source to it.
Editing a collection
After creating a collection, it is possible to edit the collection as well. This can be done by clicking the paper icon (Edit) in the actions column. A new window will open:

On this page it’s possible to edit the name and description of the collection. Click “Save changes” when done.
Deleting a collection
Deleting a collection can be done from the collections overview by clicking the red trash-bin icon (delete). Deleting a collection is irreversible, so use with caution.
Datatabs

Datatabs are a really powerful tool in INDICA to give insight into the unstructured data. Datatabs make it possible to add a structured source to the index and combine the structured information to the unstructured data. This means that it is possible to load, for example, the database of customers into the index so links can be made from unstructured documents to the corresponding customers. INDICA will create the links between unstructured and structured datasources with the click of a button.
By default, it is possible to add the following sources:
CSV Files
Database Connection
Unit4 Financial Data Suite
Alure (Innolan)
DataTabs List

The datatab list displays the existing datatabs, and allows for creating, updating and deleting datatabs.
CSV File
To add a CSV file to the index, click the green “Add New” button in the data tabs list. A new window will open:

Simply enter a name for the datatab, and click the correct option for datatab type. By default, “Database Connection” is selected. Click “CSV File”, and then click “Next”.
The next step is for uploading a CSV file. Click the “Choose File” button and pick the file you want to upload. After that, click “Next”.
You will be presented with a number of options:

- Select columns for list view
These columns will be presented in the previewer when a hit is found when clicking the “Analyze” button;
- Select columns for detail view
These columns will be displayed in the search results list;
- Select most distinguishing columns
Select the columns that are the most distinguishing;
- Select facet columns
Select the column that will be used for creating a facet in the index.
Click “Next” when all settings have been filled in.
The last step provides you with the following options:
- Select indexing recurrence
Choose how often this datatab will be indexed. It is possible to repeat the indexing step multiple times when needed. This allows to automatically update the index contents when the uploaded file is changed on disk.
- Collection name
Choose an existing name to add this datasource to an existing collection. Choose a new name if a new collection should be created.
Click “Finish” when done. The CSV file will be added to the index if the spider is enabled.
Database Connection
INDICA can connect directly with most common database types. This makes it possible to connect directly to a lot of services and appliances, as most appliances and applications rely on a database in the background.
To connect to a database, click the “Add New” button in the data tabs list.
A new window will open. Choose a name for the datatab, and select “Database Connection” in the list of options. When done, click “Next”.

A number of questions will be asked in step 2. These are:
- Database Host
Typically the IP address of the database host;
- DB Type
Choose between MySQL, Postgres, or MS SQL;
- Database Port
The port on which the database is hosted. Default ports will be filled in when selecting database type, and can be changed;
- Database Name
Name of the database;
- Database User
User that can be used to authenticate;
- Database Password
Password of the user in question.
To set up a connection, the user needs to be able to read the database and execute queries on the database.
When everything is filled in, click the “Test Connection” button. If everything is correctly set up and filled in, the test should be succesful.
Next, enter the query that will be executed on the database to get the necessary information. When filled in, click the “Save SQL” button. A message will be displayed at the top of the page containing the selected columns and the first row of values. If this is correct, go to the next step with the “Next” button.
You will be presented with a number of options:

- Select columns for list view
These columns will be presented in the previewer when a hit is found when clicking the “Analyze” button;
- Select columns for detail view
These columns will be displayed in the search results list;
- Select most distinguishing columns
Select the columns that are the most distinguishing;
- Select facet columns
Select the column that will be used for creating a facet in the index.
Click “Next” when all settings have been filled in.
The last step provides you with the following options:
- Select indexing recurrence
Choose how often this datatab will be indexed. It is possible to repeat the indexing step multiple times when needed. This allows to automatically update the index contents when the database is changed.
- Collection name
Choose an existing name to add this datasource to an existing collection. Choose a new name if a new collection should be created.
Click “Finish” when done. The retrieved information will be added to the index if the spider is enabled.
Unit4 Financial Data Suite
It is also possible to connect INDICA directly to Unt4 Financial Data Suite.
To connect to Unit4 FDS, click the “Add New” button in the data tabs list.
A new window will open.
Choose a name for the datatab, and select “Unit4 FDS (Financial Data Suite)” in the list of options. When done, click “Next”.

A number of questions will be asked in step 2. These are:
- Database Host
Typically the IP address of the database host;
- Database Port
The port on which the database is hosted. Default port will be filled in, and can be changed;
- Database Name
Name of the database;
- Database User
User that can be used to authenticate;
- Database Password
Password of the user in question.
When everything is filled in, click the “Test Connection” button. If everything is correctly set up and filled in, the test should be succesful.
Click “Next” when all settings have been filled in.
The last step provides you with the following options:
- Select indexing recurrence
Choose how often this datatab will be indexed. It is possible to repeat the indexing step multiple times when needed. This allows to automatically update the index contents when the database is changed.
- Collection name
Choose an existing name to add this datasource to an existing collection. Choose a new name if a new collection should be created.
Click “Finish” when done. The retrieved information will be added to the index if the spider is enabled.
Alure (Innolan)
INDICA can connect with Alure instances as well.
To connect to Alure, click the “Add New” button in the data tabs list.
A new window will open.
Choose a name for the datatab, and select “Alure (Innolan)” in the list of options. When done, click “Next”.

A number of questions will be asked in step 2. These are:
DataTab Name Alure Docs
Database Host
Database Port
Database Name Alure
Database Name Alure Docs
Database User
Database Password
When everything is filled in, click the “Test Connection” button. If everything is correctly set up and filled in, the test should be succesful.
Click “Next” when all settings have been filled in.
The last step provides you with the following options:
- Select indexing recurrence
Choose how often this datatab will be indexed. It is possible to repeat the indexing step multiple times when needed. This allows to automatically update the index contents when the database is changed.
- Collection name
Choose an existing name to add this datasource to an existing collection. Choose a new name if a new collection should be created.
Click “Finish” when done. The retrieved information will be added to the index if the spider is enabled.
DataTabs Order & Security
Case managers can change the order and access rights of the datatabs.

Changing the order of datatabs in the navigation bar is as easy as clicking and dragging a datatab.
To set a security filter on a datatab, open the dropdown menu and select the AD group that should have access to the datatab.
E-mail
Email can be connected in different ways, of which the most common way is a direct connection to the Webserver through the Exchange Web Services API. Other possibilities are direct reading of PST or OST files, or a connection with POP3 or IMAP boxes. To connect email sources, within the manage interface click on Sources and navigate to E-mail. Within this overview you’ll find a few different panels.

E-mail integration
After enabling the e-mail functionality, the e-mail connectivity can be chosen, either a POP archiving/catch all mailbox or EWS connections (see corresponding chapters). In order to store the email archive on an external share, please set the share information in the Archiving section. Within this panel you have a few options:
- Enable mail?
Whether you want to enable mail or not
- Show mail datatab?
Whether you want the mail to show up in a datatab
- Email tab name
The name for your datatab, if you’ve enabled the datatab option
- Mail domain name
If mail is enabled and there is no (Active) Directory integration enabled, a custom email domain can be set here too. Default it’s set to indica.lan.
- Show info
Gives a report overview. This only works when mail is enabled and everything is indexed.

Map email to user
This panel gets the users from the connected AD. If you do not have an AD connected, this will not show any users. Select the user which you wish to add email aliases to.

EWS Accounts
Most modern mailservers have EWS API connectivity. Choose expand if you want all shared mailboxes too. A special user can be created to spider all the emails.
Note
Keep in mind that INDICA needs to create an Email archive, so enough storage should be added to the system. To add a new EWS account click on the green Add new button within the EWS Accounts panel. A new row within the table will appear, which needs to be filled in:
- Source
The location of the EWS source
- User
The user that’s able to connect to the EWS source
- Password
The password corresponding with the user
- Folders
Which folders you wish to index (if unspecified, it will index all folders)
- Expand
Whether you wish to expand (or not) upon the mail boxes being read (behind the @) than the one that has been read.
- Archive
Whether you wish to enable or disable archiving. Archive is an option for mail servers that work according to the exchange guidelines to read mail on a separate archive server.

POP3 Settings
The system will connect using the Post Office Protocol 3 (POP3), and store the email on the default archive location. You can choose to access it through a separate tab. All emails from the archive POP mailbox will be downloaded and removed from the mailbox (if chosen). If needed, enter extra email aliases to the user in the list. There are a few options you’ll have to fill in before you can connect using the POP protocol:
- Enable POP3?
Whether to enable or disable the POP3 settings
- Enable TLS/SSL?
Whether to enable or disable TLS/SSL.
- POP3 Server
The server name of the POP3.
- POP3 Port
The port of the POP3.
- POP3 User
The POP3 username.
- POP3 Password
The POP3 password corresponding with the user in the previous option.
- Delete mails?
Whether you wish to delete the emails or not.

Fileshares
INDICA can connect to several types of fileshares. It can connect to any fileshare that can be mounted using CIFS. INDICA also supports mounting DFS setups, however, in most cases a direct share/server path is required to properly read Access Control Lists.
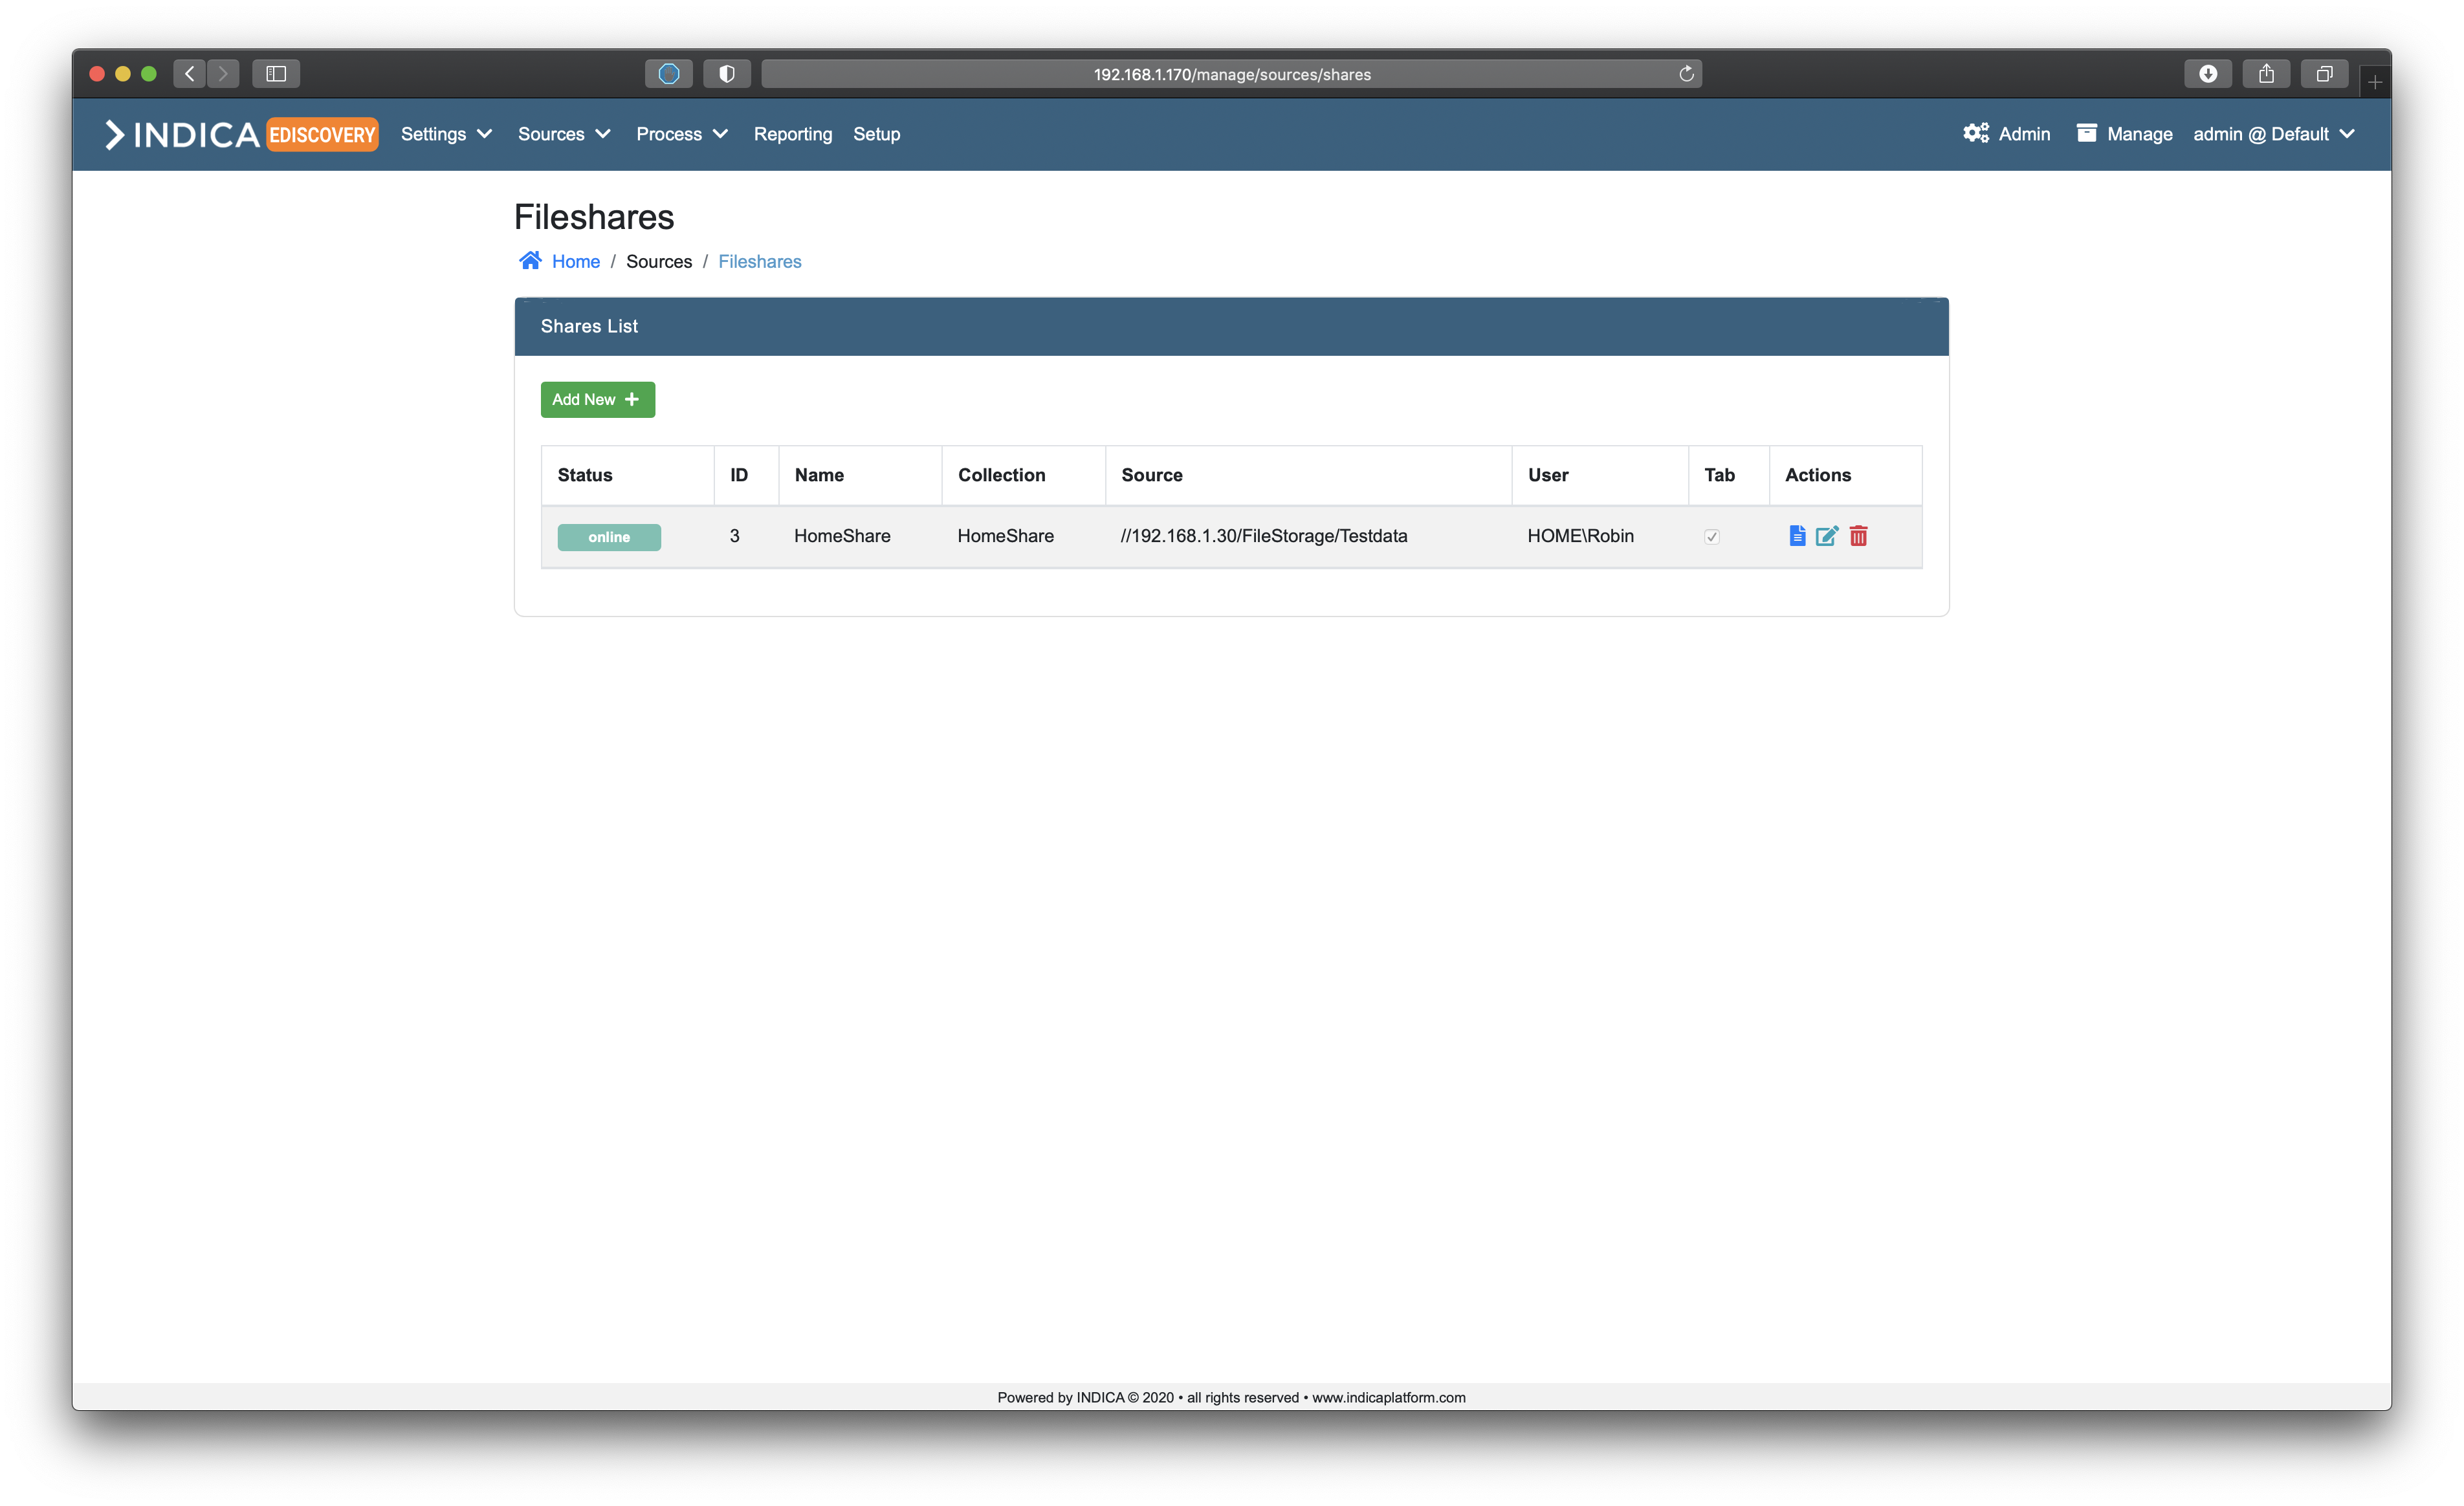
Adding a fileshare
To add a fileshare to INDICA, click the green “Add New” button in the fileshares list. A new window will open:

This window asks for the following information:
- Name
Name of the fileshare;
- Collection
Name of the collection to add the fileshare to. Pick an existing collection to add this share to it, or enter a new collection to create a new one;
- Source
Full path to the share;
- Username
Username of a user that INDICA can use to connect to the share. This is usually a special service account;
- Password
Password of the user;
- Show as datatab?
Whether this share will be displayed as a datatab in the navigation bar.
When all information is filled out, click the “Check” button to test if INDICA can find the fileshare and is able to authenticate. If everyhting is working, it returns “Succes”. Then click the “Submit” button to add the fileshare and begin the indexing process.
Note
INDICA will, by design, mount the added share read-only. This means that INDICA will not be able to modify the source data in any way.
Editing a fileshare
To edit a fileshare, click the paper icon (Edit) in the actions column. A window will open:
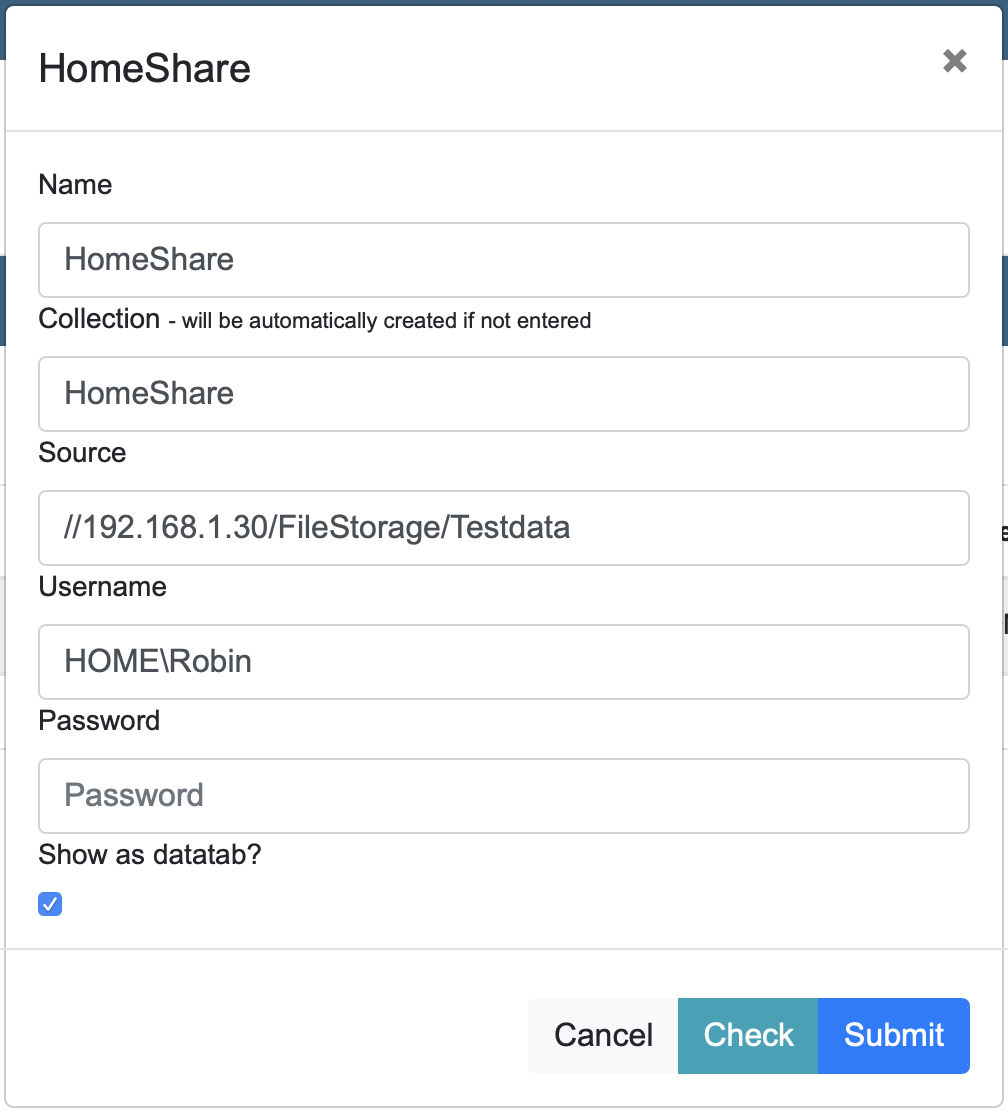
This window is identical to the “Add fileshare” window, with the exception that all information is already filled in. Here you can edit the information needed, fill in the password of the user again, and save the changes by clicking “Submit”.
Local
It is also possible to index a local source. This means that documents stored on the server can be added to the index as well. This allows for upload of documents to the server, and indexing the folder where they are stored.

Adding a local source
Adding a local source to INDICA is easy. The only piece of information to be known is the full path of the folder on the appliance.
To add a local source, click the green “Add New” button. A window will open:

Fill in the following information:
- Name
Pick a name for the local source;
- Collection
Name of the collection to add the local source to. Pick an existing collection to add this source to it, or enter a new collection to create a new one;
- Local Source
Full path of the folder on disk;
- Show as datatab?
Whether this share will be displayed as a datatab in the navigation bar.
When all information is filled in, click the “Check” button. INDICA will check if the directory exists and if the proper permissions are in place. It should return “Success” if everyting is working. Click the “Submit” button to add the local source to the appliance. The indexing of the source will begin shortly.
Editing a local source
To edit a local source, click the blue paper icon (Edit) in the actions column. A window will open:

This window is identical to the “Add Local Source” window, with the exception that all information is already filled in. Here you can edit the information needed, and save the changes by clicking “Submit”.
Deleting a local source
Removing a local source can be done by clicking the red trash-bin icon (delete) in the “Actions” column of the table.
Warning
Removing a local source will remove all corresponding documents from the index. This is irreversible, and can only be undone by re-indexing the local source.
Queries
Within INDICA it’s possible to add queries to your existing collections. This makes it easier to immediately filter on specific data within that collection. To add a query to a collection, within the manage interface, click on Sources in the menu and select Queries. This brings you to the following page:

Adding Queries
To add a new query, click on the Add new button. This will open a window:

Here you can fill in the following information:
- Name
Pick a name to identify your query with
- Collection
Name of the collection to add the query to. Pick an existing collection to add this source to it, or enter a new collection to create a new one;
- Query
Which query you wish to add
- Show as datatab?
Whether this query will be displayed as a datatab in the navigation bar in the search interface.
Editing Queries
To edit a query, click the blue pen with paper icon (Edit) in the actions column. This will open a window:

This window is identical to the “Add Queries” window, with the exception that all information is already filled in. Here you can edit the information needed, and save the changes by clicking “Submit”.
Deleting Queries
Removing a query can be done by clicking the red trash-bin icon (delete) in the “Actions” column of the table.
S3 Buckets
With INDICA it’s also possible to connect S3 Buckets as sources. To have users access data in the S3 Bucket, create an AD group with name S3_Bucket_[bucketname] and add the groups/users to it. You can add S3 buckets by going to the manage interface, clicking on Sources in the menu and navigating to S3 Buckets.

Adding S3 Buckets
To add a new S3 bucket, click on the Add new button. This will open a window:

Here you can fill in the following information:
- Name
Pick a name to identify your S3 Bucket with
- Collection
Name of the collection to add the S3 Bucket to. Pick an existing collection to add this source to, or enter a new collection to create a new one.
- Bucketname
Fill in the source path to your S3 bucket.
- Username
Fill in the username for the S3 bucket.
- Password
Fill in the password for the S3 bucket.
- Show as datatab?
Whether this query will be displayed as a datatab in the navigation bar in the search interface.
Editing S3 Buckets
To edit a S3 bucket, click the blue pen with paper icon (Edit) in the actions column. This will open a window:

This window is identical to the “Add Queries” window, with the exception that all information is already filled in (except the password field). Here you can edit the information needed, re-enter your password and save the changes by clicking “Submit”.
Deleting S3 Buckets
Removing a S3 bucket can be done by clicking the red trash-bin icon (delete) in the “Actions” column of the table.
SharePoint
INDICA can connect to SharePoint as well. It is possible to index online sites, on-premise sites, and online personal drives.
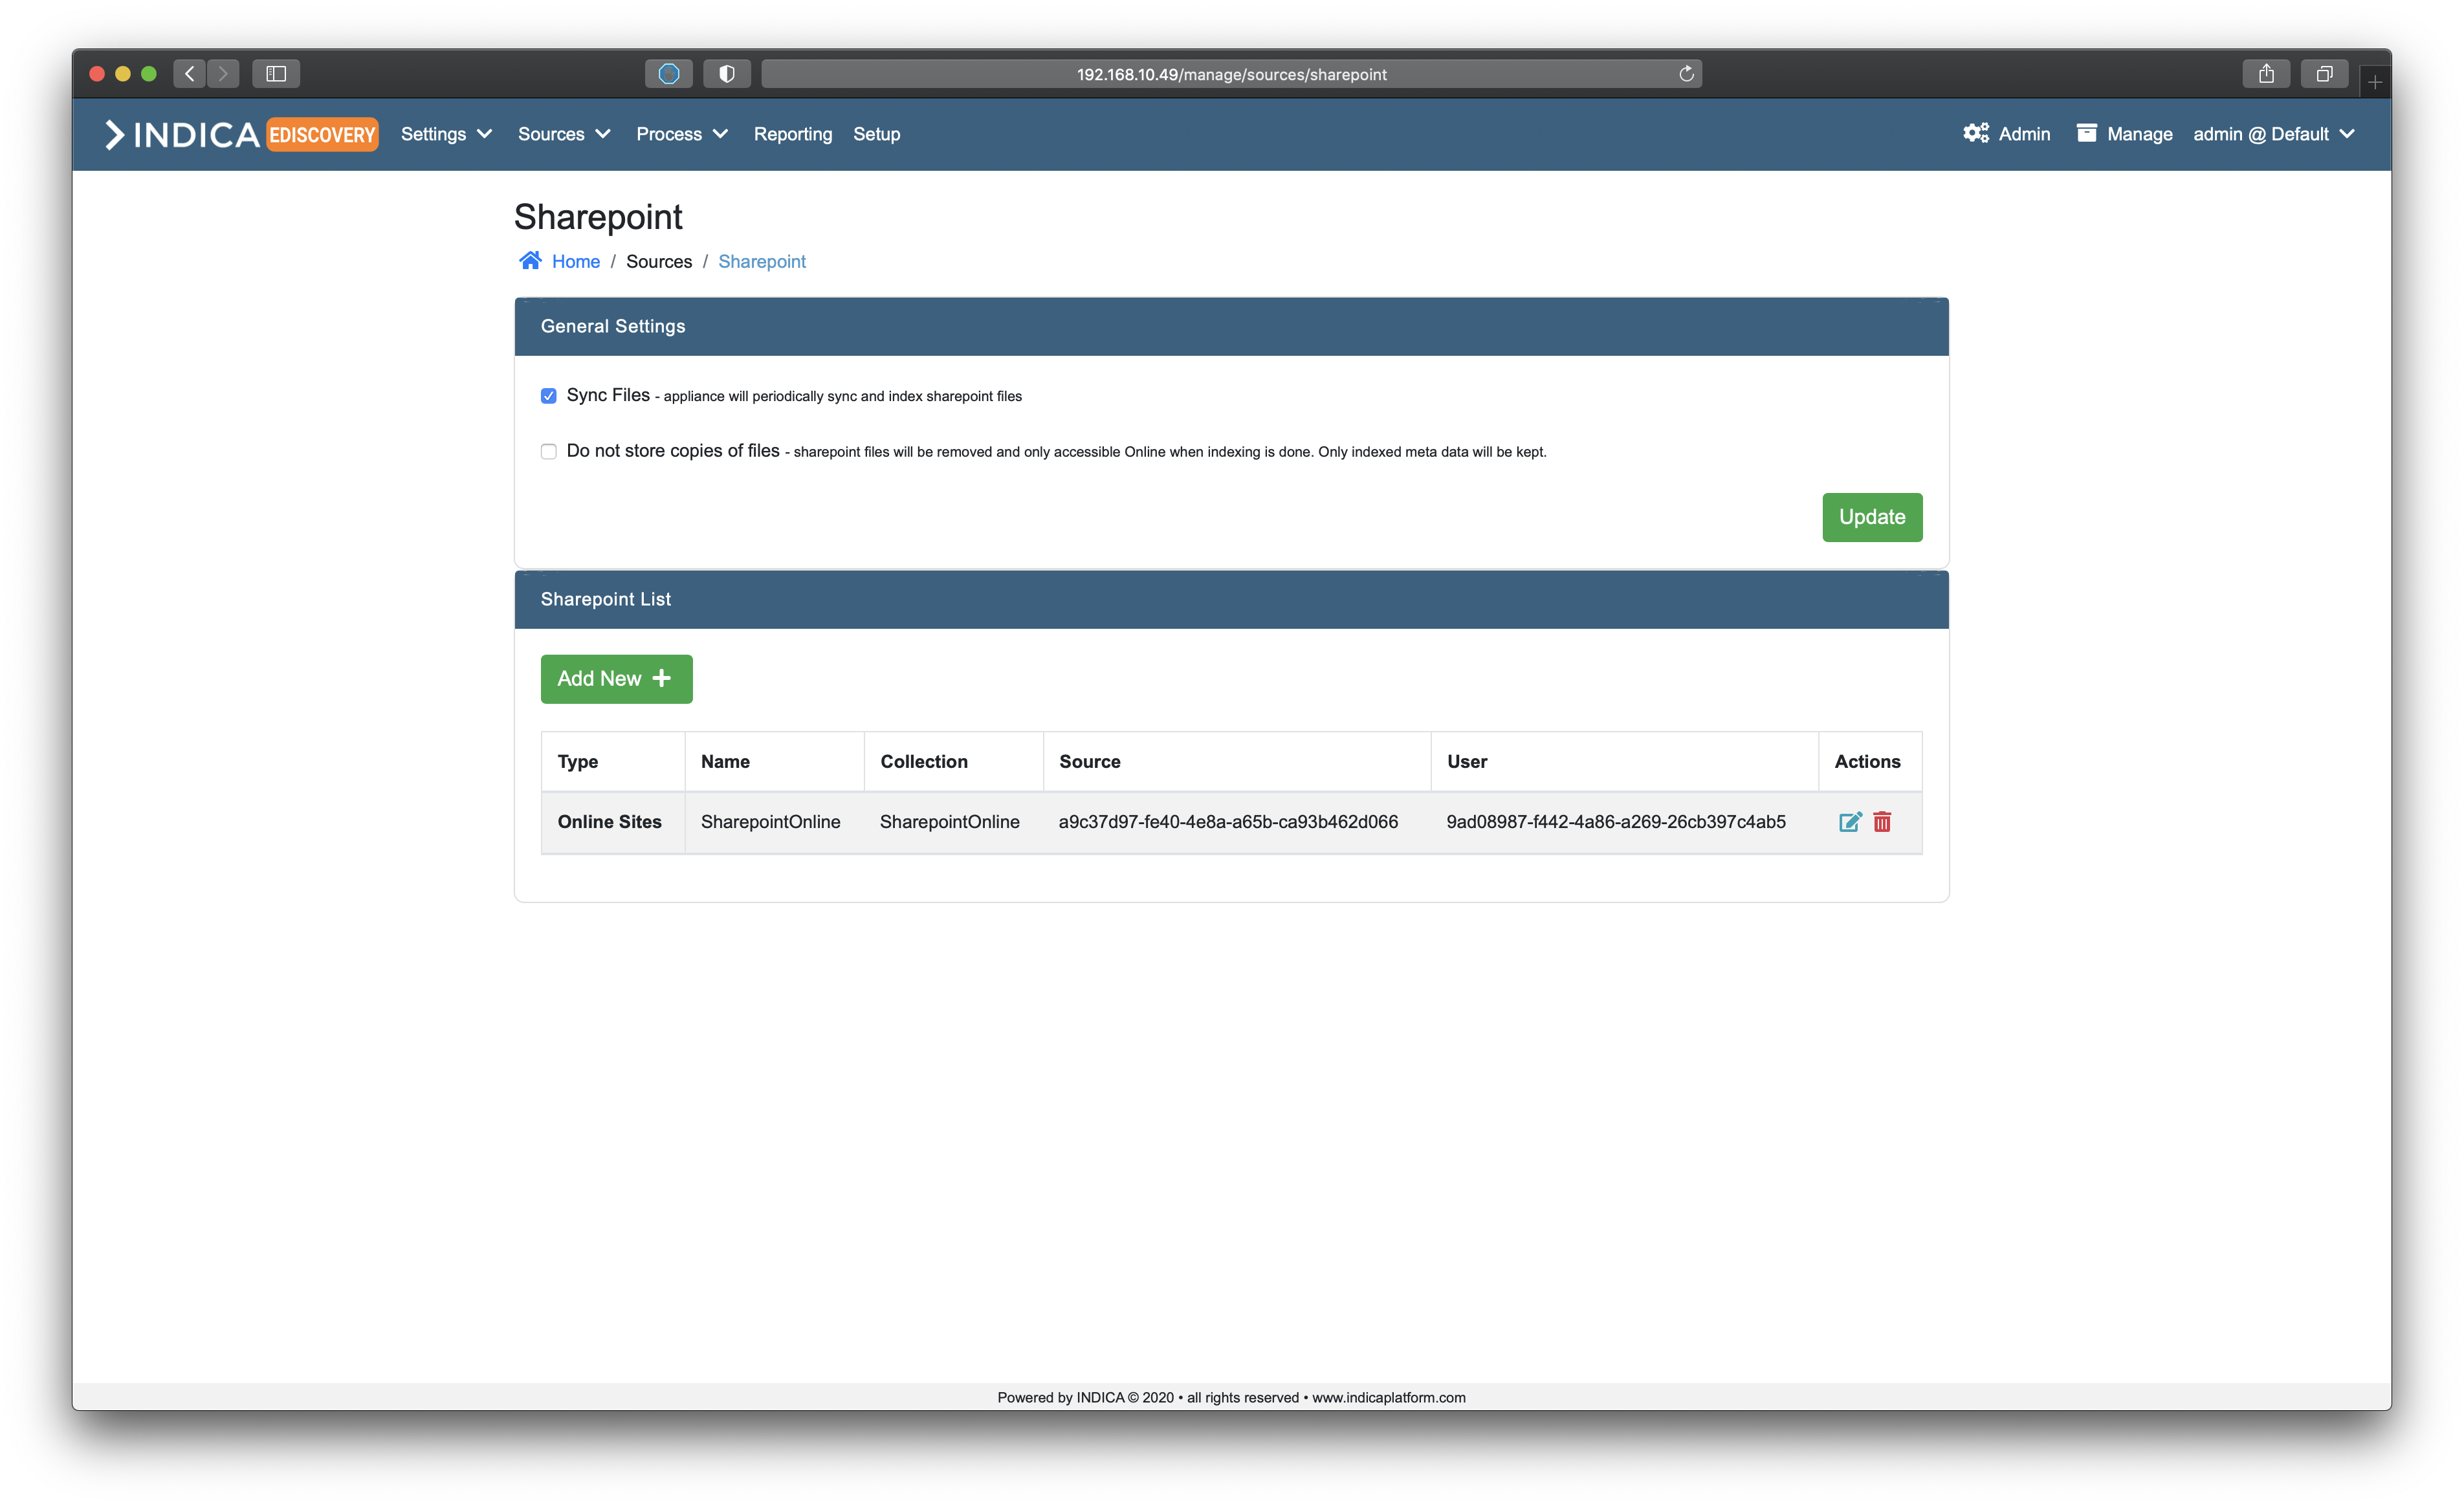
General Settings
There are two ways to index files stored in sharepoint:
- Sync Files
The INDICA appliance will periodically synchronise, download and index sharepoint files. A copy of the files will be kept on disk. Please be advised that sufficient disk space is needed for this option.
- Do not store copies of files
Sharepoint files will be removed after indexing and are only accessible Online when indexing is done. Only indexed meta data will be kept. In some situations, previewing a document will fall back to plain text when a document is unavailable.
Pick one of the two options, and click te “Update” button for the changes to take effect.
Adding a sharepoint source
Preparation
When using Application permissions, some extra preparation needs to be done before adding the source. The steps needed to take can be found on the INDICA support knowledge-base .
Adding a source
Adding a sharepoint source can be done by clicking the “Add New” button in the sharepoint sources list table. A new window will open:

The first step is picking what kind of sharepoint will be added as a data source. A choice can be made between:
Online sites;
On-premise sites;
Online personal drives.
Depending on the chosen option, the form will ask for specific information. The following paragraphs will describe the three options in more detail.
Online sites
When “Online sites” has been chosen, the following information is needed:
- Permission type
- This can be Application, or user delegated.When “Application” is chosen, INDICA will use pre-configured API permissions to connect to sharepoint as an application.When “User delegated” is chosen, INDICA will inherit the current Microsoft session. This requires authenticating with the chosen user by Microsoft.
- Name
Name of the sharepoint connection. This can be chosen freely.
- Collection name
Name of the collection to add the local source to. Pick an existing collection to add this source to it, or enter a new collection to create a new one;
- Tenant ID
Tenant ID is the ID used by Microsoft as a unique identifier of your organisation.
- Client ID
Application ID of your registered application
- Client Secret
Token that will be used to authenticate as an application by Microsoft.
- Show as datatab?
Whether this source will be displayed as a datatab in the navigation bar.
- Disabled
Allows you to enable or disable this source.
After filling out the required information, click the “Next” button. INDICA will now communicate with sharepoint and check if the settings are correct. If this is succesful, you will be presented with the following screen:
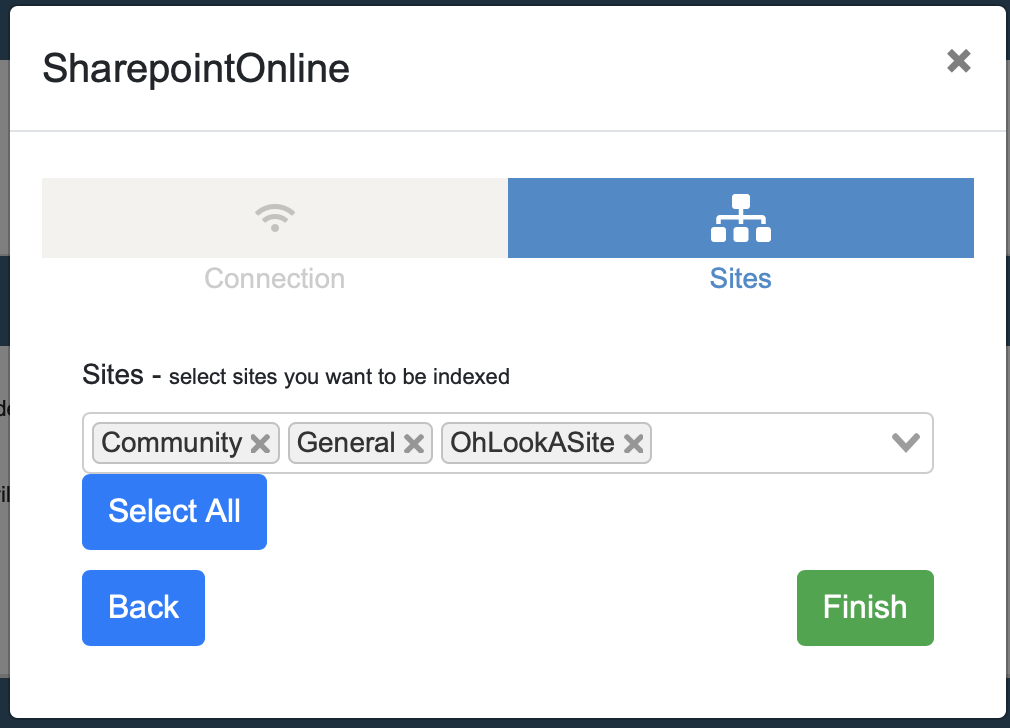
Here you have the possibility to select the sharepoint sites to index. It is also possible to select all sites with the “Select All” button. When the sites have been chosen, click “Finish” to add this source to INDICA. Downloading and indexation of the sites will begin shortly.
On-premise sites
The needed information for on-premise sites is slightly different. If this option has been selected, the following information is needed:
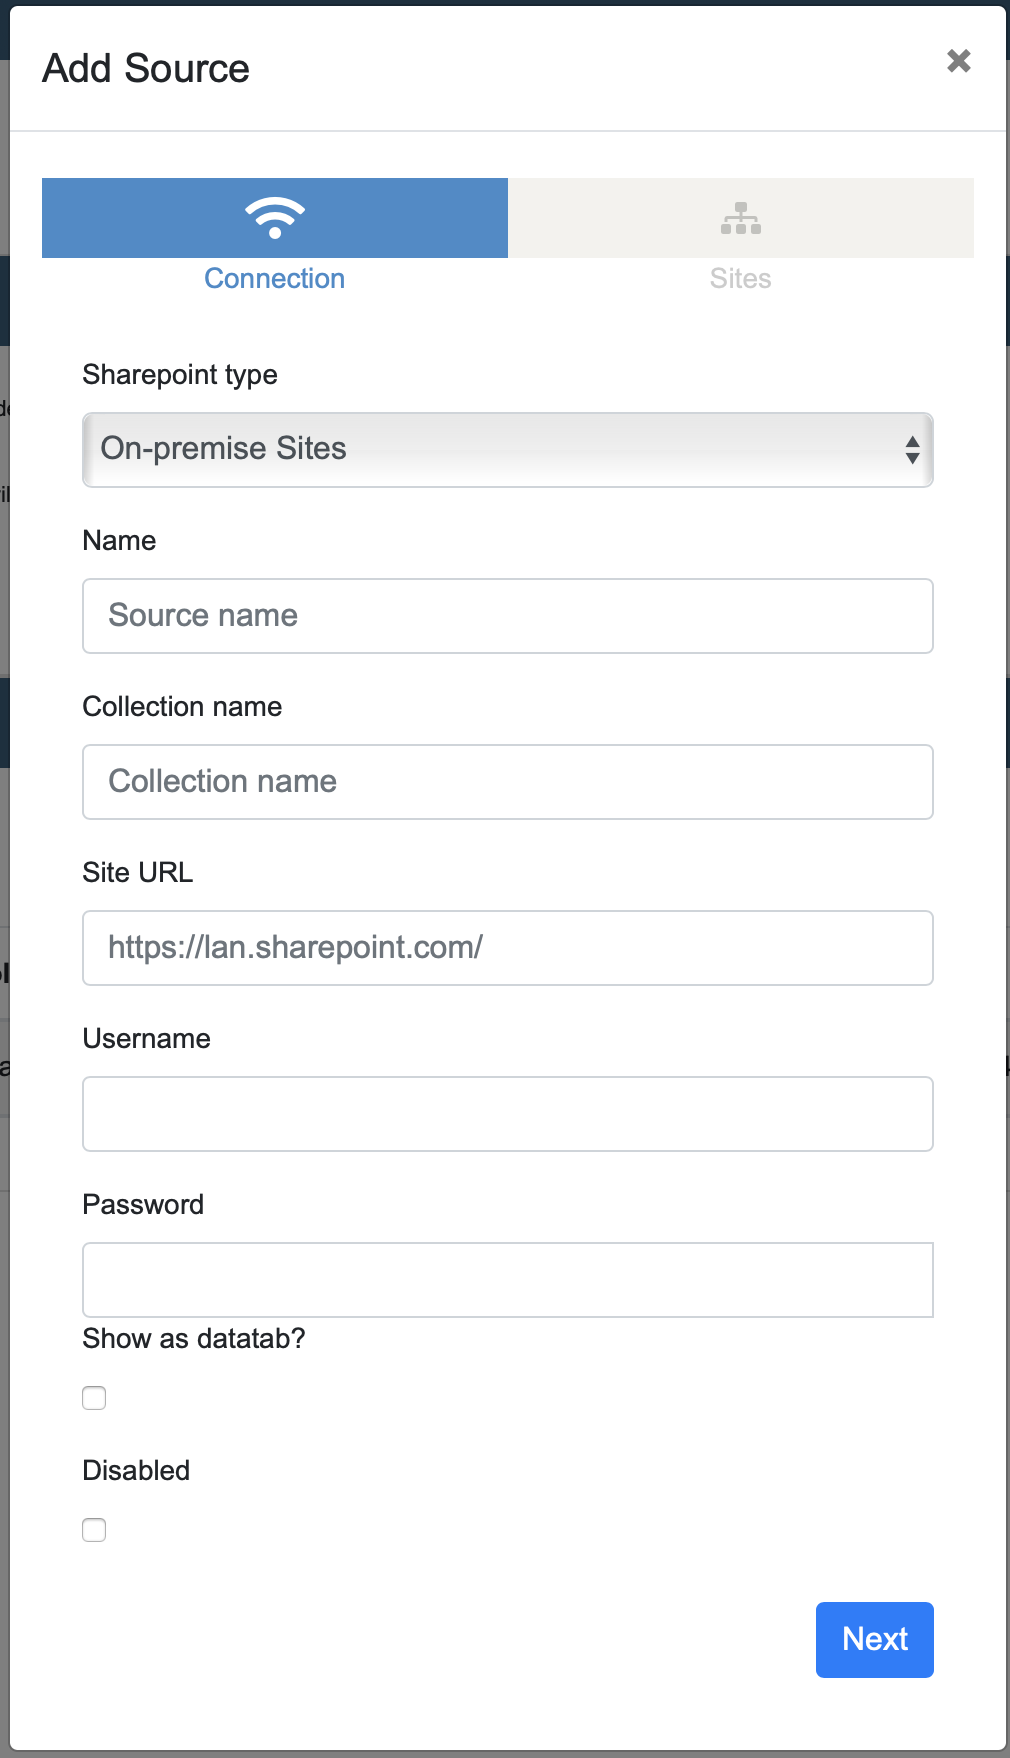
- Name
Name of the sharepoint connection. This can be chosen freely.
- Collection name
Name of the collection to add the local source to. Pick an existing collection to add this source to it, or enter a new collection to create a new one;
- Site URL
Full URL of the sharepoint instance;
- Username
Username of the user that will be used for authenticating;
- Password
Password of the corresponding user;
- Show as datatab?
Whether this source will be displayed as a datatab in the navigation bar.
- Disabled
Allows you to enable or disable this source.
After filling out the required information, click the “Next” button. INDICA will now communicate with sharepoint and check if the settings are correct. If this is succesful, you will be presented with the following screen:
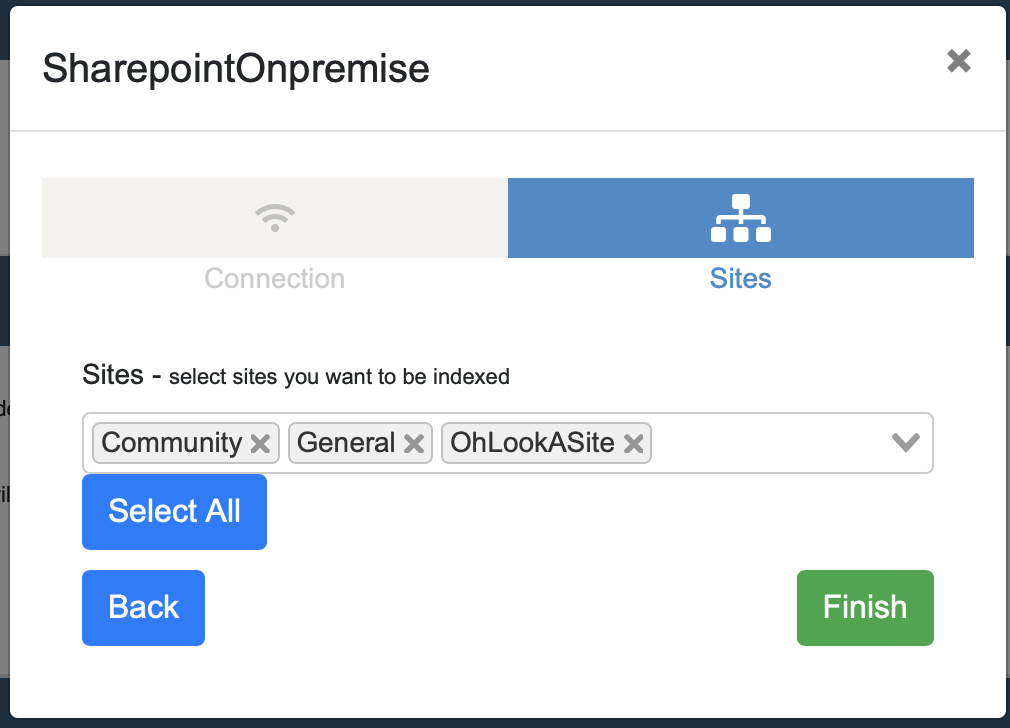
Here you have the possibility to select the sharepoint sites to index. It is also possible to select all sites with the “Select All” button. When the sites have been chosen, click “Finish” to add this source to INDICA. Downloading and indexation of the sites will begin shortly.
Online personal drives
The needed information for online personal drives is the same as for online sites. If this option has been selected, the following information is needed:
- Permission type
- This can be Application, or user delegated.When “Application” is chosen, INDICA will use pre-configured API permissions to connect to sharepoint as an application.When “User delegated” is chosen, INDICA will inherit the current Microsoft session. This requires authenticating with the chosen user by Microsoft.
- Name
Name of the sharepoint connection. This can be chosen freely.
- Collection name
Name of the collection to add the local source to. Pick an existing collection to add this source to it, or enter a new collection to create a new one;
- Tenant ID
Tenant ID is the ID used by Microsoft as a unique identifier of your organisation.
- Client ID
Application ID of your registered application
- Client Secret
Token that will be used to authenticate as an application by Microsoft.
- Show as datatab?
Whether this source will be displayed as a datatab in the navigation bar.
- Disabled
Allows you to enable or disable this source.
After filling out the required information, click the “Next” button. INDICA will now communicate with sharepoint and check if the settings are correct. If this is succesful, you will be presented with the following screen:
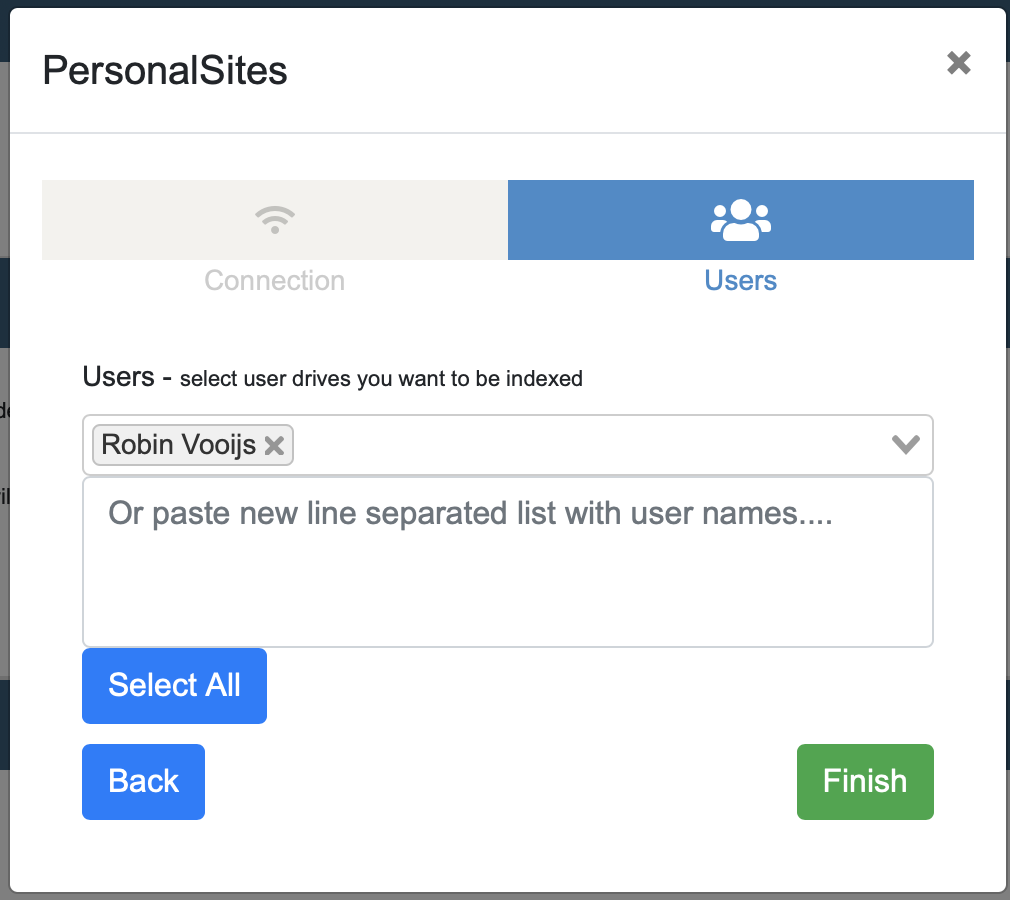
Here you can pick the personal sites of the users from the dropdown list. It is also possible to paste a list (new-line separated) with the usernames of the personal sites that need to be indexed. Alternatively, you can click the “Select All” button to select all the users.
When done selecting users, click “Finish” to save the source to the appliance. The indexation of the personal sites will begin shortly.
Box
INDICA can connect to Box.com sources as well. To set up your Box connector, head over to the manage interface, click on Sources and navigate to Box.

Adding a box source
Box Preparation
Before you can add a Box source to INDICA, you’ll need to prepare your Box app first. The steps needed to take can be found on the INDICA support knowledge-base under box connector .
Connecting Box to INDICA
After walking through the steps in Box Preparation you can connect your Box to INDICA. Adding a box connector can be done by clicking on the Add Box Connector button. This will open a new window:

Here, you can fill in the following information:
- Name
Name of the Box connection. This can be chosen freely.
- Collection
Name of the collection to add the Box to. Pick an existing collection to add this source to it, or enter a new collection to create a new one.
- Configuration Type
- You can pick between two options here. This will change your form depending on which one you pick.
- Upload config
- Config File
Choose between your files or drop your config file here.
- Manual
- Client ID
Fill in your Box Client ID.
- Client Secret
Fill in your Box Client Secret.
- Enteprise ID
Fill in your Box Enteprise ID.
- Public Key ID
Fill in your Box Public Key ID.
- Private Key File
Choose the file from your computer where your private key file is located.
- Private Key Passphrase
Fill in your private key passphrase.
- API limit
Fill in the limit for the API here.
- Datatab
Whether this source will be displayed as a datatab in the navigation bar.
- Selected users
Select the users you wish to index the files from. The users can be fetched once the credentials are filled in correctly.
Editing a box source
Editing a box source can be done by clicking the blue “paper” icon (edit) in the “Actions” column of the table.
Deleting a box source
Deleting a box source can be done by clicking the red ‘trash bin’ icon in the “Actions” column of the table.